No Bake Banana Split Cheesecake Recipe
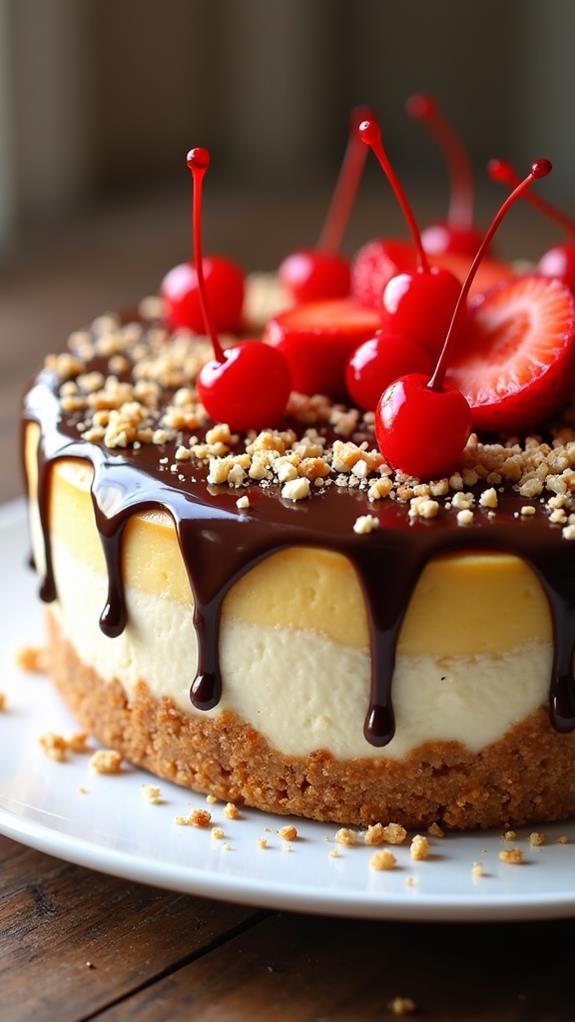
Are you craving a dessert that captures all the nostalgic flavors of a classic banana split without the hassle of baking? This No Bake Banana Split Cheesecake is your answer! This indulgent treat combines the creamy richness of cheesecake with the beloved flavors of chocolate, strawberries, and fresh bananas.
Perfect for summer gatherings or when you want to avoid turning on the oven, this recipe delivers maximum flavor with minimal effort. Get ready to create a show-stopping dessert that will have everyone asking for seconds!
What is “No Bake Banana Split Cheesecake”?
No Bake Banana Split Cheesecake is a refreshing twist on traditional cheesecake that requires no oven time. This dessert features a graham cracker crust topped with a smooth cream cheese filling, fresh banana slices, strawberry topping, chocolate drizzle, and whipped cream. It captures all the iconic elements of a banana split sundae in an elegant cheesecake form.
The beauty of this dessert lies in its simplicity and the fact that it sets perfectly in the refrigerator, making it an ideal make-ahead option for parties, potlucks, or special occasions.
Ingredients List for No Bake Banana Split Cheesecake
For the Crust:
- 2 cups graham cracker crumbs
- ½ cup melted butter
- ¼ cup granulated sugar
- Pinch of salt
For the Cheesecake Filling:
- 24 oz cream cheese, softened
- 1 cup powdered sugar
- 1 teaspoon vanilla extract
- ½ teaspoon banana extract (optional)
- 2 cups heavy whipping cream
- 1 packet unflavored gelatin
- 3 tablespoons warm water
For the Toppings:
- 3-4 ripe bananas, sliced
- 1 cup fresh strawberries, sliced
- ½ cup chocolate syrup or melted chocolate
- 1 cup heavy whipping cream
- 2 tablespoons powdered sugar
- ½ cup chopped walnuts or pecans
- Maraschino cherries for garnish
How to Make No Bake Banana Split Cheesecake: A Step-by-Step Guide
Creating this delicious No Bake Banana Split Cheesecake involves several simple steps that build layers of flavor. Here’s a detailed guide to ensure perfect results:
1. Prepare the Crust:
- In a large bowl, combine graham cracker crumbs, melted butter, granulated sugar, and a pinch of salt.
- Mix thoroughly until the mixture holds together when pressed.
- Press the mixture firmly into the bottom of a 9-inch springform pan or pie dish.
- Refrigerate the crust for 30 minutes while you prepare the filling.
2. Prepare the Gelatin:
- Sprinkle the unflavored gelatin over warm water in a small bowl.
- Let it sit for 5 minutes to bloom, then stir until completely dissolved.
- Set aside to cool slightly before adding to the cheesecake mixture.
3. Make the Cheesecake Filling:
- In a large mixing bowl, beat the softened cream cheese until smooth and creamy.
- Gradually add powdered sugar, vanilla extract, and banana extract (if using).
- Beat until well combined and no lumps remain.
- Add the cooled gelatin mixture and beat until incorporated.
4. Whip the Cream:
- In a separate bowl, whip 2 cups of heavy cream until stiff peaks form.
- Gently fold the whipped cream into the cream cheese mixture in three additions.
- Be careful not to overmix to maintain the light, airy texture.
5. Assemble the Cheesecake:
- Pour half of the cheesecake filling over the prepared crust.
- Layer half of the sliced bananas over the filling.
- Add the remaining cheesecake filling and smooth the top.
- Refrigerate for at least 4 hours or overnight until completely set.
6. Add Final Toppings:
- Just before serving, arrange the remaining banana slices and strawberries on top.
- Drizzle with chocolate syrup in decorative patterns.
- Pipe or dollop whipped cream around the edges.
- Sprinkle with chopped nuts and top with maraschino cherries.
Substitutions and Variations
Customize your No Bake Banana Split Cheesecake to suit different tastes and dietary needs with these substitutions:
- Crust Options: Use chocolate graham crackers, vanilla wafers, or Oreo cookies for different flavor profiles.
- Cream Cheese: Substitute with Greek yogurt cream cheese or dairy-free cream cheese for lighter or vegan options.
- Fruits: Try different combinations like pineapple chunks, blueberries, or raspberries for variety.
- Chocolate: Use white chocolate, dark chocolate, or caramel sauce instead of milk chocolate.
- Nuts: Swap walnuts for almonds, pistachios, or omit entirely for nut-free version.
- Extracts: Experiment with different extracts like coconut, almond, or rum for unique flavors.
Common Mistakes to Avoid
Avoid these common pitfalls when making No Bake Banana Split Cheesecake:
- Not Softening Cream Cheese: Room temperature cream cheese is essential for a smooth, lump-free filling.
- Overwhipping Cream: Stop whipping as soon as stiff peaks form to avoid making butter.
- Adding Bananas Too Early: Bananas brown quickly, so add them just before serving for the best appearance.
- Insufficient Chilling Time: The cheesecake needs adequate time to set properly; rushing this step results in a runny texture.
- Skipping the Gelatin: This helps stabilize the no-bake filling and prevents it from being too soft.
How to Serve No Bake Banana Split Cheesecake
This impressive dessert serves beautifully as the centerpiece of any meal. Cut clean slices using a sharp knife dipped in warm water between cuts. Serve chilled portions on individual dessert plates, ensuring each slice includes all the colorful toppings.
For special occasions, consider serving alongside vanilla ice cream or a drizzle of additional chocolate sauce. The combination of temperatures and textures creates an even more indulgent experience reminiscent of enjoying an actual banana split.
Presentation Ideas for No Bake Banana Split Cheesecake
Make your cheesecake visually stunning with these presentation tips:
- Colorful Arrangement: Arrange strawberries and bananas in alternating patterns for visual appeal.
- Chocolate Drizzle Art: Create artistic patterns with chocolate sauce using a squeeze bottle or piping bag.
- Individual Portions: Make mini cheesecakes in mason jars or small glasses for elegant single servings.
- Garnish Variety: Add mint leaves, chocolate shavings, or colorful sprinkles for extra visual impact.
No Bake Banana Split Cheesecake Recipe Tips
Follow these expert tips for the best results:
- Room Temperature Ingredients: Ensure cream cheese is completely softened for the smoothest texture.
- Gentle Folding: When incorporating whipped cream, use a gentle folding motion to maintain airiness.
- Fresh Fruit Selection: Choose ripe but firm bananas and fresh, bright strawberries for the best flavor and appearance.
- Make-Ahead Friendly: This dessert actually improves after overnight chilling, making it perfect for entertaining.
- Proper Storage: Cover tightly to prevent the cheesecake from absorbing refrigerator odors.
How to Store No Bake Banana Split Cheesecake
Store your finished cheesecake covered in the refrigerator for up to 5 days. For best results, add fresh fruit toppings just before serving to prevent browning and maintain optimal texture. The base cheesecake can be made up to 2 days in advance.
If you need to store it longer, the unfrosted cheesecake can be frozen for up to 1 month. Wrap tightly in plastic wrap and aluminum foil before freezing. Thaw overnight in the refrigerator before adding toppings and serving.
Frequently Asked Questions (FAQs)
Q: Can I make this cheesecake without gelatin?
A: Yes, but the texture will be softer. The gelatin helps stabilize the no-bake filling, so without it, be sure to chill thoroughly and serve immediately after adding toppings.
Q: How far in advance can I make this dessert?
A: The cheesecake base can be made 2 days ahead. Add fruit toppings and final garnishes just before serving to maintain the best appearance and texture.
Q: Why did my cheesecake turn out runny?
A: This usually happens when the cream cheese wasn’t fully softened, the gelatin wasn’t properly dissolved, or the cheesecake wasn’t chilled long enough to set completely.
Q: Can I use frozen strawberries?
A: Fresh strawberries work best for appearance and texture. If using frozen, thaw completely and pat dry to remove excess moisture before using.
Q: What’s the best way to prevent bananas from browning?
A: Brush banana slices lightly with lemon juice or add them just before serving. You can also use slightly underripe bananas that won’t brown as quickly.
Q: Can I make individual servings?
A: Absolutely! This recipe works wonderfully in mason jars, parfait glasses, or individual springform pans for elegant single servings.
Conclusion
No Bake Banana Split Cheesecake brings together the best of both worlds – the creamy indulgence of cheesecake and the fun, nostalgic flavors of a classic banana split. This dessert is perfect for any occasion when you want to impress without spending hours in the kitchen. The combination of smooth cheesecake filling, fresh fruits, chocolate, and crunchy nuts creates a symphony of textures and flavors that everyone will love.
Whether you’re hosting a summer party, celebrating a special occasion, or simply treating yourself to something special, this no-bake dessert delivers exceptional results with minimal effort. The make-ahead nature of this recipe makes it ideal for entertaining, allowing you to focus on your guests while still serving an impressive dessert. Try this recipe today and watch as it becomes a favorite in your dessert repertoire!

