Halloween Deviled Eggs Recipe That’s Super Spooky
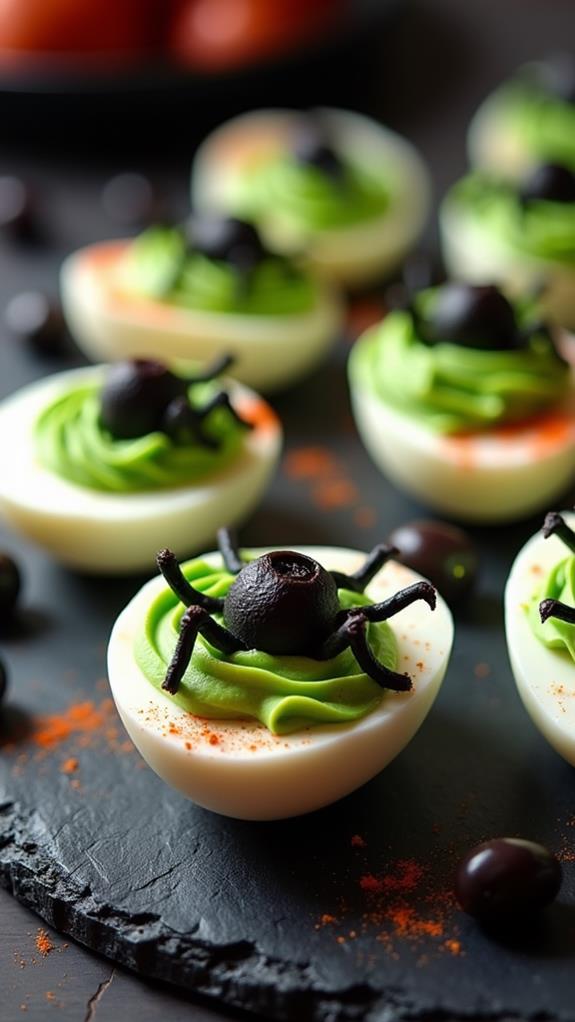
Looking for a wickedly delicious appetizer that will haunt your guests’ taste buds in the best way possible? These Halloween Deviled Eggs are the perfect blend of classic comfort food and spooky seasonal fun. With their eerie orange filling and creepy garnishes, these devilish treats will be the star of your Halloween party spread.
I’ve transformed the beloved deviled egg into a Halloween masterpiece that’s as delicious as it is frightening. These eggs are surprisingly simple to make with ingredients you likely already have in your kitchen, yet they deliver maximum visual impact that will have your guests shrieking with delight.
What are Halloween Deviled Eggs?
Halloween Deviled Eggs are a festive twist on the classic appetizer that combines traditional deviled egg flavors with spooky seasonal presentation. The secret lies in adding orange food coloring to create that perfect pumpkin-orange filling, while creative garnishes transform ordinary eggs into ghoulish delights.
These eggs maintain all the creamy, tangy goodness of traditional deviled eggs while embracing the spirit of Halloween through color and decoration. The result is an appetizer that’s both familiar and surprisingly spooky, making them perfect for Halloween parties, potluck dinners, or any autumn gathering.
Ingredients List for Halloween Deviled Eggs
- 12 large eggs
- ⅓ cup mayonnaise
- 1 tablespoon yellow mustard
- 1 teaspoon white vinegar
- ½ teaspoon salt
- ¼ teaspoon black pepper
- Orange food coloring (gel or liquid)
- 24 small black olives, sliced in half
- 12 small pieces of fresh chives or green onion tops
- Paprika for dusting
- Optional: Black sesame seeds for extra spookiness
How to Make Halloween Deviled Eggs: A Step-by-Step Guide
Creating these spooky Halloween treats is easier than you might think. Here’s my detailed guide to ensure your deviled eggs turn out perfectly creepy every time:
1. Perfect Hard-Boiled Eggs:
- Place eggs in a large saucepan and cover with cold water by about 1 inch.
- Bring water to a rolling boil over high heat, then immediately remove from heat and cover.
- Let eggs sit in the hot water for 12 minutes for perfectly cooked yolks.
- Transfer eggs to an ice bath to stop the cooking process and make peeling easier.
2. Prepare the Egg Whites:
- Once cooled, carefully peel the eggs under cool running water.
- Cut each egg in half lengthwise using a sharp knife.
- Gently remove the yolks and place them in a medium mixing bowl.
- Arrange the egg white halves on your serving platter.
3. Create the Spooky Filling:
- Mash the egg yolks with a fork until they’re completely smooth.
- Add mayonnaise, mustard, vinegar, salt, and pepper to the yolks.
- Mix everything together until the filling is creamy and well-combined.
- Add orange food coloring drop by drop until you achieve a vibrant orange color.
4. Fill the Eggs:
- Using a spoon or piping bag, fill each egg white half with the orange yolk mixture.
- Create a slightly mounded appearance for the best visual effect.
- Smooth the tops gently with the back of a spoon if needed.
5. Add the Spooky Garnishes:
- Place two black olive halves on each egg to create “spider eyes.”
- Insert small pieces of chives or green onion as “spider legs” around the sides.
- Lightly dust with paprika for an extra eerie orange glow.
- Sprinkle black sesame seeds sparingly for additional spooky texture.
Substitutions and Variations
I love how versatile this Halloween deviled egg recipe can be. Here are some creative substitutions and variations you can try:
- Food Coloring: Use red food coloring instead of orange for a bloody, vampire-inspired look.
- Mayonnaise: Greek yogurt can replace mayonnaise for a lighter, tangier version.
- Mustard: Try Dijon mustard for a more sophisticated flavor profile.
- Garnishes: Capers can substitute for olives, or use strips of nori seaweed for spidery effects.
- Spice Level: Add a pinch of cayenne pepper to the filling for some devilish heat.
- Cheese Addition: Mix in some finely grated sharp cheddar for extra richness and orange color.
Common Mistakes to Avoid
Through my years of making deviled eggs, I’ve learned to avoid these common pitfalls that can ruin your spooky creation:
- Overcooking the Eggs: This leads to gray-green rings around the yolks and a sulfuric smell.
- Skipping the Ice Bath: Without rapid cooling, eggs become difficult to peel and may continue cooking.
- Too Much Food Coloring: Start with just a few drops; you can always add more for deeper color.
- Filling Too Early: Assemble these eggs close to serving time to prevent the whites from becoming watery.
- Uneven Filling: Use a piping bag or small spoon for consistent, professional-looking results.
How to Serve Halloween Deviled Eggs
These spooky deviled eggs work beautifully as part of a larger Halloween spread. I recommend serving them on a dark platter to make the orange filling pop dramatically. Arrange them alongside other Halloween-themed appetizers like “mummy” wrapped jalapeño poppers or “graveyard” seven-layer dip.
For the best presentation, serve these eggs chilled and within 2 hours of assembly. They pair wonderfully with crisp autumn vegetables, crackers, and seasonal cocktails like apple cider sangria or pumpkin spice martinis.
Presentation Ideas for Halloween Deviled Eggs
Transform your serving area into a haunted display with these creative presentation ideas:
- Graveyard Theme: Arrange eggs on a bed of black beans or crushed chocolate cookies to mimic cemetery dirt.
- Spider Web Display: Use white chocolate drizzled in web patterns around the serving platter.
- Spooky Lighting: Dim the lights and use orange and purple LED candles for atmospheric lighting.
- Themed Garnishes: Surround the platter with plastic spiders, rubber bats, or miniature pumpkins.
Halloween Deviled Eggs Recipe Tips
Here are my top tips for ensuring your Halloween deviled eggs are both delicious and impressively spooky:
- Make Ahead: You can hard-boil eggs up to one week in advance and store them unpeeled in the refrigerator.
- Perfect Peeling: Use eggs that are at least one week old for easier peeling.
- Consistent Color: Mix the food coloring thoroughly to avoid streaky or uneven orange coloring.
- Piping Technique: If using a piping bag, twist the top tightly to prevent filling from oozing out.
- Temperature Control: Keep eggs refrigerated until serving time for food safety and best taste.
- Extra Filling: Always make slightly more filling than you think you need; some eggs may have larger yolk cavities.
How to Store Halloween Deviled Eggs
Proper storage is crucial for maintaining both the safety and quality of your spooky deviled eggs. Store assembled eggs in an airtight container in the refrigerator for up to 2 days. If you’re making them ahead, I recommend storing the prepared egg whites and filling separately, then assembling just before serving.
Cover the eggs tightly with plastic wrap or store in a container with a fitted lid to prevent them from absorbing other refrigerator odors. Never leave deviled eggs at room temperature for more than 2 hours, as the mayonnaise-based filling can spoil quickly.
Frequently Asked Questions (FAQs)
Q: Can I make these Halloween deviled eggs ahead of time?
A: Yes! You can prepare the hard-boiled eggs and filling up to 2 days in advance. Store them separately and assemble 1-2 hours before serving for the best appearance and texture.
Q: How do I get the perfect orange color without making the filling taste artificial?
A: Use gel food coloring rather than liquid, as it provides intense color without thinning the filling. Start with just a tiny amount and add gradually until you reach your desired shade.
Q: What if I don’t have black olives for the spider eyes?
A: You can use sliced black grapes, pieces of nori seaweed, or even dark chocolate chips as creative alternatives for the spooky eyes.
Q: Can I make these eggs dairy-free?
A: Absolutely! Use vegan mayonnaise in place of regular mayonnaise, and the eggs will be dairy-free while maintaining their creamy texture and delicious taste.
Q: How many people will this recipe serve?
A: This recipe makes 24 deviled egg halves, which typically serves 8-12 people as an appetizer, depending on what other foods you’re serving.
Q: Can I freeze deviled eggs?
A: I don’t recommend freezing deviled eggs, as the mayonnaise-based filling doesn’t freeze well and the texture becomes watery and unappetizing when thawed.
Conclusion
These Halloween Deviled Eggs prove that you don’t need complicated ingredients or advanced cooking skills to create show-stopping party food. With their vibrant orange filling and creative spooky garnishes, they bring together the comfort of a classic appetizer with the fun of Halloween creativity.
I love how this recipe allows you to embrace your playful side while still serving something absolutely delicious. The familiar flavors of traditional deviled eggs ensure that even the pickiest eaters will enjoy them, while the Halloween presentation adds that special seasonal magic that makes parties memorable.
Whether you’re hosting a adults-only Halloween bash or a family-friendly autumn gathering, these spooky deviled eggs will be the appetizer that disappears first from your table. The combination of creamy, tangy filling with the visual impact of those little “spider” garnishes creates an experience that’s both delicious and delightfully frightening.
So grab your eggs, embrace your inner ghoul, and get ready to serve up some seriously spooky appetizers that will have your guests talking long after Halloween night. These devilish eggs are proof that the best Halloween treats are the ones that taste as good as they look scary. Happy haunting, and even happier cooking!

