Chewy Pumpkin Chocolate Chip Cookies Recipe
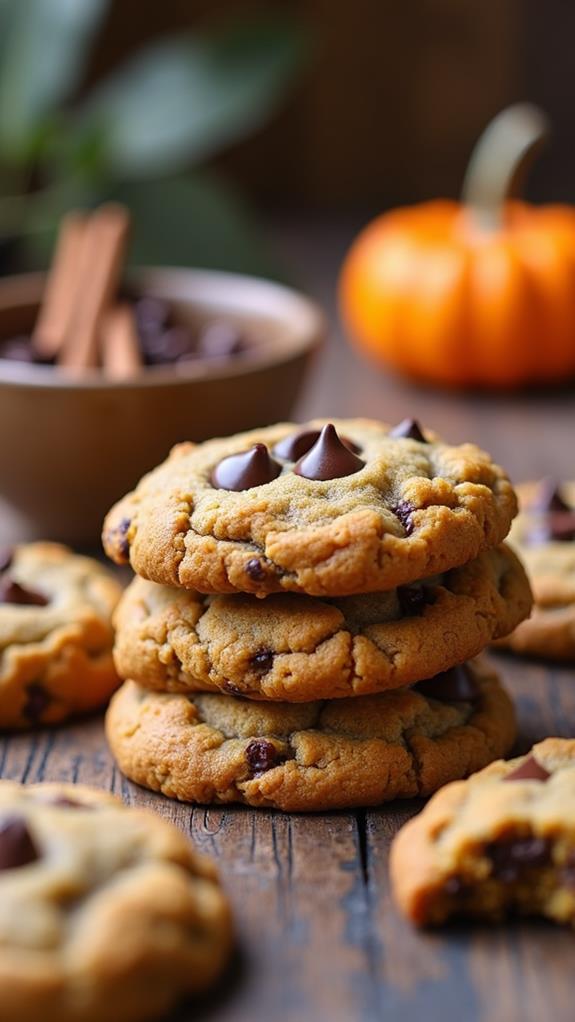
Fall is here, and there’s nothing quite like the warm, comforting aroma of freshly baked pumpkin cookies wafting through your kitchen. These Chewy Pumpkin Chocolate Chip Cookies perfectly capture the essence of autumn in every bite.
With their soft, pillowy texture and the perfect balance of warm spices and rich chocolate chips, these cookies are destined to become your go-to fall treat. I’ve perfected this recipe to ensure you get that ideal chewy texture every single time, making them irresistible to family and friends alike.
What are Chewy Pumpkin Chocolate Chip Cookies?
Chewy Pumpkin Chocolate Chip Cookies are the perfect fusion of fall flavors and classic comfort. Unlike their crispy counterparts, these cookies have a wonderfully soft and chewy texture that comes from the moisture-rich pumpkin puree and the right balance of ingredients.
The pumpkin adds natural sweetness and creates that signature autumn flavor, while warm spices like cinnamon, nutmeg, and ginger elevate the taste profile. The chocolate chips provide delightful bursts of richness that complement the pumpkin beautifully, creating a cookie that’s both seasonal and timeless.
Ingredients List for Chewy Pumpkin Chocolate Chip Cookies
- 2¼ cups all-purpose flour
- 1 teaspoon baking soda
- 1 teaspoon salt
- 1 teaspoon ground cinnamon
- ½ teaspoon ground nutmeg
- ¼ teaspoon ground ginger
- ¼ teaspoon ground cloves
- 1 cup (2 sticks) unsalted butter, softened
- ¾ cup granulated sugar
- ¾ cup packed light brown sugar
- 1 large egg
- 1 teaspoon vanilla extract
- 1 cup pumpkin puree (not pumpkin pie filling)
- 2 cups semi-sweet chocolate chips
How to Make Chewy Pumpkin Chocolate Chip Cookies: A Step-by-Step Guide
Creating the perfect batch of Chewy Pumpkin Chocolate Chip Cookies is easier than you might think. Here’s my detailed guide to ensure your cookies turn out perfectly chewy every time:
1. Prepare Your Kitchen:
- Preheat your oven to 350°F (175°C).
- Line two large baking sheets with parchment paper or silicone baking mats.
- This preparation ensures even baking and prevents the cookies from sticking.
2. Mix the Dry Ingredients:
- In a medium bowl, whisk together flour, baking soda, salt, cinnamon, nutmeg, ginger, and cloves.
- Make sure all spices are evenly distributed throughout the flour mixture.
- This step ensures that every cookie has the perfect balance of spices.
3. Cream the Butter and Sugars:
- In a large mixing bowl, cream the softened butter with both granulated and brown sugars.
- Beat for 2-3 minutes until the mixture is light and fluffy.
- The brown sugar contributes to the chewy texture while adding a subtle molasses flavor.
4. Add Wet Ingredients:
- Beat in the egg until fully incorporated.
- Add vanilla extract and pumpkin puree, mixing until the mixture is smooth and well combined.
- The pumpkin puree should be evenly distributed without any streaks.
5. Combine Wet and Dry Ingredients:
- Gradually add the flour mixture to the pumpkin mixture, mixing on low speed.
- Mix just until the ingredients are combined; overmixing can lead to tough cookies.
- Fold in the chocolate chips with a wooden spoon or spatula.
6. Shape and Bake:
- Using a cookie scoop or tablespoon, drop rounded portions of dough onto the prepared baking sheets.
- Space cookies about 2 inches apart to allow for spreading.
- Bake for 12-15 minutes, until the edges are set but centers still look slightly underbaked.
7. Cool Properly:
- Let cookies cool on the baking sheet for 5 minutes before transferring to a wire rack.
- This brief cooling period helps maintain their chewy texture.
Substitutions and Variations
Want to customize your Chewy Pumpkin Chocolate Chip Cookies? Here are some delicious variations and substitutions I recommend:
- Flour: Substitute up to ½ cup of all-purpose flour with whole wheat flour for added nutrition and a nuttier flavor.
- Chocolate Chips: Try white chocolate chips, butterscotch chips, or even cinnamon chips for different flavor profiles.
- Spices: Add a pinch of cardamom or allspice for a more complex spice blend, or reduce spices for a milder flavor.
- Mix-ins: Consider adding chopped pecans, walnuts, or dried cranberries along with or instead of chocolate chips.
- Sugar: Replace some brown sugar with coconut sugar for a deeper, more complex sweetness.
- Butter: Use coconut oil (solid, not melted) as a dairy-free alternative, though this may slightly change the texture.
Common Mistakes to Avoid
I’ve learned from experience that avoiding these common mistakes will ensure your cookies turn out perfectly every time:
- Using Pumpkin Pie Filling: Always use plain pumpkin puree, not pumpkin pie filling, which contains added spices and sugar that can throw off the recipe balance.
- Overmixing the Dough: Mix just until ingredients are combined to prevent tough, dense cookies.
- Overbaking: These cookies should look slightly underbaked when you remove them from the oven; they’ll continue cooking on the hot pan.
- Not Measuring Pumpkin Properly: Drain any excess liquid from pumpkin puree by pressing it with paper towels if it seems very wet.
- Skipping the Cooling Step: Let cookies rest on the baking sheet before moving them to prevent breaking and maintain chewiness.
How to Serve Chewy Pumpkin Chocolate Chip Cookies
These versatile cookies are perfect for various occasions and serving styles. I love serving them warm with a tall glass of cold milk or alongside a steaming mug of coffee or hot chocolate.
For special occasions, try serving them with vanilla ice cream for a delightful dessert, or pack them in decorative bags as thoughtful fall gifts for neighbors and friends. They’re also wonderful for school lunches, office treats, or any time you want to bring a touch of autumn comfort to your day.
Presentation Ideas for Chewy Pumpkin Chocolate Chip Cookies
Make your cookies as visually appealing as they are delicious with these presentation ideas:
- Rustic Display: Arrange cookies on a wooden cutting board with small pumpkins and fall leaves for a seasonal presentation.
- Gift Packaging: Layer cookies between parchment paper in decorative tins or mason jars tied with autumn-colored ribbons.
- Elegant Plating: Dust cookies lightly with powdered sugar and serve on vintage china plates for a more refined presentation.
- Cookie Bar: Create a fall cookie bar with these alongside other seasonal treats, complete with themed decorations.
Chewy Pumpkin Chocolate Chip Cookies Recipe Tips
Here are my top tips for achieving the perfect chewy texture and maximum flavor:
- Use Room Temperature Ingredients: Ensure your butter, egg, and pumpkin puree are at room temperature for better mixing and texture.
- Don’t Skip the Resting Time: Let the dough rest for 15-30 minutes before baking to allow flour to fully hydrate.
- Measure Accurately: Use a kitchen scale for the most accurate measurements, especially for flour and pumpkin puree.
- Quality Chocolate: Invest in good-quality chocolate chips; they make a noticeable difference in the final product.
- Watch Your Oven: Every oven bakes differently, so start checking at 12 minutes and adjust accordingly.
- Store Properly: Keep baked cookies soft by storing them in an airtight container with a slice of bread.
How to Store Chewy Pumpkin Chocolate Chip Cookies
Proper storage is key to maintaining that perfect chewy texture I know you’ll love. Allow cookies to cool completely before storing them in an airtight container at room temperature for up to one week.
For longer storage, you can freeze the baked cookies for up to three months in freezer-safe containers or bags. I also like to freeze portions of cookie dough on baking sheets, then transfer the frozen dough balls to freezer bags for up to three months. This way, you can bake fresh cookies whenever the craving strikes!
Frequently Asked Questions (FAQs)
Q: Can I make the dough ahead of time?
A: Absolutely! You can refrigerate the dough for up to 3 days or freeze it for up to 3 months. Cold dough may need an extra minute or two of baking time.
Q: Why are my cookies spreading too much?
A: This usually happens when the butter is too warm or the dough is too warm. Try chilling the dough for 30 minutes before baking, and ensure your butter is softened but not melted.
Q: Can I use fresh pumpkin instead of canned?
A: Yes, but make sure to cook and puree it until smooth, then drain any excess moisture. Canned pumpkin is more consistent and convenient for baking.
Q: How can I make my cookies even chewier?
A: Slightly underbake them and use more brown sugar than white sugar. The molasses in brown sugar contributes to chewiness.
Q: Can I make these cookies gluten-free?
A: Yes, substitute the all-purpose flour with a 1:1 gluten-free baking flour blend. The texture may be slightly different but still delicious.
Q: What’s the best way to reheat these cookies?
A: Warm them in a 300°F oven for 3-5 minutes or microwave individual cookies for 10-15 seconds to restore their soft texture.
Conclusion
These Chewy Pumpkin Chocolate Chip Cookies represent everything I love about fall baking – they’re warm, comforting, and absolutely irresistible. The combination of tender pumpkin, aromatic spices, and rich chocolate creates a cookie that’s both nostalgic and satisfying.
I’ve shared this recipe with countless friends and family members, and it never fails to bring smiles and requests for seconds. The key to success lies in not overbaking them and using quality ingredients, especially the pumpkin puree and chocolate chips.
Whether you’re baking for a cozy family evening, a school fundraiser, or simply treating yourself to some autumn comfort, these cookies deliver every time. The recipe is forgiving enough for beginning bakers yet sophisticated enough to impress experienced cooks.
So gather your ingredients, preheat that oven, and get ready to fill your home with the most wonderful fall aromas. I guarantee these Chewy Pumpkin Chocolate Chip Cookies will become a cherished part of your autumn baking tradition. Happy baking!

