Ruth Chris Stuffed Chicken Copycat Recipe
There’s something magical about recreating a restaurant favorite in your own kitchen. Ruth’s Chris Steak House is renowned for their exceptional steaks, but their stuffed chicken is an equally show-stopping dish that deserves attention. This copycat recipe brings that same restaurant-quality elegance to your dinner table.
With tender, juicy chicken breast filled with rich spinach and cheese, then topped with a luscious lemon butter sauce, this dish is perfect for special occasions or when you want to treat yourself to something extraordinary. Follow along as I guide you through creating this impressive meal that rivals the original.
What is Ruth’s Chris Stuffed Chicken?
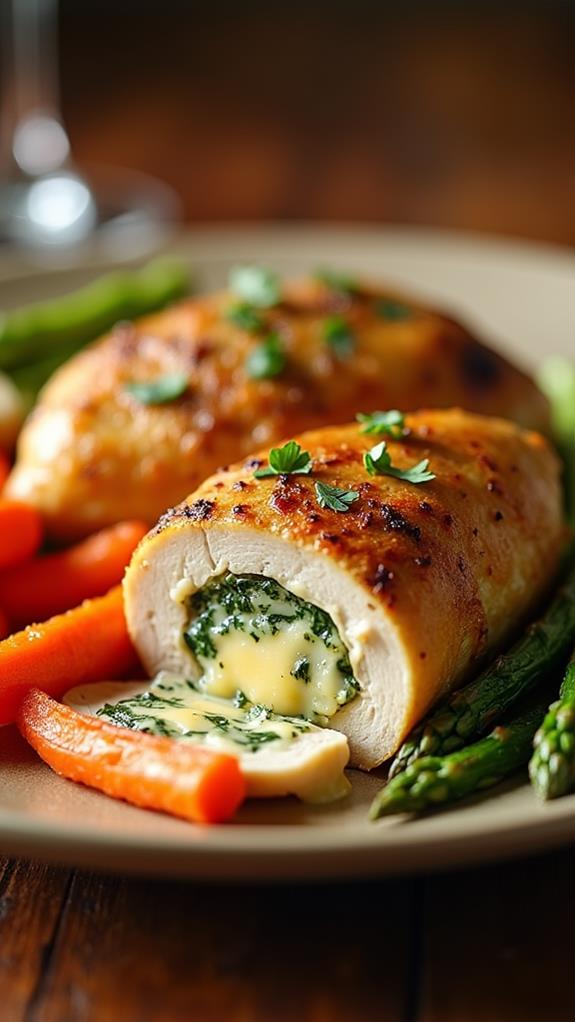
Ruth’s Chris Stuffed Chicken is a signature dish featuring a perfectly butterflied chicken breast stuffed with creamy spinach and cheese mixture, then baked to golden perfection. The chicken is served with their famous lemon butter sauce that adds a bright, rich finish to every bite.
This dish combines the comfort of home cooking with the sophistication of fine dining. The chicken remains incredibly moist while the filling provides a creamy, flavorful contrast that makes each bite memorable.
Ingredients List for Ruth’s Chris Stuffed Chicken
For the Stuffed Chicken:
- 4 large boneless, skinless chicken breasts (6-8 oz each)
- 1 tablespoon olive oil
- 1 teaspoon salt
- ½ teaspoon black pepper
- ½ teaspoon garlic powder
- ½ teaspoon paprika
For the Spinach and Cheese Filling:
- 2 tablespoons butter
- 2 cloves garlic, minced
- 4 cups fresh spinach, chopped
- 4 oz cream cheese, softened
- ½ cup shredded mozzarella cheese
- ¼ cup grated Parmesan cheese
- ¼ teaspoon nutmeg
- Salt and pepper to taste
For the Lemon Butter Sauce:
- 6 tablespoons butter
- 2 cloves garlic, minced
- ¼ cup fresh lemon juice
- 1 tablespoon fresh lemon zest
- 2 tablespoons fresh parsley, chopped
- Salt and pepper to taste
For Serving:
- Fresh herbs for garnish
- Lemon wedges
How to Cook Ruth’s Chris Stuffed Chicken: A Step-by-Step Guide
Creating this restaurant-quality dish at home requires attention to detail, but the process is straightforward when broken down into manageable steps. Here’s how to achieve perfection:
1. Prepare the Chicken:
- Remove chicken from refrigerator 20 minutes before cooking to bring to room temperature.
- Using a sharp knife, carefully butterfly each chicken breast by cutting horizontally through the middle, leaving about ½ inch connected.
- Open the chicken like a book and gently pound to an even ½-inch thickness using a meat mallet.
- Season both sides with salt, pepper, garlic powder, and paprika.
2. Make the Spinach and Cheese Filling:
- Heat butter in a large skillet over medium heat.
- Add minced garlic and sauté for 30 seconds until fragrant.
- Add chopped spinach and cook until wilted and moisture has evaporated, about 3-4 minutes.
- Remove from heat and let cool slightly.
- In a bowl, combine softened cream cheese, mozzarella, Parmesan, and nutmeg.
- Fold in the cooled spinach mixture and season with salt and pepper.
3. Stuff and Secure the Chicken:
- Preheat your oven to 375°F (190°C).
- Place about ¼ of the filling mixture on one side of each butterflied chicken breast.
- Fold the other half over the filling and secure edges with toothpicks.
- Make sure the filling is completely enclosed to prevent leaking during cooking.
4. Sear the Chicken:
- Heat olive oil in an oven-safe skillet over medium-high heat.
- Carefully place stuffed chicken breasts in the pan, seam-side down first.
- Sear for 3-4 minutes until golden brown, then flip and sear the other side.
- This initial searing locks in moisture and creates a beautiful golden exterior.
5. Finish in the Oven:
- Transfer the skillet to the preheated oven.
- Bake for 20-25 minutes or until the internal temperature reaches 165°F (74°C).
- Remove from oven and let rest for 5 minutes before serving.
6. Prepare the Lemon Butter Sauce:
- While chicken rests, melt butter in a small saucepan over medium heat.
- Add minced garlic and cook for 30 seconds.
- Stir in lemon juice, lemon zest, and fresh parsley.
- Season with salt and pepper, then remove from heat.
Substitutions and Variations
This versatile recipe can be adapted to suit different tastes and dietary needs:
- Chicken: Substitute with turkey cutlets or pork tenderloin medallions for variety.
- Cheese Filling: Try ricotta cheese mixed with herbs, or use goat cheese for a tangy twist.
- Spinach: Replace with sautéed mushrooms, sun-dried tomatoes, or roasted red peppers.
- Herbs: Experiment with fresh thyme, oregano, or basil in the filling.
- Low-Carb Option: Serve over cauliflower mash or zucchini noodles instead of traditional sides.
- Dairy-Free: Use cashew cream cheese and nutritional yeast for the filling.
Common Mistakes to Avoid
Avoid these pitfalls to ensure your stuffed chicken turns out perfectly:
- Not Pounding Evenly: Uneven thickness leads to uneven cooking. Take time to create a uniform surface.
- Overstuffing: Too much filling will leak out during cooking and make the chicken difficult to seal.
- Skipping the Searing: This step is crucial for flavor development and moisture retention.
- Overcooking: Use a meat thermometer to avoid dry chicken. Remove at exactly 165°F.
- Not Resting: Allowing the chicken to rest prevents juices from running out when sliced.
- Wet Spinach: Ensure all moisture is cooked out of the spinach to prevent soggy filling.
How to Serve Ruth’s Chris Stuffed Chicken
This elegant dish pairs beautifully with sophisticated side dishes that complement its rich flavors. Consider serving with garlic mashed potatoes, roasted asparagus, or wild rice pilaf. A crisp white wine like Chardonnay or Sauvignon Blanc enhances the lemon butter sauce perfectly.
For a complete Ruth’s Chris experience, start with a simple Caesar salad and finish with their famous bread pudding or a light lemon sorbet.
Presentation Ideas for Ruth’s Chris Stuffed Chicken
Transform your home kitchen into a fine dining experience with these presentation tips:
- Elegant Plating: Slice the chicken diagonally to showcase the colorful filling, and fan the pieces on the plate.
- Sauce Drizzle: Pool the lemon butter sauce alongside the chicken and drizzle artfully around the plate.
- Color Contrast: Add vibrant vegetables like roasted cherry tomatoes or blanched broccolini for visual appeal.
- Garnish Thoughtfully: Fresh herb sprigs and lemon zest add restaurant-quality finishing touches.
- Warm Plates: Serve on warmed plates to keep the dish at optimal temperature throughout the meal.
Ruth’s Chris Stuffed Chicken Recipe Tips
These professional tips will help you achieve restaurant-quality results:
- Temperature Control: Use an instant-read thermometer for precision. The difference between perfect and overcooked is just a few degrees.
- Quality Ingredients: Choose organic, free-range chicken and fresh herbs for the best flavor.
- Make-Ahead Option: Stuff the chicken up to 4 hours ahead and refrigerate. Bring to room temperature before cooking.
- Even Cooking: If your chicken breasts vary significantly in size, pound them to uniform thickness.
- Toothpick Placement: Insert toothpicks at an angle to better secure the filling and prevent tearing.
- Rest Time: The resting period is crucial for redistribution of juices throughout the meat.
How to Store Ruth’s Chris Stuffed Chicken
Proper storage maintains the dish’s quality and safety. Allow the stuffed chicken to cool completely before refrigerating within 2 hours of cooking. Store in an airtight container for up to 3 days in the refrigerator.
To reheat, place in a 350°F oven for 10-15 minutes until heated through. Avoid microwaving as this can make the chicken tough and unevenly heated. The lemon butter sauce can be stored separately and gently rewarmed on the stovetop.
Frequently Asked Questions (FAQs)
Q: Can I prepare the stuffed chicken in advance?
A: Yes, you can stuff the chicken up to 4 hours ahead and refrigerate. Just remember to bring it to room temperature before cooking for even results.
Q: What if my chicken breast is too thin to stuff?
A: You can pound two thin breasts together with some filling in between, or use the filling as a topping instead of stuffing.
Q: Can I freeze the stuffed chicken?
A: While possible, freezing may affect the texture of the cheese filling. It’s best enjoyed fresh, but leftovers can be frozen for up to 2 months.
Q: How do I know when the chicken is done without cutting into it?
A: Use an instant-read thermometer inserted into the thickest part of the chicken. It should read 165°F (74°C).
Q: Can I make this dish without cheese?
A: Absolutely! Try a mixture of sautéed herbs, sun-dried tomatoes, and pine nuts for a dairy-free option.
Q: What sides pair best with this dish?
A: Classic choices include garlic mashed potatoes, roasted vegetables, rice pilaf, or a simple arugula salad.
Conclusion
Recreating Ruth’s Chris Stuffed Chicken at home is more achievable than you might think. This copycat recipe captures all the elegance and flavor of the restaurant original while allowing you to customize it to your preferences. The combination of tender chicken, creamy spinach and cheese filling, and bright lemon butter sauce creates a truly memorable dining experience.
The key to success lies in proper preparation, attention to temperature, and patience with each step. Don’t rush the process—good cooking takes time, but the results are worth every minute. Whether you’re planning a romantic dinner, celebrating a special occasion, or simply wanting to elevate your weeknight meal, this stuffed chicken recipe delivers restaurant-quality results that will impress family and friends alike.
Take your time, follow the steps carefully, and enjoy the satisfaction of creating something truly special in your own kitchen. Happy cooking!

