Air Fryer Apple Pie Bombs Recipe

Craving the warm, comforting flavors of apple pie but don’t want to spend hours in the kitchen? These Air Fryer Apple Pie Bombs are your answer! These bite-sized treats deliver all the delicious taste of traditional apple pie in a fun, portable format that takes just minutes to prepare.
With their crispy golden exterior and sweet, cinnamon-spiced apple filling, these little bombs of flavor are perfect for satisfying your dessert cravings or impressing guests at your next gathering. Let’s dive into this simple yet irresistible recipe that’ll have everyone asking for seconds!
What are “Air Fryer Apple Pie Bombs”?
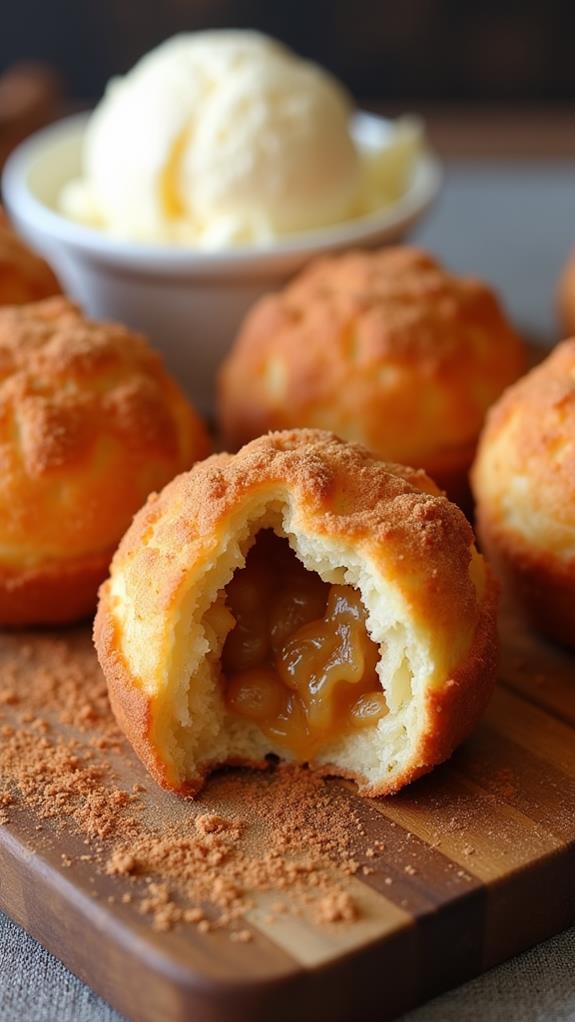
Air Fryer Apple Pie Bombs are small, round pastries filled with seasoned apple chunks and cooked to golden perfection in an air fryer. They’re essentially bite-sized versions of classic apple pie, wrapped in flaky biscuit dough and rolled in cinnamon sugar for an extra layer of sweetness.
These delightful treats combine the convenience of modern air frying technology with the timeless appeal of apple pie. The result is a crispy exterior that gives way to tender, spiced apples inside – all without the need for a traditional oven or the time commitment of making a full pie.
Ingredients List for Air Fryer Apple Pie Bombs
- 1 can (16.3 oz) refrigerated biscuit dough (8 biscuits)
- 2 medium Granny Smith apples, peeled and diced small
- 3 tablespoons brown sugar
- 1 teaspoon ground cinnamon
- ¼ teaspoon ground nutmeg
- ¼ teaspoon vanilla extract
- 1 tablespoon lemon juice
- 2 tablespoons butter, melted
- ⅓ cup granulated sugar
- 1 teaspoon ground cinnamon (for rolling)
- Cooking spray
How to Cook Air Fryer Apple Pie Bombs: A Step-by-Step Guide
Creating these delicious Apple Pie Bombs is easier than you might think. Follow these detailed steps to ensure perfect results every time:
1. Prepare the Apple Filling:
- Start by peeling and dicing your apples into small, uniform pieces (about ¼-inch cubes).
- In a medium bowl, combine the diced apples with brown sugar, 1 teaspoon cinnamon, nutmeg, vanilla extract, and lemon juice.
- Mix everything together until the apples are well coated with the spice mixture.
- Let the mixture sit for 5-10 minutes to allow the flavors to meld and the apples to release some of their juices.
2. Prepare the Biscuit Dough:
- Remove the biscuit dough from the can and separate into individual biscuits.
- Gently flatten each biscuit with your hands or a rolling pin until it’s about 4-5 inches in diameter.
- Be careful not to make them too thin, as they need to hold the filling without tearing.
3. Assemble the Apple Pie Bombs:
- Place about 1-2 tablespoons of the apple filling in the center of each flattened biscuit.
- Carefully bring the edges of the dough up and around the filling, pinching and sealing the seams tightly.
- Roll each filled dough ball gently between your palms to create a smooth, round shape.
- Make sure all seams are sealed to prevent the filling from leaking during cooking.
4. Prepare for Air Frying:
- Preheat your air fryer to 350°F (175°C) for 3-5 minutes.
- In a small bowl, combine the granulated sugar and remaining teaspoon of cinnamon.
- Brush each apple pie bomb with melted butter, then roll in the cinnamon sugar mixture until completely coated.
5. Cook the Apple Pie Bombs:
- Spray the air fryer basket with cooking spray to prevent sticking.
- Place the apple pie bombs in the air fryer basket, making sure they don’t touch each other.
- Cook for 8-10 minutes, flipping them halfway through the cooking time for even browning.
- They’re done when they’re golden brown and crispy on the outside.
6. Final Touches:
- Remove from the air fryer and let cool for 2-3 minutes before serving.
- For extra sweetness, you can dust with powdered sugar or drizzle with caramel sauce.
- Serve warm for the best taste and texture experience.
Substitutions and Variations
Want to customize your Air Fryer Apple Pie Bombs? Here are some delicious substitutions and variations to try:
- Dough Options: Use puff pastry, crescent roll dough, or even pie crust for different textures and flavors.
- Apple Varieties: Try Honeycrisp, Gala, or Braeburn apples for varying levels of sweetness and tartness.
- Spice Variations: Add a pinch of cardamom, allspice, or ginger to the apple mixture for more complex flavors.
- Add-ins: Include chopped walnuts, pecans, or even mini chocolate chips in the apple filling.
- Glaze Options: Top with vanilla glaze, cream cheese frosting, or a simple powdered sugar dusting.
- Fruit Substitutions: Replace apples with diced pears, peaches, or mixed berries for seasonal variations.
Common Mistakes to Avoid
To ensure your Apple Pie Bombs turn out perfectly every time, avoid these common pitfalls:
- Overfilling the Dough: Too much filling will cause the dough to burst during cooking, creating a mess in your air fryer.
- Not Sealing Properly: Inadequately sealed seams will allow the filling to leak out, resulting in empty bombs and a messy basket.
- Cutting Apples Too Large: Large apple pieces won’t cook through properly and may cause the dough to tear.
- Skipping the Preheating: A properly preheated air fryer ensures even cooking and better browning.
- Overcrowding the Basket: Give each bomb space to cook evenly; cook in batches if necessary.
- Not Flipping Halfway: This ensures even browning on all sides for the perfect golden color.
How to Serve Air Fryer Apple Pie Bombs
These versatile treats can be served in various ways depending on the occasion:
As a Dessert: Serve warm with a scoop of vanilla ice cream and a drizzle of caramel sauce for an indulgent treat.
For Breakfast: Pair with a cup of coffee or hot chocolate for a sweet morning treat.
Party Appetizer: Arrange on a platter with small bowls of different dipping sauces like caramel, chocolate, or vanilla glaze.
Holiday Treat: Perfect for fall gatherings, Thanksgiving dessert tables, or Christmas morning breakfast.
Presentation Ideas for Air Fryer Apple Pie Bombs
Make your Apple Pie Bombs look as good as they taste with these presentation suggestions:
- Rustic Charm: Serve on a wooden board with fresh apple slices and cinnamon sticks as garnish.
- Elegant Plating: Arrange on individual dessert plates with a drizzle of caramel sauce and a sprig of fresh mint.
- Holiday Theme: Dust with powdered sugar to create a “snowy” effect for winter gatherings.
- Colorful Display: Serve alongside other fall treats like pumpkin cookies or maple donuts for a seasonal dessert spread.
Air Fryer Apple Pie Bombs Recipe Tips
Here are my top tips for making the most delicious Apple Pie Bombs:
- Choose the Right Apples: Granny Smith apples hold their shape well and provide a nice tart contrast to the sweet dough.
- Work Quickly: Keep unused biscuit dough covered to prevent it from drying out while you work.
- Test Your Air Fryer: Cooking times may vary between different air fryer models, so check for doneness a minute or two early.
- Make Ahead Option: You can assemble the bombs up to 4 hours ahead and refrigerate until ready to cook.
- Double Coat: For extra cinnamon sugar flavor, roll the bombs in the mixture twice.
- Temperature Matters: Ensure your air fryer reaches the correct temperature for optimal cooking results.
How to Store Air Fryer Apple Pie Bombs
These treats are best enjoyed fresh and warm, but here’s how to store any leftovers:
Short-term Storage: Allow the apple pie bombs to cool completely, then store in an airtight container at room temperature for up to 2 days.
Refrigeration: For longer storage, refrigerate in an airtight container for up to 5 days.
Reheating: Warm leftover bombs in the air fryer at 300°F for 2-3 minutes to restore their crispy exterior.
Freezing: You can freeze cooked bombs for up to 1 month. Thaw overnight in the refrigerator and reheat as directed above.
Frequently Asked Questions (FAQs)
Q: Can I make these without an air fryer?
A: Yes! You can bake them in a conventional oven at 375°F for 12-15 minutes, or until golden brown.
Q: Can I use fresh pie crust instead of biscuit dough?
A: Absolutely! Pie crust will give you a more traditional apple pie flavor, though the texture will be slightly different.
Q: How do I prevent the filling from leaking out?
A: Make sure to seal the seams tightly and don’t overfill the dough. A light coating of water on the edges can help the dough stick together better.
Q: Can I make these dairy-free?
A: Yes, use dairy-free biscuit dough and substitute the butter with melted coconut oil or vegan butter.
Q: What’s the best way to dice the apples?
A: Aim for uniform ¼-inch pieces. This ensures even cooking and prevents the dough from tearing.
Q: Can I add other fruits to the filling?
A: Definitely! Diced pears, cranberries, or even a mix of berries work wonderfully with the apple base.
Conclusion
Air Fryer Apple Pie Bombs are the perfect solution when you’re craving the comforting flavors of apple pie but want something quick, easy, and portion-controlled. These delightful treats deliver all the satisfaction of traditional apple pie in a convenient, handheld format that’s ready in just minutes.
Whether you’re making them for a special occasion, a weeknight dessert, or just because you’re craving something sweet, these apple pie bombs are sure to become a favorite in your recipe collection. The combination of crispy, cinnamon-sugar coated exterior and warm, spiced apple filling creates a truly irresistible treat that appeals to all ages.
I encourage you to experiment with different variations and make this recipe your own. The beauty of these apple pie bombs lies in their versatility and the joy they bring to everyone who tries them. So fire up that air fryer, gather your ingredients, and get ready to create some truly magical little bites of apple pie heaven!


