Cheeseburger Sliders Recipe
Craving a crowd-pleasing appetizer that’s both fun to make and irresistible to eat? These homemade Cheeseburger Sliders are exactly what you need! Perfect for game day parties, family gatherings, or any time you want to bring smiles to the table.
I’ve perfected this recipe over the years, and these bite-sized burgers never fail to disappear within minutes. With juicy beef patties, melted cheese, and all your favorite burger fixings on soft slider buns, they’re essentially miniature versions of everyone’s favorite comfort food.
What are Cheeseburger Sliders?
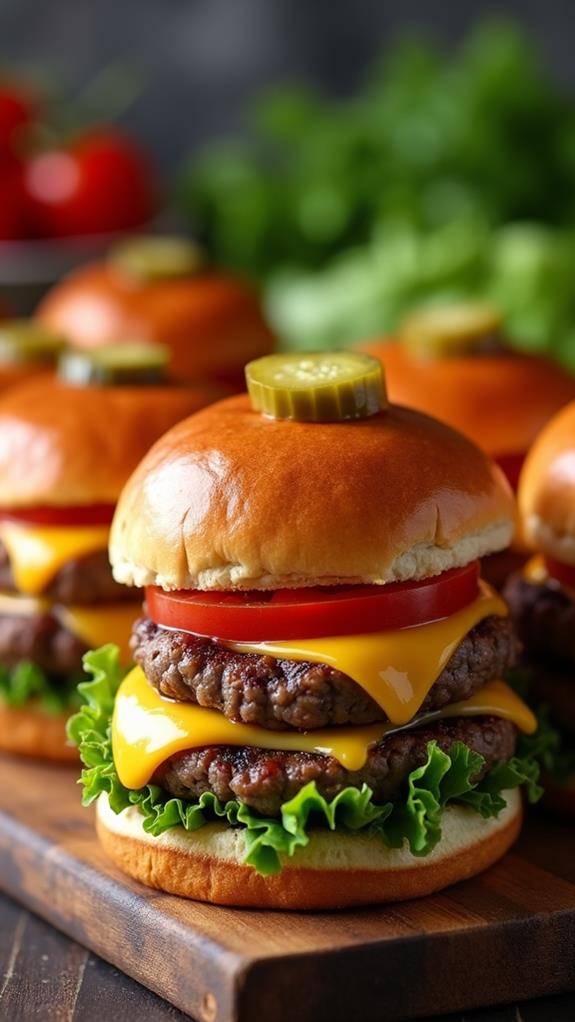
Cheeseburger Sliders are miniature hamburgers typically served on small, soft buns that are usually 2-3 inches in diameter. Unlike regular burgers, sliders are designed to be eaten in just a few bites, making them perfect for parties, appetizers, or when you want to sample multiple flavors.
The term “slider” originally came from White Castle in the 1920s, referring to how these small burgers would “slide” down easily. Today, sliders have evolved into gourmet creations that pack all the flavors of a full-sized burger into a perfectly portioned package.
What makes these sliders special is their versatility. You can customize them with different cheeses, toppings, and sauces while keeping the preparation simple enough for any home cook to master.
Ingredients List for Cheeseburger Sliders
- 12 slider buns (or dinner rolls)
- 1 pound ground beef (80/20 blend preferred)
- 12 slices American or cheddar cheese
- 1 medium yellow onion, thinly sliced
- 2 tablespoons butter
- 1 tablespoon olive oil
- 1 teaspoon salt
- 1/2 teaspoon black pepper
- 1/2 teaspoon garlic powder
- 1/4 teaspoon onion powder
- 12 pickle slices
- 2 medium tomatoes, sliced thin
- 1 cup shredded lettuce
- 1/4 cup mayonnaise
- 2 tablespoons ketchup
- 1 tablespoon yellow mustard
How to Cook Cheeseburger Sliders: A Step-by-Step Guide
Creating perfect Cheeseburger Sliders requires attention to detail and proper timing. Here’s my tried-and-tested method for making sliders that will have everyone asking for the recipe:
1. Prepare the Ingredients:
- Remove the ground beef from the refrigerator 15 minutes before cooking to bring it to room temperature.
- Slice the onions thinly and set aside.
- Prepare your toppings: slice tomatoes, wash and dry lettuce, and arrange pickle slices.
- Mix together mayonnaise, ketchup, and mustard in a small bowl for the special sauce.
2. Form the Patties:
- Divide the ground beef into 12 equal portions, roughly 1.3 ounces each.
- Gently form each portion into a patty slightly larger than your buns, as they’ll shrink during cooking.
- Season both sides with salt, pepper, garlic powder, and onion powder.
- Make a small indentation in the center of each patty with your thumb to prevent puffing.
3. Cook the Onions:
- Heat 1 tablespoon of butter in a large skillet over medium heat.
- Add the sliced onions and cook for 8-10 minutes, stirring occasionally, until golden and caramelized.
- Remove onions from the pan and set aside.
4. Cook the Patties:
- Increase heat to medium-high and add olive oil to the same skillet.
- Cook the patties in batches if necessary, avoiding overcrowding the pan.
- Cook for 2-3 minutes on the first side without pressing down on them.
- Flip the patties and immediately top each with a slice of cheese.
- Cook for another 2-3 minutes until the internal temperature reaches 160°F.
5. Prepare the Buns:
- While the patties cook, slice the slider buns in half if they aren’t pre-sliced.
- Lightly toast the cut sides in a dry pan for 1-2 minutes until golden.
- This step prevents the buns from becoming soggy.
6. Assemble the Sliders:
- Spread the special sauce on the bottom half of each bun.
- Layer with lettuce, then the cheese-topped patty.
- Add caramelized onions, tomato slice, and pickles.
- Top with the other half of the bun.
- Secure with toothpicks if desired for easier handling.
Substitutions and Variations
The beauty of Cheeseburger Sliders lies in their adaptability. Here are some variations I’ve tried and loved:
- Meat Options: Turkey, chicken, or plant-based patties work well. Adjust cooking times accordingly.
- Cheese Varieties: Swiss, provolone, pepper jack, or even blue cheese can create unique flavor profiles.
- Bun Alternatives: Brioche buns, Hawaiian rolls, or even biscuits make excellent substitutions.
- Healthier Options: Use lean ground beef, whole wheat buns, and add avocado for healthy fats.
- Gourmet Touches: Try bacon, sautéed mushrooms, or caramelized onions with herbs.
- Spicy Version: Add jalapeños, pepper jack cheese, and spicy mayo for heat lovers.
Common Mistakes to Avoid
Through years of making sliders, I’ve learned to avoid these common pitfalls:
- Overworking the Meat: Handle ground beef gently to avoid tough, dense patties.
- Cooking at Too High Heat: Medium-high heat prevents burning while ensuring proper cooking.
- Pressing the Patties: Resist the urge to press down with a spatula, as this squeezes out juices.
- Skipping the Thumb Indentation: This prevents the patties from puffing into balls.
- Not Resting the Meat: Let cooked patties rest for 2-3 minutes to redistribute juices.
- Soggy Buns: Always toast the buns lightly to create a barrier against moisture.
How to Serve Cheeseburger Sliders
Cheeseburger Sliders are incredibly versatile when it comes to serving options. I typically serve them as the main attraction at casual gatherings, accompanied by classic sides that complement their rich, savory flavors.
For the perfect slider meal, pair them with crispy french fries, onion rings, or sweet potato fries. A simple coleslaw or potato salad adds a refreshing contrast to the richness of the sliders. For lighter options, serve with a mixed green salad or fresh fruit.
At parties, I arrange the sliders on large platters with small bowls of extra condiments, pickles, and napkins readily available. They’re perfect finger food that guests can grab easily while mingling.
Presentation Ideas for Cheeseburger Sliders
Great presentation elevates these simple sliders into party showstoppers:
- Tiered Serving: Use cake stands or tiered trays to create height and visual interest on your buffet table.
- Colorful Picks: Secure each slider with decorative toothpicks in team colors or party themes.
- Mini Baskets: Serve individual sliders in small paper-lined baskets for a diner-style presentation.
- Garnish Station: Set up a DIY topping bar with various cheeses, sauces, and vegetables.
- Themed Arrangements: Arrange sliders on wooden boards with complementary sides for a rustic feel.
Cheeseburger Sliders Recipe Tips
Here are my insider tips for slider success:
- Quality Ingredients: Use fresh ground beef from a trusted butcher for the best flavor and texture.
- Temperature Control: Use a meat thermometer to ensure perfect doneness without overcooking.
- Batch Cooking: Cook patties in batches rather than overcrowding for even cooking.
- Cheese Timing: Add cheese during the last minute of cooking for perfect melting.
- Assembly Line: Set up all toppings before cooking for quick, efficient assembly.
- Make-Ahead Option: Form patties the day before and refrigerate, covered, until ready to cook.
- Freezer Friendly: Uncooked patties freeze well for up to 3 months when properly wrapped.
How to Store Cheeseburger Sliders
Proper storage ensures you can enjoy leftover sliders safely and deliciously. Allow assembled sliders to cool completely before storing, ideally within 2 hours of cooking to prevent bacterial growth.
For best results, store components separately when possible. Wrap leftover patties in aluminum foil or place in airtight containers. Store buns in their original packaging or wrapped in plastic wrap to maintain freshness.
Assembled sliders can be refrigerated for up to 2 days, though the buns may become slightly soggy. To refresh, reheat the entire slider in a 350°F oven for 5-7 minutes, or separate the components and reheat the patties alone.
Frequently Asked Questions (FAQs)
Q: Can I make Cheeseburger Sliders ahead of time?
A: Yes! Form and season the patties up to 24 hours in advance. Store covered in the refrigerator. Cook just before serving for best results, though you can reheat assembled sliders in the oven.
Q: What’s the best ground beef blend for sliders?
A: I recommend 80/20 ground beef for the perfect balance of flavor and juiciness. The fat content keeps the small patties moist during cooking.
Q: How do I prevent the buns from getting soggy?
A: Toast the buns lightly and avoid overloading with wet ingredients. You can also spread a thin layer of butter or mayo on the buns as a moisture barrier.
Q: Can I grill these sliders instead of pan-frying?
A: Absolutely! Grill over medium heat for 3-4 minutes per side. Use a grill basket or be very careful when flipping due to their small size.
Q: How many sliders should I plan per person?
A: For appetizers, plan 2-3 sliders per person. As a main dish, 3-4 sliders per person is usually sufficient, depending on other dishes served.
Q: Can I freeze cooked sliders?
A: While possible, I don’t recommend it as the texture suffers. Instead, freeze uncooked seasoned patties and cook fresh when needed.
Conclusion
Cheeseburger Sliders represent everything I love about comfort food – they’re familiar, satisfying, and bring people together. This recipe has become my go-to for entertaining because it’s reliable, customizable, and always receives rave reviews.
The key to perfect sliders lies in using quality ingredients, proper technique, and not overthinking the process. These mini burgers prove that good food doesn’t have to be complicated. With simple ingredients and straightforward methods, you can create something that feels special and indulgent.
Whether you’re hosting a Super Bowl party, planning a backyard barbecue, or just want to treat your family to something fun for dinner, these Cheeseburger Sliders will deliver every time. The recipe is forgiving enough for beginners yet satisfying enough for experienced cooks who want to create something memorable.
I encourage you to make this recipe your own by experimenting with different toppings, cheeses, and seasonings. The foundation is solid, but the possibilities for customization are endless. Most importantly, have fun with it – cooking should be enjoyable, and sharing good food with people you care about is one of life’s greatest pleasures. Happy cooking!