Cheesy Hot Beef Sandwich Recipe
When comfort food cravings strike, nothing beats the satisfaction of a perfectly crafted Cheesy Hot Beef Sandwich. This hearty, melty masterpiece combines tender seasoned beef, gooey cheese, and flavorful vegetables all nestled between toasted bread that’s crispy on the outside and soft on the inside.
I’ve perfected this recipe over years of experimenting, and it never fails to deliver that perfect balance of savory beef, creamy cheese, and satisfying textures. Whether you’re feeding hungry teenagers, looking for a quick weeknight dinner, or want to impress guests with minimal effort, this sandwich will become your go-to recipe.
What is a “Cheesy Hot Beef Sandwich”?
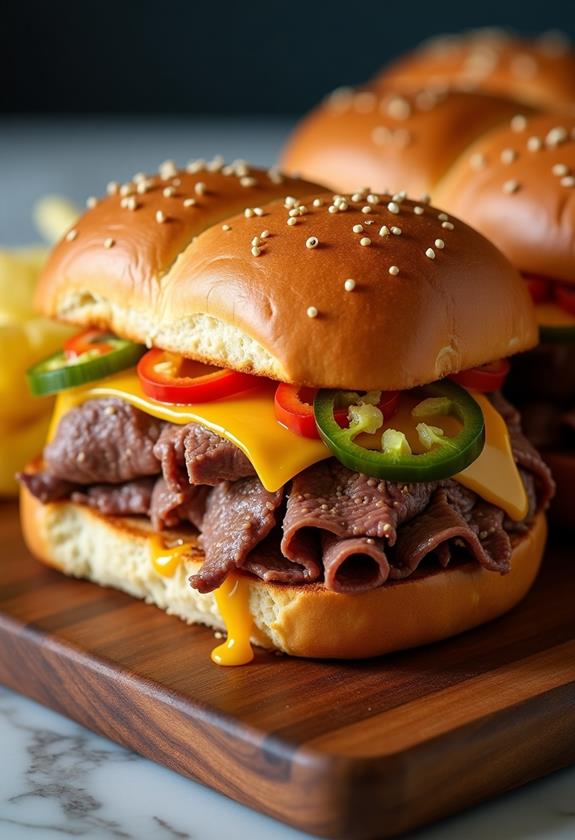
A Cheesy Hot Beef Sandwich is the ultimate comfort food creation that transforms simple ingredients into something extraordinary. Unlike cold deli sandwiches, this hot sandwich features seasoned ground beef cooked with onions and peppers, topped with melted cheese, and served on toasted bread or rolls.
The magic happens when all the components come together hot and fresh – the beef mixture stays juicy and flavorful, the cheese melts into every crevice, and the bread provides the perfect vehicle for this delicious combination. It’s essentially a cross between a Philly cheesesteak and a sloppy joe, but with its own unique character.
Ingredients List for Cheesy Hot Beef Sandwich
- 1 pound ground beef (80/20 lean-to-fat ratio)
- 4 large sandwich rolls or hoagie buns
- 2 tablespoons olive oil
- 1 large onion, sliced thin
- 1 green bell pepper, sliced thin
- 3 cloves garlic, minced
- 1 tablespoon Worcestershire sauce
- 1 teaspoon paprika
- 1 teaspoon onion powder
- ½ teaspoon black pepper
- 1 teaspoon salt
- 8 slices provolone cheese (or cheese of choice)
- 2 tablespoons butter, softened
- Optional: sliced mushrooms, jalapeños, or hot sauce
How to Cook Cheesy Hot Beef Sandwich: A Step-by-Step Guide
Creating the perfect Cheesy Hot Beef Sandwich is all about building layers of flavor and getting the timing right. Here’s my detailed approach to ensure every sandwich turns out perfectly:
1. Prepare Your Ingredients:
- Slice your onions and bell peppers into thin strips for even cooking.
- Mince the garlic and set aside.
- Have your cheese slices ready and at room temperature for better melting.
- Slice your rolls horizontally, leaving them attached at the hinge if possible.
2. Cook the Beef Mixture:
- Heat a large skillet over medium-high heat and add the ground beef.
- Break up the beef with a wooden spoon and cook until it’s browned and no longer pink, about 5-7 minutes.
- Drain excess fat, leaving about 1 tablespoon in the pan for flavor.
- Season the beef with salt, pepper, paprika, and onion powder while it’s still hot.
3. Sauté the Vegetables:
- Push the beef to one side of the skillet and add olive oil to the empty space.
- Add the sliced onions and bell peppers to the oil.
- Cook for 4-5 minutes until the vegetables start to soften and become fragrant.
- Add the minced garlic and cook for another 30 seconds until aromatic.
4. Combine and Season:
- Mix the beef and vegetables together in the skillet.
- Add Worcestershire sauce and stir well to distribute the flavors.
- Taste and adjust seasoning as needed.
- Let the mixture simmer for 2-3 minutes to allow flavors to meld.
5. Prepare the Bread:
- Preheat your oven’s broiler or use a toaster oven.
- Spread softened butter on the cut sides of your rolls.
- Toast the rolls lightly until they’re golden brown but still soft inside.
- This prevents the bread from getting soggy and adds texture.
6. Assemble the Sandwiches:
- Divide the beef mixture evenly among the bottom halves of the rolls.
- Top each portion with 2 slices of cheese, overlapping slightly.
- Place the sandwiches on a baking sheet and broil for 1-2 minutes until cheese melts.
- Top with the other half of the roll and serve immediately.
Substitutions and Variations
The beauty of this Cheesy Hot Beef Sandwich recipe lies in its versatility. Here are some substitutions and variations I’ve tried that work wonderfully:
- Meat Options: Ground turkey or chicken work well for a lighter version. For a vegetarian option, try crumbled firm tofu or plant-based ground meat.
- Cheese Varieties: While provolone is my favorite, American cheese, sharp cheddar, or Swiss all melt beautifully. For extra richness, try a combination of cheeses.
- Bread Choices: Hoagie rolls are classic, but try brioche buns for richness, ciabatta for rustic texture, or even Texas toast for extra heartiness.
- Vegetable Additions: Sautéed mushrooms add earthiness, while sliced jalapeños bring heat. Roasted red peppers offer sweetness and color.
- Sauce Upgrades: Add a tablespoon of tomato paste for depth, or stir in some cream cheese for extra richness.
Common Mistakes to Avoid
After making countless Cheesy Hot Beef Sandwiches, I’ve learned to avoid these common pitfalls:
- Overcooking the Beef: Ground beef can become dry and tough if cooked too long. Cook just until it loses its raw color.
- Skipping the Vegetable Sauté: Raw onions and peppers will release water and make your sandwich soggy. Always cook them until softened.
- Using Cold Cheese: Room temperature cheese melts more evenly and quickly than cold cheese from the refrigerator.
- Soggy Bread: Not toasting the bread or adding wet ingredients to untoasted bread will result in a messy, soggy sandwich.
- Overfilling: While it’s tempting to pile on the filling, overfilled sandwiches fall apart and are difficult to eat.
How to Serve Cheesy Hot Beef Sandwich
I love serving these sandwiches as the centerpiece of a casual meal. They pair beautifully with crispy french fries or sweet potato fries for a classic combination. A simple coleslaw provides a cool, crunchy contrast to the hot, rich sandwich.
For a healthier option, serve alongside a fresh green salad with vinaigrette or some pickled vegetables to cut through the richness. The sandwiches are substantial enough to be the main event, but light sides help balance the meal.
Presentation Ideas for Cheesy Hot Beef Sandwich
Even casual comfort food can look appealing with a little attention to presentation:
- Cut Diagonally: Slice each sandwich diagonally to show off the melted cheese and colorful filling.
- Skewer Method: Use decorative toothpicks to hold the sandwich halves together and prevent them from falling apart.
- Garnish Simply: A sprinkle of fresh chopped parsley or a pickle spear on the side adds color and freshness.
- Serve on Parchment: Wrapping each sandwich in parchment paper makes them easier to handle and adds a casual, deli-style appeal.
Cheesy Hot Beef Sandwich Recipe Tips
Here are my top tips for sandwich success every time:
- Quality Beef Matters: Choose ground beef with some fat content (80/20) for the most flavor and juiciness.
- Season While Hot: Add your spices to the hot beef for better flavor absorption.
- Don’t Rush the Vegetables: Properly sautéed onions and peppers make all the difference in flavor development.
- Control the Heat: Medium heat prevents burning while ensuring everything cooks evenly.
- Taste as You Go: Adjust seasonings throughout the cooking process to build the best flavor profile.
- Serve Immediately: These sandwiches are best enjoyed hot when the cheese is still melty.
How to Store Cheesy Hot Beef Sandwich
While these sandwiches are definitely best enjoyed fresh and hot, you can store components separately for meal prep. Allow the beef mixture to cool completely before transferring to an airtight container in the refrigerator for up to 3 days.
To reheat, warm the beef mixture in a skillet over medium heat until heated through. Toast fresh bread and add cheese, then broil until melted. Never store assembled sandwiches as the bread will become soggy.
For longer storage, the beef mixture can be frozen for up to 3 months. Thaw overnight in the refrigerator before reheating.
Frequently Asked Questions (FAQs)
Q: Can I make the beef mixture ahead of time?
A: Absolutely! The beef mixture actually tastes better the next day as the flavors have time to develop. Store it in the refrigerator and reheat when ready to serve.
Q: What’s the best cheese for melting?
A: Provolone, American, and mild cheddar all melt beautifully. Avoid harder cheeses like sharp cheddar or aged cheeses as they don’t melt as smoothly.
Q: Can I use lean ground beef?
A: While you can use leaner beef, the 80/20 ratio provides the best flavor and juiciness. If using lean beef, add a bit more oil to prevent dryness.
Q: How do I prevent soggy sandwiches?
A: Always toast your bread, drain excess fat from the beef, and serve immediately after assembling.
Q: Can I make these in a slow cooker?
A: Yes! Brown the beef first, then combine all ingredients except cheese in a slow cooker. Cook on low for 2-3 hours, then serve on toasted rolls with cheese.
Q: What sides go best with these sandwiches?
A: Classic choices include french fries, onion rings, coleslaw, or a simple green salad. Pickles also make a great tangy contrast.
Conclusion
The Cheesy Hot Beef Sandwich represents everything I love about comfort food – it’s hearty, satisfying, and made with simple ingredients that come together to create something truly special. This recipe has become a family favorite in my kitchen, and I’m confident it will become one in yours too.
The key to success lies in not rushing the process and paying attention to each component. When you take the time to properly season the beef, sauté the vegetables until they’re perfectly tender, and choose quality cheese that melts beautifully, you’ll be rewarded with a sandwich that’s restaurant-quality but made in your own kitchen.
Whether you’re cooking for a busy weeknight dinner, a casual weekend lunch, or feeding a crowd, this recipe scales easily and always delivers satisfying results. The versatility of the recipe means you can adapt it to your family’s preferences and dietary needs while still maintaining that perfect balance of flavors and textures that makes this sandwich so special.
Give this recipe a try, and I guarantee you’ll have a new go-to meal that everyone will request again and again. Happy cooking!