Chocolate Covered Banana Pudding Cups Recipe
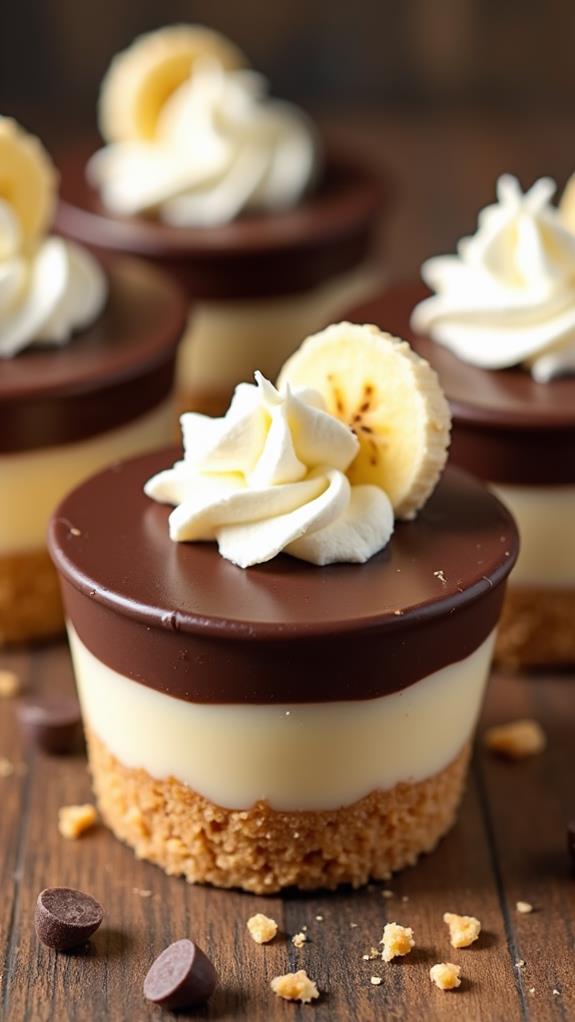
Craving a dessert that perfectly balances creamy indulgence with fresh, fruity sweetness? These Chocolate Covered Banana Pudding Cups are exactly what you need. This delightful treat layers silky vanilla pudding with fresh banana slices and rich chocolate ganache, creating individual portions of pure bliss.
I’ve perfected this recipe to deliver restaurant-quality results using simple ingredients you likely already have in your kitchen. Each spoonful offers the perfect combination of textures and flavors that will have everyone asking for the recipe!
What are Chocolate Covered Banana Pudding Cups?
Chocolate Covered Banana Pudding Cups are individual dessert portions that combine the classic flavors of banana pudding with a luxurious chocolate topping. These elegant treats feature layers of creamy vanilla pudding, fresh banana slices, optional vanilla wafers for crunch, and a glossy chocolate ganache crown.
The beauty of this dessert lies in its versatility and presentation. Served in clear glasses or cups, each layer is visible, creating an impressive visual appeal that’s perfect for dinner parties, special occasions, or simply when you want to treat yourself to something extraordinary.
Ingredients List for Chocolate Covered Banana Pudding Cups
For the Vanilla Pudding:
- 2 cups whole milk
- ½ cup granulated sugar
- 3 large egg yolks
- 3 tablespoons cornstarch
- 2 tablespoons butter
- 1 teaspoon vanilla extract
- Pinch of salt
For the Chocolate Ganache:
- 6 oz dark chocolate, finely chopped
- ½ cup heavy cream
- 1 tablespoon butter
- 1 tablespoon honey (optional)
For Assembly:
- 3-4 ripe bananas, sliced
- 1 cup vanilla wafers, crushed (optional)
- 2 tablespoons lemon juice
- Whipped cream for garnish
- Chocolate shavings for decoration
How to Make Chocolate Covered Banana Pudding Cups: A Step-by-Step Guide
Creating these stunning dessert cups involves several simple steps that come together beautifully. Here’s my detailed guide to ensure perfect results every time:
1. Prepare the Vanilla Pudding:
- In a medium saucepan, heat 1½ cups of milk over medium heat until it begins to steam.
- In a separate bowl, whisk together egg yolks, sugar, cornstarch, and salt until smooth and pale.
- Slowly pour the remaining ½ cup cold milk into the egg mixture, whisking constantly to prevent lumps.
- Once the milk in the saucepan is hot, gradually add about ½ cup to the egg mixture, whisking vigorously.
- Pour the tempered egg mixture back into the saucepan with the remaining hot milk.
2. Cook the Pudding:
- Continue cooking over medium heat, whisking constantly, until the mixture thickens and coats the back of a spoon.
- This usually takes 3-5 minutes after the mixture begins to bubble.
- Remove from heat and immediately whisk in butter and vanilla extract.
- Press plastic wrap directly onto the surface of the pudding to prevent a skin from forming.
- Refrigerate for at least 2 hours or until completely chilled.
3. Make the Chocolate Ganache:
- Place chopped chocolate in a heatproof bowl.
- Heat heavy cream in a small saucepan until it just begins to simmer.
- Pour the hot cream over the chocolate and let sit for 2 minutes.
- Gently stir from the center outward until the chocolate is completely melted and smooth.
- Whisk in butter and honey if using for extra shine and sweetness.
- Let cool to room temperature, stirring occasionally.
4. Prepare the Bananas:
- Slice bananas into ¼-inch rounds just before assembling.
- Toss banana slices gently with lemon juice to prevent browning.
- This step is crucial for maintaining the bananas’ fresh appearance and preventing oxidation.
5. Assemble the Pudding Cups:
- Start with a layer of crushed vanilla wafers in the bottom of each cup (if using).
- Add a layer of chilled vanilla pudding, filling about one-third of the cup.
- Arrange banana slices over the pudding layer, pressing gently against the sides for visual appeal.
- Add another layer of pudding, followed by more banana slices.
- Top with a final layer of pudding, leaving space for the chocolate ganache.
6. Add the Chocolate Topping:
- Spoon the cooled chocolate ganache over the top pudding layer.
- Use the back of a spoon to create a smooth, even surface.
- Refrigerate the assembled cups for at least 30 minutes to set the ganache.
7. Final Touches:
- Just before serving, add a dollop of whipped cream and chocolate shavings.
- Serve immediately for the best texture and presentation.
Substitutions and Variations
I love how adaptable this recipe is to different dietary needs and preferences. Here are some variations you can try:
- Pudding Base: Use instant pudding mix for a quicker version, or try chocolate pudding for a double-chocolate experience.
- Milk Options: Substitute with coconut milk or almond milk for dairy-free versions, though the texture may be slightly different.
- Chocolate: White chocolate or milk chocolate can replace dark chocolate for a sweeter ganache.
- Banana Alternatives: Try sliced strawberries, raspberries, or even caramelized pears for different fruit flavors.
- Crunch Factor: Replace vanilla wafers with graham crackers, ladyfingers, or crushed cookies of your choice.
- Healthier Version: Use sugar-free pudding mix and dark chocolate with higher cocoa content for a lighter option.
Common Mistakes to Avoid
Through my experience making these pudding cups, I’ve learned to avoid these common pitfalls:
- Lumpy Pudding: Always whisk egg yolks thoroughly and temper them slowly with hot milk to prevent curdling.
- Overcooked Pudding: Remove from heat as soon as the mixture thickens to avoid a grainy texture.
- Broken Ganache: Ensure the cream isn’t too hot when pouring over chocolate, and stir gently to maintain smoothness.
- Brown Bananas: Always toss banana slices with lemon juice and assemble just before serving.
- Runny Ganache: Allow the ganache to cool to room temperature before using, or it will sink into the pudding.
How to Serve Chocolate Covered Banana Pudding Cups
These elegant dessert cups are perfect for entertaining and can be served in various ways. I recommend presenting them in clear glass cups or mason jars to showcase the beautiful layers. They’re ideal as individual portions for dinner parties, special celebrations, or romantic dinners.
For a more casual presentation, you can serve them in regular bowls with the same layering technique. The key is ensuring each person gets all the components in every spoonful – the creamy pudding, fresh bananas, optional wafer crunch, and rich chocolate topping.
Presentation Ideas for Chocolate Covered Banana Pudding Cups
To make your pudding cups truly spectacular, consider these presentation ideas:
- Garnish Variety: Top with fresh mint leaves, a sprinkle of cinnamon, or crushed nuts for added visual appeal and flavor.
- Chocolate Drizzle: Create artistic drizzles down the sides of clear cups using melted chocolate in a squeeze bottle.
- Layered Aesthetics: Use a piping bag to create neat, defined layers of pudding for a professional bakery look.
- Seasonal Touches: Add themed decorations like chocolate hearts for Valentine’s Day or colorful sprinkles for birthdays.
Chocolate Covered Banana Pudding Cups Recipe Tips
Here are my top tips for achieving perfect results every time:
- Temperature Control: Ensure all components are properly chilled before assembly for the best texture contrast.
- Quality Ingredients: Use real vanilla extract and high-quality chocolate for superior flavor.
- Make-Ahead Strategy: Prepare pudding and ganache up to two days in advance, but assemble cups no more than 4 hours before serving.
- Serving Size: These rich desserts are quite satisfying – smaller portions in shot glasses work well for large gatherings.
- Storage: Keep assembled cups covered in the refrigerator and consume within 24 hours for best quality.
How to Store Chocolate Covered Banana Pudding Cups
Proper storage is essential for maintaining the quality and safety of your pudding cups. Store assembled desserts covered in the refrigerator for up to 24 hours. The pudding and ganache can be made separately and stored for up to 3 days before assembly.
Cover individual cups with plastic wrap, ensuring the wrap doesn’t touch the chocolate surface to prevent it from sticking. For longer storage, keep components separate and assemble fresh cups as needed.
Frequently Asked Questions (FAQs)
Q: Can I make these pudding cups ahead of time?
A: Yes! You can prepare the pudding and ganache up to 2 days in advance. However, assemble the cups no more than 4 hours before serving to prevent the bananas from browning and the wafers from becoming soggy.
Q: Can I use instant pudding instead of homemade?
A: Absolutely! Instant vanilla pudding is a great time-saver. Prepare according to package directions and let it set completely before using in the recipe.
Q: How do I prevent the bananas from turning brown?
A: Toss banana slices with lemon juice immediately after cutting. The acid helps prevent oxidation. Also, assemble the cups as close to serving time as possible.
Q: Can I freeze these dessert cups?
A: I don’t recommend freezing assembled cups as the texture of the pudding and bananas will change significantly. However, you can freeze the vanilla pudding base for up to 1 month.
Q: What if my ganache is too thick?
A: Gently warm the ganache and add a tablespoon of warm cream at a time until you reach the desired consistency. Stir gently to maintain smoothness.
Q: Can I make this dairy-free?
A: Yes! Use coconut milk for the pudding and coconut cream for the ganache. The texture will be slightly different but still delicious.
Conclusion
These Chocolate Covered Banana Pudding Cups represent the perfect harmony of flavors and textures that make dessert truly special. I’ve found that they never fail to impress guests while remaining surprisingly simple to prepare with basic ingredients and techniques.
The combination of creamy vanilla pudding, fresh bananas, and rich chocolate ganache creates a dessert that’s both nostalgic and elegant. Whether you’re preparing them for a special occasion or simply treating yourself to something wonderful, these individual portions offer the perfect balance of indulgence and sophistication.
Remember to take your time with each component, especially the pudding and ganache, as these form the foundation of your dessert’s success. With proper preparation and attention to detail, you’ll create beautiful, restaurant-quality desserts that will have everyone asking for your secret. Happy cooking, and enjoy every spoonful of these delightful pudding cups!