Chocolate Peanut Butter Banana Cream Trifle Recipe
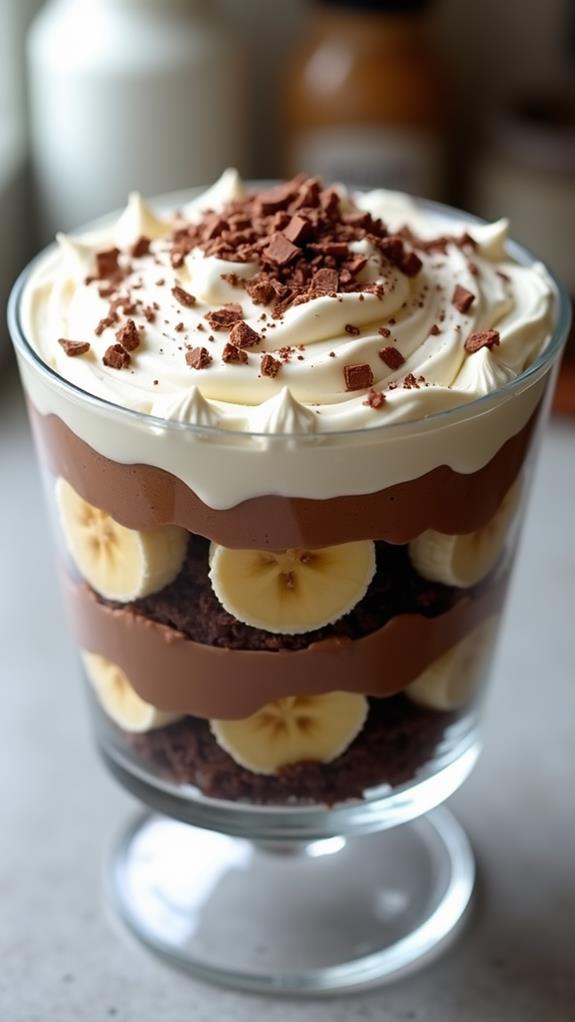
There’s something magical about the combination of chocolate, peanut butter, and banana that never fails to create dessert perfection. This Chocolate Peanut Butter Banana Cream Trifle brings together these beloved flavors in a stunning layered dessert that’s as beautiful as it is delicious.
Perfect for special occasions or when you want to treat your family to something extraordinary, this trifle combines rich chocolate cake, creamy peanut butter mousse, fresh bananas, and fluffy whipped cream. The best part? It’s surprisingly simple to make and can be prepared ahead of time, making it ideal for entertaining.
What is a Chocolate Peanut Butter Banana Cream Trifle?
A trifle is a traditional layered dessert that showcases different textures and flavors in beautiful, transparent layers. This particular version features moist chocolate cake as the base, complemented by a luscious peanut butter cream, fresh banana slices, and topped with billowy whipped cream.
The beauty of a trifle lies not only in its impressive presentation but also in how the flavors meld together as it sits, creating a harmonious dessert that’s greater than the sum of its parts.
Ingredients List for Chocolate Peanut Butter Banana Cream Trifle
For the Chocolate Cake Layer:
- 1 box chocolate cake mix (or homemade equivalent)
- 3 large eggs
- 1/3 cup vegetable oil
- 1¼ cups water
For the Peanut Butter Cream:
- 1 cup creamy peanut butter
- 8 oz cream cheese, softened
- 1 cup powdered sugar
- 1 teaspoon vanilla extract
- 1½ cups heavy whipping cream
For Assembly:
- 4-5 ripe bananas, sliced
- 2 cups heavy whipping cream
- ¼ cup powdered sugar
- 1 teaspoon vanilla extract
- ½ cup chocolate chips or shavings for garnish
- ¼ cup chopped peanuts (optional)
How to Make Chocolate Peanut Butter Banana Cream Trifle: A Step-by-Step Guide
Creating this show-stopping trifle involves several components, but each step is straightforward and manageable. Here’s how I approach making this delicious dessert:
1. Prepare the Chocolate Cake:
- Preheat your oven according to the cake mix package directions (usually 350°F).
- In a large mixing bowl, combine the cake mix, eggs, vegetable oil, and water.
- Mix until well combined and smooth, following package instructions.
- Pour into a greased 9×13 inch pan and bake according to package directions.
- Allow the cake to cool completely before cutting into cubes.
2. Make the Peanut Butter Cream:
- In a large bowl, beat the softened cream cheese until smooth and fluffy.
- Add the peanut butter and mix until well combined.
- Gradually add the powdered sugar and vanilla extract, beating until smooth.
- In a separate bowl, whip the heavy cream to stiff peaks.
- Gently fold the whipped cream into the peanut butter mixture until just combined.
- Be careful not to overmix, as this can deflate the cream.
3. Prepare the Whipped Cream Topping:
- In a clean bowl, whip the heavy cream until it begins to thicken.
- Add the powdered sugar and vanilla extract.
- Continue whipping until stiff peaks form.
- Set aside in the refrigerator until ready to use.
4. Slice the Bananas:
- Just before assembly, slice the bananas into rounds about ¼ inch thick.
- To prevent browning, you can lightly brush with lemon juice if desired.
5. Assemble the Trifle:
- Cut the cooled chocolate cake into 1-inch cubes.
- In your trifle bowl or large glass bowl, start with a layer of cake cubes covering the bottom.
- Add a layer of peanut butter cream, spreading it evenly over the cake.
- Arrange a layer of banana slices over the cream.
- Repeat the layers: cake, peanut butter cream, bananas.
- Top with the prepared whipped cream.
- Garnish with chocolate chips and chopped peanuts if using.
Substitutions and Variations
This versatile trifle recipe can be adapted to suit different tastes and dietary needs:
- Cake: Use a homemade chocolate cake, brownies, or even chocolate sandwich cookies crushed up for a different texture.
- Peanut Butter: Substitute with almond butter, sunflower seed butter, or Nutella for different flavor profiles.
- Bananas: Try strawberries, raspberries, or even sliced peaches for a seasonal variation.
- Cream Cheese: For a lighter version, use reduced-fat cream cheese or substitute half with Greek yogurt.
- Heavy Cream: You can use whipped topping from a container if you prefer convenience over homemade.
Common Mistakes to Avoid
When making this trifle, here are some pitfalls I’ve learned to avoid:
- Using Warm Cake: Always ensure your cake is completely cool before assembly, or it will melt the cream layers.
- Overmixing the Peanut Butter Cream: Fold gently to maintain the light, airy texture.
- Slicing Bananas Too Early: Cut bananas just before assembly to prevent browning and maintain freshness.
- Skipping the Chill Time: Allow the trifle to chill for at least 2 hours before serving for the best flavor development.
- Using Overripe Bananas: While perfect for banana bread, overripe bananas can become mushy in a trifle.
How to Serve Chocolate Peanut Butter Banana Cream Trifle
This impressive dessert serves beautifully as the centerpiece of any dinner party or celebration. I like to serve it in individual glass cups or bowls to showcase the beautiful layers, though a large trifle bowl creates a stunning presentation for larger gatherings.
Serve chilled, and consider providing both large spoons and dessert spoons so guests can enjoy every layer. The trifle pairs wonderfully with a cup of coffee or a glass of cold milk.
Presentation Ideas for Chocolate Peanut Butter Banana Cream Trifle
To make your trifle even more visually appealing, consider these presentation tips:
- Individual Servings: Layer the trifle in clear glass jars or individual trifle bowls for elegant single servings.
- Garnish Artfully: Create patterns with chocolate shavings, drizzle melted peanut butter on top, or dust with cocoa powder.
- Add Height: Use a pedestal cake stand to elevate your trifle bowl and make it a true centerpiece.
- Color Contrast: The natural colors of chocolate, cream, and banana create beautiful contrast, but you can add a mint leaf for a pop of green.
Chocolate Peanut Butter Banana Cream Trifle Recipe Tips
Here are my best tips for trifle success:
- Make It Ahead: This dessert actually improves with time. Assemble it the day before serving for the best flavor melding.
- Layer Evenly: Use a large spoon to spread each layer evenly, ensuring every serving has all the components.
- Don’t Overfill: Leave some space at the top of your bowl for the whipped cream and garnishes.
- Quality Ingredients: Use good-quality peanut butter and real vanilla extract for the best flavor.
- Temperature Matters: Keep all dairy components well-chilled throughout the preparation process.
How to Store Chocolate Peanut Butter Banana Cream Trifle
This trifle is best stored covered in the refrigerator and should be consumed within 2-3 days of assembly. The bananas will naturally soften over time, but this actually enhances the overall texture and flavor of the dessert.
Cover the trifle tightly with plastic wrap, ensuring the wrap doesn’t touch the whipped cream surface. If you’ve made individual servings, cover each one individually.
Unfortunately, trifles don’t freeze well due to the fresh fruit and dairy components, so plan to enjoy it fresh.
Frequently Asked Questions (FAQs)
Q: Can I make this trifle without peanut butter due to allergies?
A: Absolutely! Substitute the peanut butter with sunflower seed butter, almond butter, or even a chocolate mousse for a double chocolate version.
Q: How far in advance can I make this trifle?
A: You can assemble this trifle up to 24 hours in advance. In fact, it tastes even better after the flavors have had time to meld together.
Q: Can I use store-bought cake instead of making my own?
A: Yes! You can use store-bought chocolate cake, pound cake, or even chocolate muffins. Just ensure they’re fresh and cut them into appropriate-sized pieces.
Q: What size trifle bowl should I use?
A: A 3-4 quart trifle bowl works perfectly for this recipe. If you don’t have a trifle bowl, any large, clear glass bowl will work beautifully.
Q: Can I make this dairy-free?
A: Yes, with some substitutions. Use dairy-free cream cheese, coconut whipped cream, and ensure your chocolate cake is made with dairy-free ingredients.
Q: Why do my bananas turn brown?
A: Bananas naturally oxidize when exposed to air. To minimize browning, slice them just before assembly and consider brushing lightly with lemon juice.
Conclusion
This Chocolate Peanut Butter Banana Cream Trifle represents everything I love about dessert making – it’s impressive enough for special occasions yet simple enough for a weekend family treat. The combination of textures and flavors creates a dessert that’s both nostalgic and sophisticated.
The beauty of this recipe lies in its flexibility. You can adapt it to suit dietary restrictions, seasonal fruit availability, or personal preferences. Whether you’re hosting a dinner party, celebrating a birthday, or simply wanting to create something special for your loved ones, this trifle delivers on both taste and visual impact.
Take your time with each layer, use quality ingredients, and don’t be afraid to make it your own. The result will be a dessert that not only looks stunning but tastes absolutely divine. Each spoonful delivers the perfect balance of rich chocolate, creamy peanut butter, and fresh banana – a combination that never fails to delight. Happy cooking!

