Classic Peanut Butter Blossoms Recipe
Nothing says comfort and nostalgia quite like the perfect peanut butter blossom cookie. These delightful treats combine the rich, nutty flavor of peanut butter with the sweet surprise of chocolate in every bite.
I’ve perfected this classic recipe over the years, and I’m excited to share it with you. These cookies are incredibly easy to make with simple pantry ingredients, making them perfect for holiday baking, family gatherings, or whenever you’re craving something sweet and satisfying.
What are “Classic Peanut Butter Blossoms”?
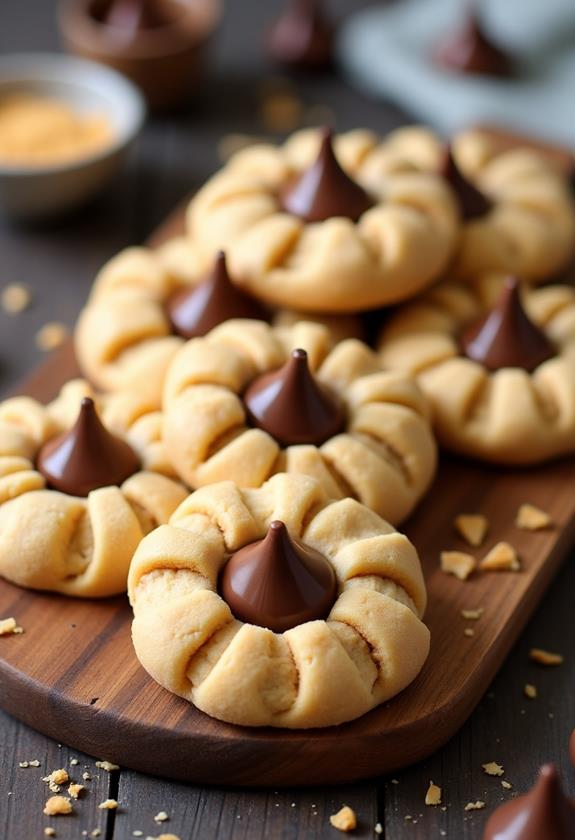
Classic Peanut Butter Blossoms are beloved American cookies that have been gracing cookie jars and holiday platters for decades. These soft, chewy peanut butter cookies are rolled in granulated sugar before baking, creating a beautiful sparkly exterior.
The defining feature of these cookies is the chocolate kiss pressed into the center while they’re still warm from the oven. This creates the signature “blossom” appearance that gives these cookies their charming name. The contrast between the warm peanut butter cookie and the smooth chocolate center makes every bite absolutely irresistible.
These cookies first gained popularity in the 1950s and have remained a staple in American baking ever since. They’re particularly popular during the holiday season but are delicious year-round.
Ingredients List for Classic Peanut Butter Blossoms
- 1¾ cups all-purpose flour
- 1 teaspoon baking soda
- 1 teaspoon salt
- ½ cup butter, softened
- ½ cup creamy peanut butter
- ½ cup granulated sugar (plus extra for rolling)
- ½ cup packed light brown sugar
- 1 large egg
- 1 tablespoon milk
- 1 teaspoon vanilla extract
- 48 chocolate kisses (unwrapped)
How to Make Classic Peanut Butter Blossoms: A Step-by-Step Guide
Making perfect Peanut Butter Blossoms is easier than you might think. I’ll walk you through each step to ensure your cookies turn out soft, chewy, and absolutely delicious every time.
1. Prepare Your Workspace:
- Preheat your oven to 375°F (190°C).
- Line two large baking sheets with parchment paper or silicone baking mats.
- Unwrap all the chocolate kisses and set them aside – this is crucial as you’ll need to work quickly when the cookies come out of the oven.
2. Mix the Dry Ingredients:
- In a medium bowl, whisk together the flour, baking soda, and salt.
- Set this mixture aside – we’ll add it to the wet ingredients later.
- This step ensures even distribution of the leavening agents throughout the flour.
3. Cream the Butter and Peanut Butter:
- In a large mixing bowl, use an electric mixer to cream together the softened butter and peanut butter until light and fluffy.
- This usually takes about 2-3 minutes on medium speed.
- Proper creaming creates the perfect texture for your cookies.
4. Add the Sugars:
- Beat in both the granulated sugar and brown sugar until well combined.
- The mixture should be smooth and creamy, taking another 2-3 minutes.
- The brown sugar adds moisture and chewiness to the final cookies.
5. Incorporate Wet Ingredients:
- Beat in the egg, milk, and vanilla extract until fully combined.
- Make sure to scrape down the sides of the bowl to ensure everything is well mixed.
- The dough should be smooth and cohesive at this point.
6. Add the Flour Mixture:
- Gradually mix in the flour mixture on low speed until just combined.
- Don’t overmix – this can make your cookies tough instead of tender.
- The dough should hold together but not be sticky.
7. Shape and Roll the Cookies:
- Roll the dough into 1-inch balls using your hands or a cookie scoop.
- Roll each ball in granulated sugar until completely coated.
- Place the sugar-coated balls on your prepared baking sheets, spacing them about 2 inches apart.
8. Bake to Perfection:
- Bake for 8-10 minutes, or until the edges are lightly golden.
- The centers should still look slightly soft – they’ll continue cooking on the hot pan.
- Remove from the oven and immediately press a chocolate kiss into the center of each cookie.
9. Cool and Set:
- Allow cookies to cool on the baking sheet for 5 minutes before transferring to a wire rack.
- This helps the chocolate kisses set without sliding off.
- Let cool completely before storing or serving.
Substitutions and Variations
I love how versatile this recipe is! Here are some substitutions and variations you can try to customize your Peanut Butter Blossoms:
- Peanut Butter: Crunchy peanut butter works wonderfully if you prefer texture in your cookies. Natural peanut butter can be used but may affect the texture slightly.
- Chocolate Centers: Try different flavored kisses like caramel, dark chocolate, or even peppermint during the holidays.
- Sugar Coating: Roll in cinnamon sugar or colored sugar for festive variations.
- Flour Alternative: For gluten-free cookies, substitute with a 1:1 gluten-free flour blend.
- Butter Substitute: Vegetable shortening can replace butter for a slightly different texture.
- Add-ins: Mix in mini chocolate chips or chopped peanuts for extra flavor and texture.
Common Mistakes to Avoid
Through years of making these cookies, I’ve learned to avoid these common pitfalls that can affect your results:
- Using Cold Ingredients: Make sure your butter and egg are at room temperature for proper mixing and texture.
- Overbaking: These cookies continue to cook on the hot pan, so slightly underbaking is better than overbaking.
- Forgetting to Unwrap Kisses: Always unwrap your chocolate kisses before you start baking – you’ll need to work quickly when the cookies are hot.
- Pressing Kisses Too Hard: Gently press the chocolate kisses to avoid cracking the cookies.
- Skipping the Sugar Roll: The sugar coating isn’t just for looks – it adds sweetness and creates that beautiful sparkly appearance.
How to Serve Classic Peanut Butter Blossoms
These delightful cookies are perfect for numerous occasions and pair beautifully with various beverages. Serve them alongside a tall glass of cold milk for the ultimate comfort food experience. They’re also wonderful with hot coffee or tea, making them ideal for afternoon gatherings.
For special occasions, arrange them on a decorative platter with other holiday cookies. They make excellent additions to cookie exchanges, bake sales, or as homemade gifts. The beautiful appearance of these cookies makes them naturally elegant for any dessert table.
Presentation Ideas for Classic Peanut Butter Blossoms
Making your Peanut Butter Blossoms look as good as they taste is easy with these presentation ideas:
- Holiday Arrangement: Arrange cookies on a festive platter with seasonal decorations like pine sprigs or holiday ribbon.
- Gift Packaging: Layer cookies in decorative tins or clear containers tied with colorful ribbons for perfect homemade gifts.
- Dessert Table Display: Use tiered serving stands to create height and visual interest when displaying multiple dozens.
- Individual Wrapping: Wrap each cookie in clear cellophane bags tied with ribbon for party favors or bake sale items.
Classic Peanut Butter Blossoms Recipe Tips
Here are my tried-and-true tips for achieving perfect Peanut Butter Blossoms every time:
- Measure Accurately: Baking is a science, so use proper measuring techniques for consistent results.
- Room Temperature Ingredients: This ensures proper mixing and the best texture in your finished cookies.
- Don’t Overbake: The cookies should look slightly underdone when you remove them from the oven.
- Work Quickly with Kisses: Have your chocolate kisses ready and press them in immediately after removing cookies from the oven.
- Uniform Size: Use a cookie scoop for consistently sized cookies that bake evenly.
- Quality Ingredients: Use good-quality peanut butter and fresh chocolate kisses for the best flavor.
How to Store Classic Peanut Butter Blossoms
Proper storage keeps your Peanut Butter Blossoms fresh and delicious for days. Allow cookies to cool completely before storing. Place them in an airtight container, separating layers with parchment paper to prevent the chocolate from sticking.
Store at room temperature for up to one week. For longer storage, freeze the cookies in a freezer-safe container for up to three months. Thaw at room temperature before serving.
The dough can also be prepared ahead of time and refrigerated for up to three days or frozen for up to three months. If freezing dough, shape into balls first, then freeze on a baking sheet before transferring to freezer bags.
Frequently Asked Questions (FAQs)
Q: Can I make these cookies without chocolate kisses?
A: Absolutely! You can press a chocolate chip or small piece of chocolate into the center instead, or simply enjoy them as plain peanut butter cookies.
Q: Why did my cookies spread too much during baking?
A: This usually happens when the butter is too warm or the dough is too soft. Chill the dough for 30 minutes before baking if this occurs.
Q: Can I use natural peanut butter?
A: Yes, but the texture may be slightly different. Make sure to stir the natural peanut butter well before measuring.
Q: How do I prevent the chocolate kisses from sliding off?
A: Press them in immediately when the cookies come out of the oven while they’re still hot and soft. Let them cool on the pan to set.
Q: Can I make these cookies smaller or larger?
A: Yes! Adjust the baking time accordingly – smaller cookies will bake faster, while larger ones need more time.
Q: What’s the best way to soften butter quickly?
A: Cut cold butter into small pieces and let it sit at room temperature for 15-20 minutes, or microwave for 10-15 seconds.
Conclusion
Classic Peanut Butter Blossoms are truly one of those timeless recipes that never goes out of style. The combination of rich peanut butter, sweet sugar coating, and smooth chocolate creates a cookie that’s both nostalgic and irresistibly delicious.
Whether you’re baking for the holidays, a special occasion, or just because you’re craving something sweet, these cookies are guaranteed to bring smiles to faces young and old. The simple ingredients and straightforward technique make them accessible for bakers of all skill levels, while the beautiful presentation makes them worthy of any special gathering.
I hope this recipe becomes a cherished part of your baking repertoire, just as it has been in mine. There’s something truly magical about the moment you press that chocolate kiss into the warm cookie – it’s a small act that creates big joy. Happy baking, and enjoy every delicious bite of these classic treats!