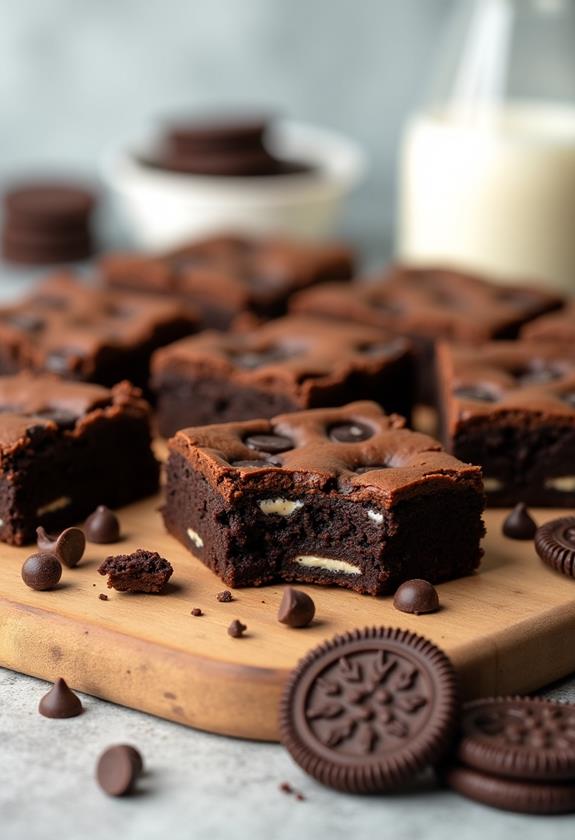
Cookies And Cream Brownies Recipe
There’s something magical about combining two beloved desserts into one irresistible treat. These Cookies and Cream Brownies take the fudgy richness of classic brownies and elevate them with chunks of chocolate sandwich cookies throughout.
I’ve perfected this recipe to deliver the ultimate indulgence – brownies that are perfectly chewy, loaded with cookie pieces, and topped with a creamy frosting that mimics your favorite cookies and cream flavor. Get ready to create a dessert that will have everyone asking for seconds!
What are Cookies and Cream Brownies?
Cookies and Cream Brownies are a decadent twist on traditional brownies that incorporate crushed chocolate sandwich cookies (like Oreos) directly into the brownie batter. The result is a rich, fudgy brownie with delightful chunks of cookies throughout, creating a perfect marriage of textures and flavors.
These brownies often feature a cookies and cream frosting on top, made with cream cheese, butter, and more crushed cookies. The combination creates a dessert that’s reminiscent of cookies and cream ice cream but in brownie form – absolutely irresistible for anyone with a sweet tooth.
Ingredients List for Cookies and Cream Brownies
For the Brownies:
- 1 cup unsalted butter
- 8 oz semi-sweet chocolate, chopped
- 1½ cups granulated sugar
- 4 large eggs
- 1 teaspoon vanilla extract
- 1 cup all-purpose flour
- ¼ cup unsweetened cocoa powder
- ½ teaspoon salt
- 20 chocolate sandwich cookies (like Oreos), roughly chopped
For the Cookies and Cream Frosting:
- 8 oz cream cheese, softened
- ½ cup unsalted butter, softened
- 3 cups powdered sugar
- 1 teaspoon vanilla extract
- 10 chocolate sandwich cookies, crushed
- 2-3 tablespoons heavy cream (if needed)
How to Make Cookies and Cream Brownies: A Step-by-Step Guide
Creating these indulgent brownies requires attention to detail and proper technique. Here’s my comprehensive guide to ensure your brownies turn out perfectly every time:
1. Prepare Your Pan and Oven:
- Preheat your oven to 350°F (175°C).
- Line a 9×13 inch baking pan with parchment paper, leaving some overhang for easy removal.
- Lightly grease the parchment paper with butter or cooking spray.
2. Melt the Chocolate and Butter:
- In a large microwave-safe bowl, combine the chopped chocolate and butter.
- Microwave in 30-second intervals, stirring between each interval, until completely melted and smooth.
- Alternatively, you can melt them together in a double boiler over simmering water.
- Set aside to cool slightly.
3. Mix the Wet Ingredients:
- Add the granulated sugar to the melted chocolate mixture and whisk until combined.
- Beat in the eggs one at a time, ensuring each is fully incorporated before adding the next.
- Stir in the vanilla extract until the mixture is smooth and glossy.
4. Combine the Dry Ingredients:
- In a separate bowl, whisk together the flour, cocoa powder, and salt.
- Gradually fold the dry ingredients into the chocolate mixture using a spatula.
- Mix just until combined – don’t overmix, as this can make the brownies tough.
5. Add the Cookie Pieces:
- Gently fold the chopped chocolate sandwich cookies into the brownie batter.
- Make sure the cookies are evenly distributed throughout the mixture.
- Reserve a few cookie pieces for sprinkling on top if desired.
6. Bake the Brownies:
- Pour the batter into your prepared pan and spread it evenly.
- Bake for 25-30 minutes, or until a toothpick inserted in the center comes out with a few moist crumbs.
- Don’t overbake – the brownies will continue to cook slightly as they cool.
- Allow to cool completely in the pan before frosting.
7. Make the Cookies and Cream Frosting:
- Beat the softened cream cheese and butter together until light and fluffy.
- Gradually add the powdered sugar, beating until smooth.
- Mix in the vanilla extract and crushed cookies.
- If the frosting is too thick, add heavy cream one tablespoon at a time until you reach the desired consistency.
8. Frost and Serve:
- Spread the frosting evenly over the cooled brownies.
- Sprinkle additional crushed cookies on top for decoration.
- Cut into squares and serve.
Substitutions and Variations
I love experimenting with this recipe, and here are some substitutions and variations you can try:
- Cookie Types: Instead of chocolate sandwich cookies, try vanilla sandwich cookies, peanut butter sandwich cookies, or even chocolate chip cookies.
- Chocolate: Substitute semi-sweet chocolate with dark chocolate for a more intense flavor, or use milk chocolate for a sweeter taste.
- Nuts: Add ½ cup of chopped walnuts or pecans along with the cookies for extra texture.
- Frosting Alternatives: Skip the cream cheese frosting and dust with powdered sugar, or drizzle with melted chocolate.
- Mini Version: Use a mini muffin tin to create individual brownie bites – perfect for parties.
Common Mistakes to Avoid
Through my years of baking, I’ve learned to avoid these common pitfalls when making Cookies and Cream Brownies:
- Overbaking: Brownies continue to cook as they cool, so remove them when they’re still slightly underdone.
- Overmixing: Once you add the flour, mix just until combined to avoid tough, dense brownies.
- Not Cooling Completely: Frosting warm brownies will cause the frosting to melt and slide off.
- Using Cold Ingredients: Make sure your cream cheese and butter are properly softened for smooth frosting.
- Chopping Cookies Too Small: Larger cookie pieces provide better texture contrast in the finished brownies.
How to Serve Cookies and Cream Brownies
These brownies are versatile and can be served in various ways depending on the occasion:
For casual gatherings, I like to cut them into generous squares and serve them on a platter with napkins. For more formal occasions, cut them into smaller, more elegant rectangles and arrange them on individual dessert plates.
They pair beautifully with a cold glass of milk, hot coffee, or even a scoop of vanilla ice cream for an extra indulgent treat. During summer months, I sometimes serve them alongside fresh berries for a pop of color and freshness.
Presentation Ideas for Cookies and Cream Brownies
To make your brownies look as good as they taste, consider these presentation ideas:
- Layered Display: Arrange brownies on a tiered serving stand for height and visual appeal.
- Garnish Creatively: Top each brownie with a mini chocolate sandwich cookie or a drizzle of melted chocolate.
- Individual Wrapping: Wrap individual brownies in clear cellophane bags tied with ribbon for gifts or party favors.
- Dust with Color: Use a fine-mesh sieve to dust the frosted brownies with a light coating of cocoa powder for an elegant finish.
Cookies and Cream Brownies Recipe Tips
Here are my top tips for achieving bakery-quality results:
- Quality Ingredients: Use high-quality chocolate and real vanilla extract for the best flavor.
- Room Temperature Eggs: Bring eggs to room temperature before using for better incorporation.
- Proper Measuring: Use a kitchen scale for accuracy, especially when measuring flour.
- Test for Doneness: The toothpick test is your friend – look for a few moist crumbs, not wet batter.
- Sharp Knife: Use a sharp knife dipped in warm water and wiped clean between cuts for neat squares.
- Storage: Store unfrosted brownies wrapped in plastic wrap to maintain moisture.
How to Store Cookies and Cream Brownies
Proper storage ensures your brownies stay fresh and delicious:
Store frosted brownies covered in the refrigerator for up to 5 days. For longer storage, you can freeze unfrosted brownies wrapped tightly in plastic wrap and aluminum foil for up to 3 months.
If you’re planning to freeze them, I recommend doing so before adding the frosting. Thaw overnight in the refrigerator, then bring to room temperature and add fresh frosting before serving.
For short-term storage, cover tightly with plastic wrap or store in an airtight container at room temperature for up to 2 days.
Frequently Asked Questions (FAQs)
Q: Can I make these brownies without frosting?
A: Absolutely! The brownies are delicious on their own. You can dust them with powdered sugar or drizzle with melted chocolate instead.
Q: Can I use a different pan size?
A: Yes, but adjust the baking time accordingly. An 8×8 pan will require 35-40 minutes, while individual muffin cups will need 18-22 minutes.
Q: Why are my brownies dry?
A: This usually happens from overbaking or using too much flour. Make sure to measure flour correctly and check for doneness early.
Q: Can I make the batter ahead of time?
A: It’s best to bake the brownies immediately after mixing, but you can prepare the dry ingredients in advance.
Q: How do I know when the brownies are done?
A: A toothpick inserted in the center should come out with a few moist crumbs attached, not completely clean or with wet batter.
Q: Can I double this recipe?
A: Yes, you can double the recipe and use two 9×13 pans or one large sheet pan. Adjust baking time as needed.
Conclusion
Cookies and Cream Brownies represent the perfect fusion of two classic desserts, creating something that’s greater than the sum of its parts. The rich, fudgy brownie base provides the perfect canvas for chunks of chocolate sandwich cookies, while the creamy frosting adds an extra layer of indulgence that makes these brownies truly special.
I’ve found that these brownies are perfect for any occasion – from casual family dinners to special celebrations. They’re impressive enough for parties but simple enough for a weeknight treat. The combination of textures and flavors creates a dessert experience that satisfies every craving.
Remember to take your time with each step, use quality ingredients, and don’t overbake. With proper technique and a little patience, you’ll create brownies that rival any bakery. Happy baking, and enjoy sharing these incredible Cookies and Cream Brownies with your loved ones!