Cream Cheese Lemon Bars Recipe

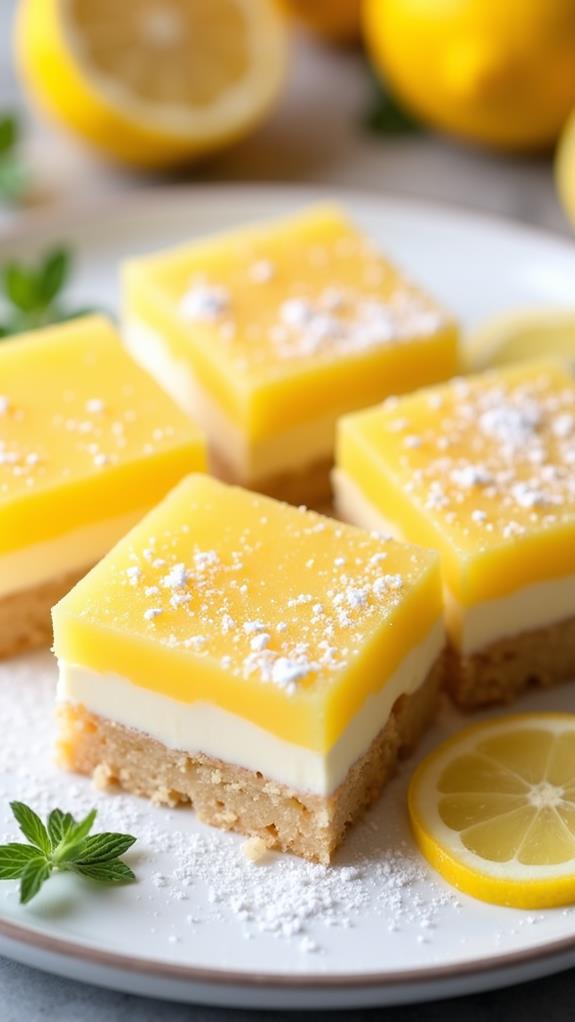
Nothing quite captures the essence of sunshine like a perfectly crafted lemon dessert, and these Cream Cheese Lemon Bars are the ultimate expression of citrusy bliss. With their buttery shortbread crust and tangy-sweet cream cheese topping, these bars strike the perfect balance between rich and refreshing.
Whether you’re hosting a spring gathering, need a show-stopping dessert for a potluck, or simply want to brighten someone’s day, these lemon bars deliver every time. Get ready to master a recipe that’s guaranteed to become your go-to crowd-pleaser!
What are Cream Cheese Lemon Bars?
Cream Cheese Lemon Bars are a delightful twist on the classic lemon bar. While traditional lemon bars feature a simple lemon curd filling, these elevated versions incorporate cream cheese for an incredibly smooth, rich texture that melts in your mouth. The addition of cream cheese creates a more stable filling that’s less likely to crack and provides a lovely contrast to the bright, zesty lemon flavor.
The base consists of a tender shortbread crust that provides the perfect buttery foundation, while the cream cheese lemon layer on top offers a perfect balance of tangy and creamy. These bars are essentially a hybrid between cheesecake and lemon bars, giving you the best of both worlds in one irresistible dessert.
Ingredients List for Cream Cheese Lemon Bars
For the Shortbread Crust:
- 2 cups all-purpose flour
- ½ cup powdered sugar
- 1 cup unsalted butter, cold and cubed
- ¼ teaspoon salt
For the Cream Cheese Lemon Filling:
- 8 oz cream cheese, softened to room temperature
- 1¼ cups granulated sugar
- 3 large eggs
- ⅓ cup fresh lemon juice (about 2-3 lemons)
- 2 tablespoons lemon zest
- 3 tablespoons all-purpose flour
- ¼ teaspoon salt
- Powdered sugar for dusting (optional)
How to Make Cream Cheese Lemon Bars: A Step-by-Step Guide
Creating these heavenly Cream Cheese Lemon Bars involves preparing two distinct layers that come together beautifully. Here’s your detailed roadmap to success:
1. Prepare Your Pan and Oven:
- Preheat your oven to 350°F (175°C).
- Line a 9×13-inch baking pan with parchment paper, leaving some overhang for easy removal.
- Lightly grease the parchment paper with cooking spray or butter.
2. Make the Shortbread Crust:
- In a large mixing bowl, whisk together flour, powdered sugar, and salt.
- Add the cold, cubed butter to the flour mixture.
- Using a pastry cutter or your fingers, work the butter into the flour until the mixture resembles coarse crumbs with some larger butter pieces.
- Press the mixture firmly and evenly into the bottom of your prepared pan.
- Bake for 18-20 minutes, or until the edges are lightly golden brown.
3. Prepare the Cream Cheese Filling:
- While the crust is baking, ensure your cream cheese is at room temperature for smooth mixing.
- In a large bowl, beat the softened cream cheese until smooth and creamy, about 2-3 minutes.
- Gradually add the granulated sugar, beating until well combined and fluffy.
- Add eggs one at a time, beating well after each addition.
4. Add the Lemon Components:
- Mix in the fresh lemon juice and lemon zest until fully incorporated.
- Sprinkle the flour and salt over the mixture and beat until just combined.
- Don’t overmix at this stage to avoid a tough texture.
5. Assemble and Bake:
- Pour the cream cheese lemon mixture over the hot crust, spreading it evenly to the edges.
- Return to the oven and bake for 22-25 minutes, or until the center is almost set but still slightly jiggly.
- The filling should not be completely firm as it will continue to set as it cools.
6. Cool and Finish:
- Allow the bars to cool completely in the pan at room temperature, then refrigerate for at least 2 hours.
- Once chilled, use the parchment paper overhang to lift the bars from the pan.
- Cut into squares using a sharp knife wiped clean between cuts.
- Dust with powdered sugar just before serving if desired.
Substitutions and Variations
These Cream Cheese Lemon Bars are wonderfully adaptable to different dietary needs and flavor preferences. Here are some variations you can try:
- Gluten-Free Option: Replace all-purpose flour with a 1:1 gluten-free flour blend in both the crust and filling.
- Reduced Sugar: Use ¾ cup sugar in the filling instead of 1¼ cups, though the bars will be more tart.
- Different Citrus: Substitute lime juice and zest for a Cream Cheese Lime Bar variation, or try orange for a milder citrus flavor.
- Crust Alternatives: Use graham cracker crumbs mixed with melted butter for a different crust texture.
- Dairy-Free Version: Use vegan cream cheese and plant-based butter, though the texture may vary slightly.
- Add-Ins: Fold in fresh blueberries or raspberries to the filling for a fruity twist.
Common Mistakes to Avoid
Perfecting your Cream Cheese Lemon Bars requires avoiding these common pitfalls:
- Under-baking the Crust: A pale, under-baked crust will become soggy when you add the filling. Make sure it’s lightly golden before proceeding.
- Cold Cream Cheese: Room temperature cream cheese is crucial for a smooth filling. Cold cream cheese will result in lumps that are difficult to eliminate.
- Over-baking the Filling: The filling should still have a slight jiggle in the center when you remove it from the oven. Over-baking leads to cracks and a dry texture.
- Cutting Too Soon: Patience is key! Cutting the bars before they’re completely chilled will result in messy, uneven pieces.
- Skipping the Parchment Paper: This makes removal nearly impossible and can ruin your beautiful bars.
How to Serve Cream Cheese Lemon Bars
These versatile bars work beautifully in numerous serving situations. For casual gatherings, simply cut them into squares and arrange on a serving platter. They’re perfect for picnics, potlucks, and afternoon tea parties.
For more formal occasions, consider cutting them into smaller, bite-sized pieces and serving them as part of a dessert spread. They pair wonderfully with fresh berries, a dollop of whipped cream, or a scoop of vanilla ice cream for an elevated dessert experience.
These bars also make excellent gifts when cut into squares and packaged in decorative boxes or tins. Their stable texture makes them ideal for transport, and their bright, cheerful flavor is universally appealing.
Presentation Ideas for Cream Cheese Lemon Bars
Transform your Cream Cheese Lemon Bars into a stunning dessert with these presentation tips:
- Elegant Dusting: A light dusting of powdered sugar through a fine-mesh sieve creates a professional, bakery-quality appearance.
- Garnish Creatively: Top each bar with a thin lemon slice, a sprig of fresh mint, or a few fresh berries for color and visual appeal.
- Layered Serving: Arrange the bars on a tiered serving stand with other complementary desserts for an impressive display.
- Individual Portions: Cut into precise squares and serve on small dessert plates with a fork for a more refined presentation.
Cream Cheese Lemon Bars Recipe Tips
Here are my tried-and-true tips for achieving lemon bar perfection every time:
- Room Temperature Ingredients: This cannot be overstated. Room temperature cream cheese and eggs blend much more easily and create a smoother filling.
- Fresh Lemon Juice: Always use fresh lemon juice rather than bottled for the brightest, most authentic flavor.
- Zest First: Always zest your lemons before juicing them. It’s much easier to zest a whole lemon than trying to zest lemon halves.
- Line Your Pan Well: Use enough parchment paper to create a sling that makes removal effortless.
- Sharp, Clean Knife: Wipe your knife clean between cuts to ensure neat, professional-looking squares.
- Chill Thoroughly: The longer you can chill the bars, the cleaner they’ll cut and the better they’ll hold their shape.
How to Store Cream Cheese Lemon Bars
Proper storage keeps your Cream Cheese Lemon Bars fresh and delicious for days. Once completely cooled and cut, store the bars in an airtight container in the refrigerator for up to 5 days. Layer them between sheets of parchment paper to prevent sticking.
For longer storage, these bars freeze beautifully for up to 3 months. Wrap individual bars in plastic wrap, then place them in a freezer-safe container. Thaw overnight in the refrigerator before serving.
If you’re planning to give them as gifts or transport them, they can safely sit at room temperature for up to 4 hours, making them perfect for parties and gatherings.
Frequently Asked Questions (FAQs)
Q: Can I make these bars ahead of time?
A: Absolutely! These bars actually improve in flavor after chilling overnight. You can make them up to 3 days in advance and store them covered in the refrigerator.
Q: Why did my filling crack?
A: Cracking usually occurs from over-baking or too high an oven temperature. The filling should still jiggle slightly in the center when you remove it from the oven.
Q: Can I double this recipe?
A: Yes, you can double the recipe and use two 9×13-inch pans or one large sheet pan. Just adjust the baking time accordingly and watch for doneness cues.
Q: My crust is too crumbly. What went wrong?
A: This usually happens when the butter is too cold or not worked in enough. Make sure to press the crust firmly into the pan, and ensure the butter is properly incorporated.
Q: Can I use bottled lemon juice?
A: While you can use bottled lemon juice in a pinch, fresh lemon juice provides significantly better flavor and will make your bars taste much more vibrant and authentic.
Q: How do I know when they’re done baking?
A: The edges should be set and lightly golden, while the center should still have a slight jiggle. The surface should look mostly set but not completely firm.
Conclusion
These Cream Cheese Lemon Bars represent the perfect marriage of tangy and creamy, creating a dessert that’s both sophisticated and comfortingly familiar. The buttery shortbread crust provides the ideal foundation for the luscious cream cheese lemon filling, resulting in bars that are rich yet refreshing.
Whether you’re an experienced baker or just starting your culinary journey, this recipe offers a wonderful opportunity to create something truly special. The combination of simple ingredients and straightforward techniques makes these bars accessible to bakers of all skill levels, while the impressive results will have everyone asking for the recipe.
Remember to be patient with the chilling process, use room temperature ingredients, and don’t be afraid to let that beautiful golden color develop on your crust. With these tips in mind, you’ll create Cream Cheese Lemon Bars that are not only delicious but also picture-perfect. Enjoy sharing these sunny, delightful treats with your family and friends!


