Halloween Bloodshot Eyeballs Candy Recipe
Looking to add some spine-chilling treats to your Halloween spread? These Halloween Bloodshot Eyeballs Candy are guaranteed to give your guests the creeps while satisfying their sweet tooth! These eerily realistic eyeball candies are surprisingly simple to make with just a few ingredients you probably already have at home.
Perfect for Halloween parties, trick-or-treat bags, or just having some ghoulish fun in the kitchen, these bloodshot eyeballs will be the hit of your spooky celebration. Follow this step-by-step recipe to create candy so realistic, your guests might do a double-take!
What are “Halloween Bloodshot Eyeballs Candy”?
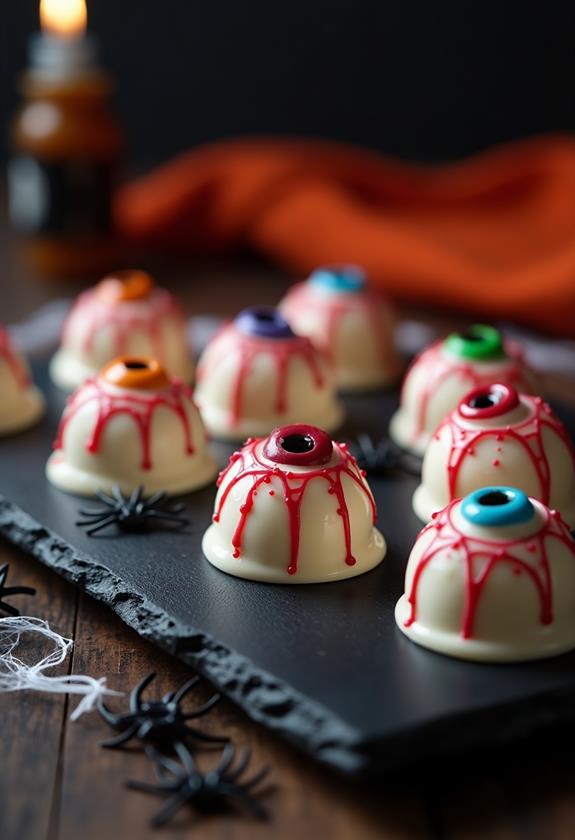
Halloween Bloodshot Eyeballs Candy are creepy confections that look remarkably like real eyeballs, complete with bloodshot veins and realistic coloring. These treats combine the sweetness of white chocolate with the tartness of gummy candies to create both a visual shock and a delicious flavor combination.
The “eyeball” effect is achieved by using white chocolate as the base, adding a colored center for the iris and pupil, and finishing with red food coloring or gel to create those disturbing bloodshot veins. Despite their gruesome appearance, they’re completely edible and surprisingly addictive!
Ingredients List for Halloween Bloodshot Eyeballs Candy
- 2 cups white chocolate chips or white melting wafers
- 24-30 round gummy candies (green, blue, or brown for iris)
- 12-15 small black candies or chocolate chips (for pupils)
- Red food coloring or red decorating gel
- 1 tablespoon coconut oil (optional, for smoothness)
- Toothpicks for detail work
- Parchment paper
- Round candy molds or ice cube trays (optional)
How to Make Halloween Bloodshot Eyeballs Candy: A Step-by-Step Guide
Creating these ghoulish treats is easier than you might think! Here’s your complete guide to making perfectly creepy eyeball candies:
1. Prepare Your Workspace:
- Line a baking sheet with parchment paper to prevent sticking.
- Gather all your ingredients and have them within easy reach.
- If using candy molds, make sure they’re clean and completely dry.
- Set up a small workspace with toothpicks and red food coloring ready for detailing.
2. Melt the White Chocolate:
- Place white chocolate chips in a microwave-safe bowl.
- Microwave in 30-second intervals, stirring between each interval to prevent burning.
- Continue until the chocolate is completely smooth and melted, usually 1-2 minutes total.
- If desired, stir in coconut oil for a smoother consistency and easier working time.
3. Form the Eyeball Base:
- Using a spoon, drop dollops of melted white chocolate onto the parchment paper.
- Make them roughly round and about 1-2 inches in diameter.
- If using molds, fill each cavity about halfway with the melted chocolate.
- Work quickly as white chocolate sets faster than regular chocolate.
4. Add the Iris and Pupil:
- While the white chocolate is still soft, gently press a colored gummy candy into the center of each eyeball.
- This will serve as the iris, so choose colors that look realistic (green, blue, brown, or hazel).
- Immediately place a small black candy or chocolate chip in the center of the gummy for the pupil.
- Press gently to ensure they’re embedded but not completely sunk into the chocolate.
5. Create the Bloodshot Effect:
- Once the chocolate has set slightly but is still workable (about 2-3 minutes), begin adding the blood vessels.
- Dip a toothpick into red food coloring or squeeze a small amount of red decorating gel onto the tip.
- Starting from the outer edge of the eyeball, draw thin, jagged lines toward the iris.
- Vary the thickness and length of the lines to make them look more realistic.
- Add multiple lines from different directions, but don’t overdo it – less is more for a convincing effect.
6. Final Setting:
- Allow the eyeballs to set completely at room temperature for about 15-20 minutes.
- For faster setting, place them in the refrigerator for 5-10 minutes.
- Once fully set, carefully remove from parchment paper or molds.
- Store in a cool, dry place until ready to serve.
Substitutions and Variations
Want to customize your bloodshot eyeballs or work with what you have on hand? Here are some creative substitutions and variations:
- White Chocolate: Use white candy melts, white almond bark, or even vanilla-flavored coating chocolate.
- Iris Colors: Try using different colored candies like Skittles, M&Ms, or even small round cereals for unique eye colors.
- Pupils: Black peppercorns, mini chocolate chips, or small pieces of black licorice work great.
- Blood Effect: Strawberry jam thinned with water, red gel icing, or even ketchup for non-edible display pieces.
- Size Variations: Make mini eyeballs using smaller amounts of chocolate, or create giant ones for a more dramatic effect.
Common Mistakes to Avoid
Avoid these common pitfalls to ensure your eyeball candies turn out perfectly creepy:
- Overheating the Chocolate: White chocolate burns easily, so use short microwave intervals and stir frequently.
- Adding Wet Ingredients: Make sure all candies and tools are completely dry before use, as moisture can cause chocolate to seize.
- Too Much Red Coloring: Start with less red than you think you need – you can always add more, but you can’t take it away.
- Working Too Slowly: White chocolate sets quickly, so have everything ready before you start melting.
- Overcrowding Blood Vessels: Too many red lines will make the eyeballs look fake rather than eerily realistic.
How to Serve Halloween Bloodshot Eyeballs Candy
These creepy candies are perfect for various Halloween presentations. Serve them on a black platter surrounded by dry ice for a spooky fog effect, or arrange them in a clear glass bowl to show off their gruesome details.
For parties, place them strategically around your food table, or use them as cake decorations on Halloween desserts. They also make excellent additions to trick-or-treat bags, though you might want to warn parents about their realistic appearance!
Consider serving them alongside other Halloween treats like chocolate spiders, candy corn, or pumpkin-shaped cookies for a complete spooky spread.
Presentation Ideas for Halloween Bloodshot Eyeballs Candy
Make your bloodshot eyeballs even more impressive with these presentation ideas:
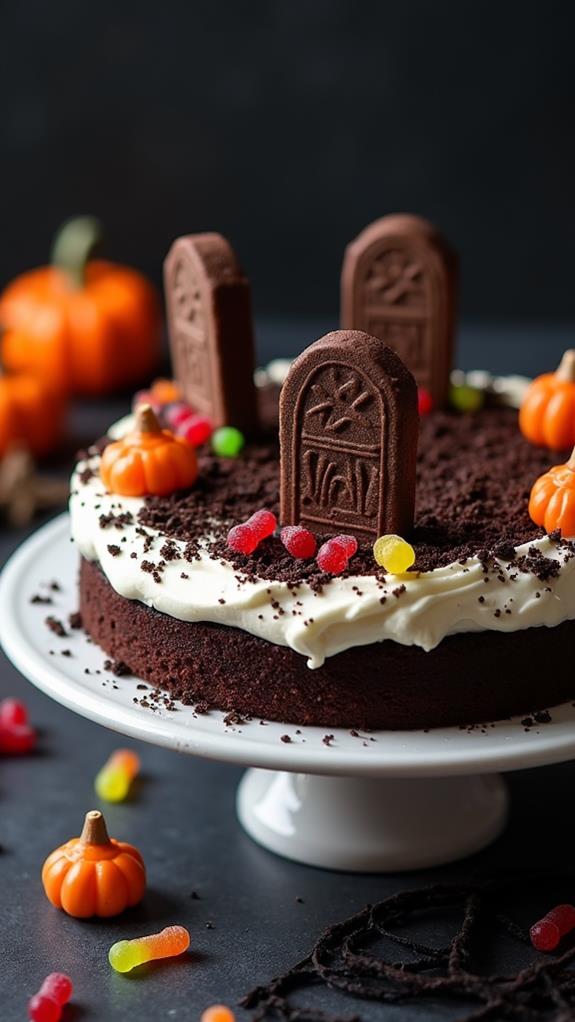
- Graveyard Scene: Create a cemetery scene using chocolate cookie crumbs as dirt and place eyeballs peeking out from behind cookie tombstones.
- Laboratory Display: Use glass beakers or laboratory flasks filled with colored water and float the eyeballs inside for a mad scientist effect.
- Creepy Cake Toppers: Arrange multiple eyeballs on top of a chocolate cake for an incredibly disturbing but delicious dessert.
- Individual Containers: Place each eyeball in a small clear plastic container with a black lid for take-home party favors.
Halloween Bloodshot Eyeballs Candy Recipe Tips
Here are some expert tips to make your eyeball candies even more convincing and delicious:
- Temperature Matters: Work in a cool kitchen when possible, as heat can cause the chocolate to become too soft to work with.
- Practice the Blood Effect: Try the red coloring technique on a practice piece first to get the hang of creating realistic blood vessels.
- Vary the Sizes: Make eyeballs of different sizes for a more natural, unsettling effect.
- Storage is Key: Keep finished eyeballs in a cool, dry place and avoid stacking them to prevent damage to the details.
- Make Ahead: These can be made up to a week in advance and stored in an airtight container.
How to Store Halloween Bloodshot Eyeballs Candy
Allow the eyeball candies to cool and set completely before storing. Place them in a single layer in an airtight container, separating layers with parchment paper if stacking is necessary.
Store at room temperature in a cool, dry place for up to one week. Avoid refrigeration unless your kitchen is very warm, as condensation can cause the chocolate to develop a white bloom and affect the appearance of your carefully crafted blood vessels.
Frequently Asked Questions (FAQs)
Q: Can I make these eyeballs dairy-free?
A: Yes! Use dairy-free white chocolate chips or coconut-based white chocolate for a dairy-free version that tastes just as good.
Q: How far in advance can I make these?
A: You can make them up to one week ahead of time. Store them properly in an airtight container, and they’ll maintain their creepy appearance and taste.
Q: Can I use regular chocolate instead of white chocolate?
A: While you can use regular chocolate, white chocolate gives the most realistic eyeball appearance. Dark chocolate would create a very different, less eye-like effect.
Q: What if my white chocolate seizes up?
A: If your chocolate becomes thick and grainy, try adding a small amount of coconut oil or shortening to smooth it out. Prevention is key – keep all utensils dry!
Q: Can kids help make these?
A: Absolutely! Kids love the gross-out factor. Just supervise the melting of chocolate and let them help with placing the iris and pupil candies and creating the blood effect.
Q: Are these suitable for people with nut allergies?
A: Check all ingredient labels carefully. While the basic recipe doesn’t call for nuts, some white chocolate brands may contain nuts or be processed in facilities with nuts.
Conclusion
These Halloween Bloodshot Eyeballs Candy are the perfect combination of creepy and delicious, guaranteed to be the talk of your Halloween celebration. The simple ingredients and straightforward technique make them accessible for bakers of all skill levels, while the realistic final result will impress even the most discerning Halloween enthusiasts.
Whether you’re hosting a spooky party, contributing to a school Halloween event, or just want to have some ghoulish fun in the kitchen, these eyeball candies deliver maximum impact with minimal effort. The key is in the details – those carefully crafted blood vessels and realistic coloring that make guests do a double-take before they realize these gruesome orbs are actually sweet treats.
Remember to have fun with the process and don’t worry about making them too perfect. Sometimes the slightly imperfect, asymmetrical eyeballs are the most convincingly creepy! Happy Halloween, and enjoy watching your guests’ reactions when they encounter these delightfully disturbing candies!