Homemade Bubblegum Cloud Fudge Recipe
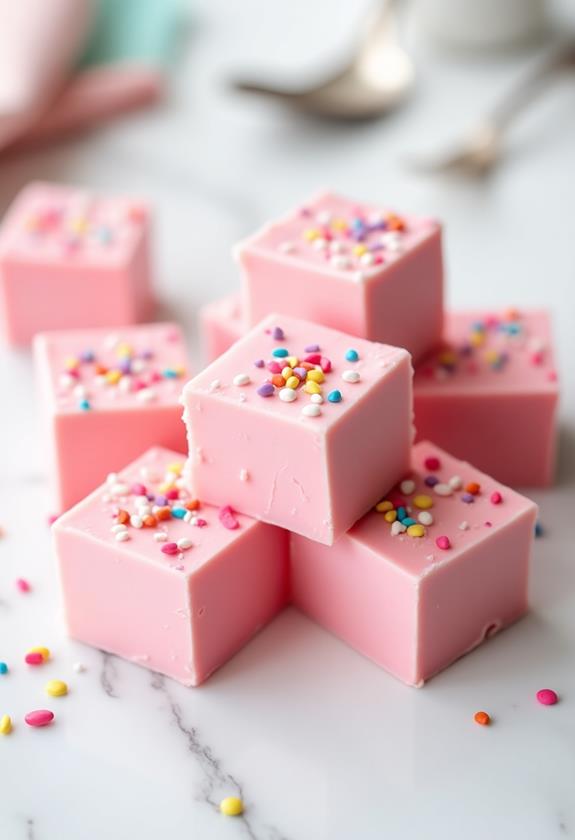
Have you ever wanted to capture the whimsical joy of childhood in a single bite? My Homemade Bubblegum Cloud Fudge recipe does exactly that! This dreamy, cotton candy-colored confection combines the nostalgic flavor of bubblegum with the creamy richness of homemade fudge.
With its fluffy texture and playful pink and blue swirls, this fudge looks like edible clouds straight from a fairy tale. Follow along as I guide you through creating this magical treat that’s perfect for birthday parties, bake sales, or whenever you need a dose of pure sweetness and fun.
What is “Bubblegum Cloud Fudge”?
Bubblegum Cloud Fudge is a whimsical twist on traditional fudge that captures the essence of childhood wonder in every square. This delightful confection gets its name from its cloud-like appearance, created by swirling pink and blue food coloring through creamy white chocolate fudge.
The star of this recipe is bubblegum extract, which provides that distinctive sweet, fruity flavor we all remember from our favorite childhood gum. Unlike regular fudge, this version has a lighter, fluffier texture that melts beautifully on your tongue.
What makes this fudge truly special is its visual appeal. The marbled pink and blue colors create a dreamy, cloud-like effect that’s almost too pretty to eat. It’s the perfect treat for anyone who believes that food should be both delicious and magical.
Ingredients List for Bubblegum Cloud Fudge
- 3 cups white chocolate chips
- 1 can (14 oz) sweetened condensed milk
- 3 tablespoons butter
- 1 teaspoon bubblegum extract
- ½ teaspoon vanilla extract
- Pinch of salt
- Pink food coloring
- Blue food coloring
- ½ cup mini marshmallows (optional, for extra fluffiness)
- 2 tablespoons powdered sugar (for dusting)
How to Make Bubblegum Cloud Fudge: A Step-by-Step Guide
Creating this magical fudge is easier than you might think! Here’s my foolproof method for achieving that perfect cloud-like texture and vibrant swirled appearance:
1. Prepare Your Pan:
- Line an 8×8 inch square pan with parchment paper, leaving some overhang for easy removal.
- Lightly grease the parchment paper with butter or cooking spray.
- This preparation step is crucial for getting clean, beautiful fudge squares later.
2. Melt the Base:
- In a medium saucepan over low heat, combine white chocolate chips, sweetened condensed milk, and butter.
- Stir constantly with a wooden spoon to prevent burning.
- The mixture should be completely smooth and glossy, which usually takes 5-7 minutes.
- Remove from heat once everything is melted and well combined.
3. Add the Flavoring:
- Quickly stir in the bubblegum extract, vanilla extract, and a pinch of salt.
- Mix until the flavoring is evenly distributed throughout the fudge base.
- If using mini marshmallows, fold them in gently at this stage for extra texture.
4. Create the Cloud Effect:
- Divide the fudge mixture into three separate bowls.
- Leave one bowl plain (white), add pink food coloring to the second bowl, and blue to the third.
- Start with just a few drops and add more until you achieve your desired pastel shades.
- Mix each color thoroughly but work quickly as the fudge will start to set.
5. Create the Swirl Pattern:
- Drop spoonfuls of each colored fudge alternately into your prepared pan.
- Use a knife or toothpick to gently swirl the colors together, creating a marbled cloud effect.
- Don’t overmix – you want distinct color streaks, not a muddy blend.
6. Set and Finish:
- Tap the pan gently on the counter to release air bubbles and level the surface.
- Refrigerate for at least 2 hours or until completely firm.
- Once set, lift the fudge out using the parchment paper overhang.
- Dust lightly with powdered sugar for that final cloud-like appearance.
- Cut into squares using a sharp knife, wiping the blade between cuts for clean edges.
Substitutions and Variations
I love experimenting with different flavors and techniques, and this recipe is wonderfully adaptable. Here are some variations you can try:
- Extract Options: If you can’t find bubblegum extract, try cotton candy extract or a combination of strawberry and vanilla extracts.
- Chocolate Base: Swap white chocolate for milk chocolate chips if you prefer a less sweet base, though this will affect the final color.
- Color Variations: Create different color combinations like purple and yellow for a galaxy theme, or stick to one color for a more subtle look.
- Texture Add-ins: Try crushed cookies, sprinkles, or pop rocks candy for extra texture and fun.
- Dairy-Free Version: Use coconut condensed milk and vegan white chocolate chips for a dairy-free alternative.
Common Mistakes to Avoid
Through my years of fudge-making, I’ve learned to avoid these common pitfalls that can ruin your batch:
- Overheating the Chocolate: Always use low heat and stir constantly. Burnt chocolate will make your fudge grainy and bitter.
- Adding Too Much Food Coloring: Start with just a drop or two. Too much can affect the taste and make colors look artificial rather than dreamy.
- Overmixing the Swirl: Gentle swirling creates beautiful marbled effects. Overmixing will muddy your colors.
- Cutting Too Soon: Wait until the fudge is completely set before cutting, or you’ll end up with messy, uneven squares.
- Using Old Extract: Fresh bubblegum extract makes all the difference in achieving that authentic flavor.
How to Serve Bubblegum Cloud Fudge
This whimsical fudge is perfect for so many occasions! I love serving it at children’s birthday parties where it becomes an instant hit. The colorful appearance makes it a natural centerpiece for dessert tables.
For adult gatherings, I arrange the squares on a pretty vintage plate alongside other nostalgic treats. It pairs beautifully with vanilla ice cream or can be enjoyed on its own with a glass of cold milk.
Consider packaging individual squares in clear cellophane bags tied with colorful ribbons for party favors or bake sale items. The visual appeal makes it an easy sell!
Presentation Ideas for Bubblegum Cloud Fudge
The beauty of this fudge lies in its visual impact, so presentation is key:
- Tiered Display: Use a multi-level cake stand to showcase the colorful squares at different heights.
- Cloud Theme: Surround the fudge with cotton balls or white tissue paper to enhance the cloud effect.
- Colorful Backdrop: Place the fudge against a bright blue background to make the colors pop.
- Mix and Match: Arrange squares in a checkerboard pattern alternating with white chocolate squares for contrast.
Bubblegum Cloud Fudge Recipe Tips
Here are my tried-and-true tips for perfect fudge every time:
- Temperature Matters: Let all ingredients come to room temperature before starting for easier mixing and better texture.
- Quality Ingredients: Use high-quality white chocolate chips for the smoothest, most delicious base.
- Work Quickly: Once you add the coloring, work fast as the fudge sets quickly at room temperature.
- Clean Cuts: Use a sharp knife dipped in warm water and wiped clean between cuts for professional-looking squares.
- Storage Success: Store in airtight containers with parchment paper between layers to prevent sticking.
How to Store Bubblegum Cloud Fudge
Proper storage keeps your fudge fresh and maintains its beautiful appearance. Allow the fudge to cool completely before storing (this usually takes about 3 hours total including refrigeration time).
Store cut squares in an airtight container at room temperature for up to one week. Layer parchment paper between rows to prevent sticking. For longer storage, refrigerate for up to three weeks or freeze for up to three months.
If refrigerating, let the fudge come to room temperature for about 30 minutes before serving for the best texture and flavor.
Frequently Asked Questions (FAQs)
Q: Can I make Bubblegum Cloud Fudge without bubblegum extract?
A: Yes! Try cotton candy extract, or create your own blend using equal parts strawberry and vanilla extracts for a similar sweet, fruity flavor.
Q: Why is my fudge too soft or won’t set?
A: This usually happens if the chocolate mixture wasn’t heated enough or if too much liquid was added. Try refrigerating longer, or next time ensure the mixture is completely smooth and hot before adding extracts.
Q: Can I add real bubblegum to the fudge?
A: I don’t recommend adding actual gum as it won’t melt properly and could create choking hazards. Stick to extracts and food coloring for the bubblegum experience.
Q: How can I make the colors more vibrant?
A: Use gel food coloring instead of liquid for more intense colors without adding extra moisture to the fudge. Start with a tiny amount and build up gradually.
Q: Can I double this recipe?
A: Absolutely! Use a 9×13 inch pan for a double batch, and you may need to extend the setting time slightly.
Q: Is there a way to make this sugar-free?
A: You can try using sugar-free white chocolate chips and sugar-free sweetened condensed milk, though the texture may be slightly different from the original.
Conclusion
Creating Homemade Bubblegum Cloud Fudge is like bringing a childhood dream to life in your own kitchen. This magical treat combines nostalgia, creativity, and deliciousness in every colorful square. Whether you’re making it for a special celebration or just because you want to add some whimsy to your day, this recipe never fails to bring smiles.
The beauty of this fudge lies not just in its stunning appearance, but in its ability to transport us back to simpler times when the world was full of wonder and magic. Every bite delivers that perfect balance of creamy sweetness and playful bubblegum flavor that makes both kids and adults light up with joy.
Remember, the key to perfect Bubblegum Cloud Fudge is patience with the melting process and creativity with the swirling technique. Don’t be afraid to experiment with different color combinations or add your own special touches. After all, the best recipes are the ones that reflect your personality and bring happiness to those you share them with. Happy fudge making!

