Lemon Blueberry Cheesecake Bars Recipe
Looking for the perfect dessert that combines creamy cheesecake with the bright flavors of lemon and juicy blueberries? These Lemon Blueberry Cheesecake Bars are exactly what you need! With their buttery graham cracker crust, velvety lemon-infused cheesecake filling, and bursts of fresh blueberries, these bars deliver the perfect balance of tangy and sweet in every bite.
I’ve perfected this recipe over the years, and it never fails to impress at gatherings, potlucks, or as a special treat for my family. The best part? They’re surprisingly easy to make and can be prepared ahead of time, making them ideal for busy schedules.
What are Lemon Blueberry Cheesecake Bars?
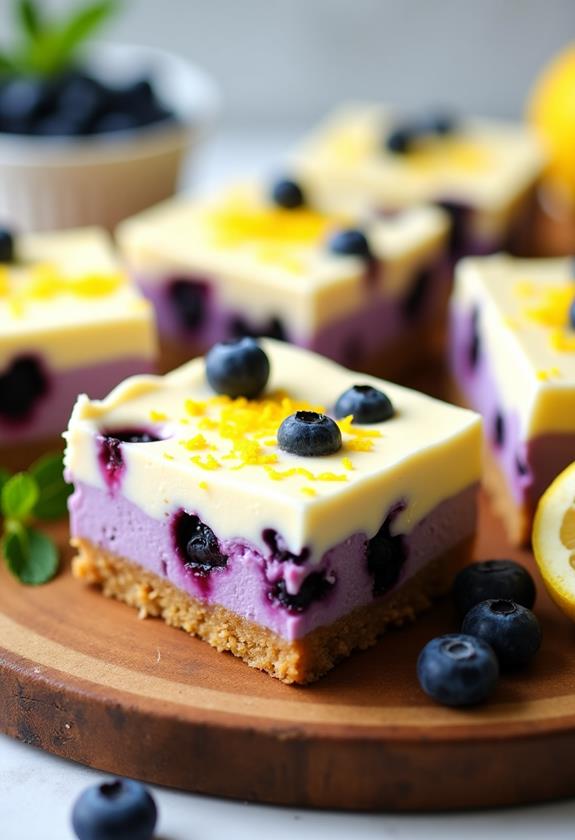
Lemon Blueberry Cheesecake Bars are a delightful twist on traditional cheesecake, presented in convenient bar form that’s perfect for sharing. These bars feature three distinct layers: a crispy graham cracker crust on the bottom, a rich and creamy lemon cheesecake filling in the middle, and fresh blueberries scattered throughout and on top.
The beauty of these bars lies in their perfect flavor combination. The tartness of fresh lemon juice and zest pairs beautifully with the sweetness of plump blueberries, while the cream cheese creates that signature rich, velvety texture we all love in cheesecake. Unlike traditional round cheesecakes, these bars are much easier to cut and serve, making them ideal for parties and events.
Ingredients List for Lemon Blueberry Cheesecake Bars
For the Crust:
- 1½ cups graham cracker crumbs
- ⅓ cup granulated sugar
- 6 tablespoons unsalted butter, melted
- Pinch of salt
For the Cheesecake Filling:
- 24 oz (3 packages) cream cheese, softened to room temperature
- ¾ cup granulated sugar
- 3 large eggs, room temperature
- ½ cup sour cream
- ¼ cup fresh lemon juice
- 2 tablespoons lemon zest (about 2 large lemons)
- 1 teaspoon vanilla extract
- 2 tablespoons all-purpose flour
For the Blueberry Topping:
- 1½ cups fresh blueberries, washed and dried
- 2 tablespoons granulated sugar
- 1 tablespoon cornstarch
- 1 tablespoon lemon juice
For Garnish (optional):
- Powdered sugar for dusting
- Extra lemon zest
- Fresh mint leaves
How to Make Lemon Blueberry Cheesecake Bars: A Step-by-Step Guide
Creating these delicious cheesecake bars is a straightforward process that yields impressive results. Here’s my detailed guide to ensure your bars turn out perfectly every time:
1. Prepare Your Pan and Oven:
- Preheat your oven to 325°F (163°C).
- Line a 9×13-inch baking pan with parchment paper, leaving some overhang for easy removal.
- Lightly grease the parchment paper with cooking spray or butter.
2. Make the Graham Cracker Crust:
- In a medium bowl, combine graham cracker crumbs, sugar, melted butter, and a pinch of salt.
- Mix until the crumbs are evenly moistened and hold together when pressed.
- Press the mixture firmly into the bottom of your prepared pan, creating an even layer.
- Use the bottom of a measuring cup to ensure the crust is packed tightly.
- Bake for 10 minutes, then remove and set aside to cool while you prepare the filling.
3. Prepare the Cheesecake Filling:
- In a large mixing bowl, beat the softened cream cheese with an electric mixer until smooth and creamy, about 2-3 minutes.
- Gradually add the sugar, beating until well combined and fluffy.
- Add eggs one at a time, beating well after each addition. Make sure to scrape down the sides of the bowl.
- Mix in the sour cream, lemon juice, lemon zest, and vanilla extract until just combined.
- Finally, add the flour and mix until just incorporated. Don’t overmix at this stage.
4. Prepare the Blueberry Topping:
- In a small bowl, gently toss the fresh blueberries with sugar, cornstarch, and lemon juice.
- This coating will help prevent the blueberries from sinking and will create a lovely glaze as they bake.
5. Assemble and Bake:
- Pour the cheesecake filling over the pre-baked crust, spreading it evenly with a spatula.
- Gently tap the pan on the counter to release any air bubbles.
- Scatter the prepared blueberries evenly over the top of the filling.
- Bake for 35-40 minutes, or until the center is almost set but still slightly jiggly.
6. Cool and Chill:
- Remove from the oven and let cool completely at room temperature, about 2 hours.
- Once cooled, refrigerate for at least 4 hours or overnight before cutting.
- This chilling time is crucial for achieving clean cuts and the perfect texture.
Substitutions and Variations
I love experimenting with different flavors and ingredients, and these cheesecake bars are quite versatile. Here are some substitutions and variations you can try:
- Graham Crackers: Substitute with vanilla wafers, digestive biscuits, or even crushed lemon cookies for a different flavor base.
- Cream Cheese: You can use reduced-fat cream cheese, but the texture may be slightly less rich. I don’t recommend fat-free versions as they can make the bars watery.
- Sour Cream: Greek yogurt can be substituted for a tangier flavor and slightly lighter texture.
- Fresh Blueberries: Frozen blueberries work too, but don’t thaw them first. You can also try raspberries, blackberries, or a mixed berry combination.
- Lemon: Replace with lime for Lime Blueberry Cheesecake Bars, or use orange for a different citrus twist.
- Gluten-Free Option: Use gluten-free graham crackers and substitute the flour with cornstarch or gluten-free flour blend.
Common Mistakes to Avoid
Through my years of making cheesecake bars, I’ve learned to avoid these common pitfalls:
- Using Cold Ingredients: Room temperature cream cheese and eggs are essential for a smooth, lump-free filling. Cold ingredients can create a lumpy texture that’s difficult to fix.
- Overmixing the Batter: Once you add the eggs, mix just until combined. Overmixing incorporates too much air, which can cause cracks.
- Overbaking: The center should still have a slight jiggle when you remove it from the oven. It will continue to set as it cools.
- Skipping the Chill Time: Don’t rush this step! Proper chilling is essential for clean cuts and the right texture.
- Using Wet Blueberries: Make sure your blueberries are completely dry before adding them to prevent excess moisture in the bars.
How to Serve Lemon Blueberry Cheesecake Bars
These versatile bars work beautifully for various occasions. I love serving them as a refreshing dessert after a heavy meal, or as a sweet treat with afternoon tea or coffee. They’re perfect for summer gatherings, baby showers, or any time you want something that feels both elegant and approachable.
For the best presentation, I recommend cutting them with a sharp knife that’s been wiped clean between cuts. This ensures neat, professional-looking bars that showcase the beautiful layers.
Presentation Ideas for Lemon Blueberry Cheesecake Bars
To make your cheesecake bars look as amazing as they taste, try these presentation ideas:
- Elegant Dusting: A light dusting of powdered sugar just before serving adds a beautiful, bakery-style finish.
- Fresh Garnishes: Top each bar with a few fresh blueberries, a small mint leaf, or a twist of lemon zest for color and freshness.
- Layered Display: Arrange the bars on a tiered serving stand alongside fresh berries and lemon slices for an impressive dessert table.
- Individual Plating: Serve each bar on a small dessert plate with a dollop of whipped cream and a few extra berries.
Lemon Blueberry Cheesecake Bars Recipe Tips
Here are my tried-and-true tips for cheesecake bar success:
- Quality Ingredients Matter: Use full-fat cream cheese and fresh lemons for the best flavor and texture.
- Test for Doneness: The center should be set but still slightly jiggly when gently shaken. It will firm up completely as it cools.
- Perfect Cuts: Use a sharp knife and wipe it clean between each cut for neat, professional-looking bars.
- Make Ahead Friendly: These bars actually improve in flavor after a day in the refrigerator, making them perfect for advance preparation.
- Prevent Soggy Crust: Let the pre-baked crust cool slightly before adding the filling to prevent it from becoming soggy.
How to Store Lemon Blueberry Cheesecake Bars
Proper storage is key to maintaining the quality and safety of your cheesecake bars. Cover the bars tightly with plastic wrap or store them in an airtight container in the refrigerator for up to 5 days. The flavors actually develop and improve after the first day, so don’t hesitate to make them ahead of time.
For longer storage, you can freeze the bars for up to 2 months. Wrap individual bars in plastic wrap and place them in a freezer-safe container. Thaw overnight in the refrigerator before serving.
Frequently Asked Questions (FAQs)
Q: Can I make these bars without a springform pan?
A: Absolutely! A 9×13-inch rectangular baking pan works perfectly and is actually my preferred method. Just be sure to line it with parchment paper for easy removal.
Q: Why did my cheesecake bars crack?
A: Cracks usually occur from overmixing, overbaking, or temperature shock. Make sure your ingredients are at room temperature, don’t overmix once you add the eggs, and let the bars cool gradually.
Q: Can I use frozen blueberries?
A: Yes, but don’t thaw them first. Use them straight from the freezer to prevent excess moisture and color bleeding.
Q: How do I know when the bars are done baking?
A: The edges should be set, and the center should have just a slight jiggle when you gently shake the pan. They’ll continue to set as they cool.
Q: Can I make mini cheesecake bars?
A: Definitely! Use a mini muffin tin lined with paper cups. Reduce the baking time to about 15-20 minutes and watch carefully for doneness.
Q: What’s the best way to cut clean bars?
A: Use a sharp knife and clean it with a damp towel between each cut. Make sure the bars are completely chilled before cutting.
Conclusion
These Lemon Blueberry Cheesecake Bars have become one of my most requested desserts, and for good reason. They offer all the creamy, decadent goodness of traditional cheesecake with the added brightness of fresh lemon and the sweet-tart burst of blueberries. The convenience of bar form makes them perfect for entertaining, while the make-ahead nature means you can have an impressive dessert ready whenever you need it.
Whether you’re serving them at a summer barbecue, bringing them to a potluck, or simply treating your family to something special, these bars are guaranteed to be a hit. The combination of textures – from the crispy crust to the creamy filling to the juicy blueberries – creates a truly satisfying dessert experience that celebrates the best of both lemon and blueberry flavors.
I encourage you to make this recipe your own by trying different variations and presentation ideas. Most importantly, take your time with each step, especially the chilling process, and you’ll be rewarded with perfectly set, deliciously creamy cheesecake bars that look and taste absolutely divine. Happy baking!