No Bake Cheesecake Jars Recipe
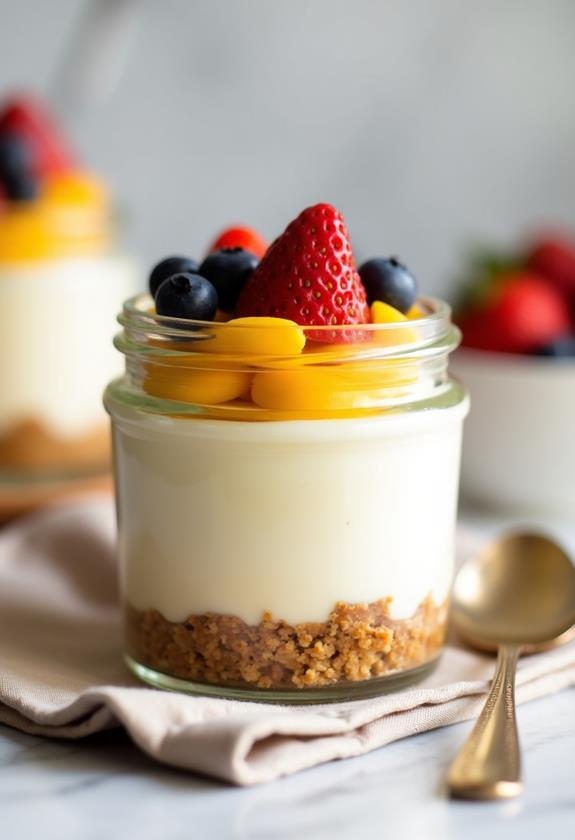
Looking for an elegant dessert that requires zero baking skills but delivers maximum wow factor? These No Bake Cheesecake Jars are your answer! Perfect for entertaining, these individual desserts combine the rich, creamy texture of classic cheesecake with the convenience of no-bake preparation.
Whether you’re hosting a dinner party, planning a romantic evening, or simply craving something sweet, these delightful jars will become your go-to dessert. Let me walk you through this foolproof recipe that’s guaranteed to impress every time.
What are No Bake Cheesecake Jars?
No Bake Cheesecake Jars are individual portions of creamy, rich cheesecake served in mason jars or small glasses. Unlike traditional cheesecake that requires hours of baking and cooling, these desserts set in the refrigerator using gelatin or the natural firmness of cream cheese.
The beauty of this dessert lies in its simplicity and presentation. Each jar features distinct layers – a crunchy graham cracker crust base, smooth and velvety cheesecake filling, and optional fruit or sauce toppings. The transparent jars showcase these beautiful layers, making them as visually appealing as they are delicious.
Ingredients List for No Bake Cheesecake Jars
For the Crust:
- 1½ cups graham cracker crumbs
- ¼ cup granulated sugar
- 6 tablespoons melted butter
- Pinch of salt
For the Cheesecake Filling:
- 16 oz cream cheese, softened to room temperature
- ¾ cup powdered sugar
- 1 teaspoon vanilla extract
- 1 tablespoon fresh lemon juice
- 1 cup heavy whipping cream, cold
- 1 packet (2¼ teaspoons) unflavored gelatin
- 3 tablespoons warm water
For the Topping (Optional):
- Fresh berries (strawberries, blueberries, or raspberries)
- Berry sauce or fruit preserves
- Whipped cream for garnish
- Mint leaves for decoration
How to Make No Bake Cheesecake Jars: A Step-by-Step Guide
Creating these stunning No Bake Cheesecake Jars is easier than you might think. Follow these detailed steps to ensure perfect results every time:
1. Prepare Your Jars and Workspace:
- Gather 6-8 mason jars or small glasses (8 oz capacity works best).
- Ensure all jars are clean and completely dry.
- Set up your workspace with all ingredients measured and ready.
- This preparation makes the assembly process smooth and efficient.
2. Make the Graham Cracker Crust:
- In a medium bowl, combine graham cracker crumbs, granulated sugar, and a pinch of salt.
- Pour the melted butter over the mixture and stir until everything is evenly moistened.
- The mixture should hold together when pressed but not be overly wet.
- Divide the crust mixture evenly among your jars, using about 2-3 tablespoons per jar.
- Press down firmly with the back of a spoon or a small glass to create a compact base.
3. Prepare the Gelatin:
- Sprinkle the unflavored gelatin over 3 tablespoons of warm water in a small bowl.
- Let it sit for 5 minutes to bloom – the gelatin will absorb the water and become spongy.
- After blooming, microwave for 10-15 seconds or stir into a small saucepan over low heat until completely dissolved.
- Set aside to cool slightly while you prepare the filling.
4. Create the Cheesecake Filling:
- In a large mixing bowl, beat the softened cream cheese until smooth and fluffy, about 2-3 minutes.
- Gradually add the powdered sugar, beating until well combined and no lumps remain.
- Mix in the vanilla extract and fresh lemon juice until incorporated.
- Slowly drizzle in the cooled gelatin mixture while beating on low speed.
5. Whip the Cream:
- In a separate clean bowl, whip the cold heavy cream until soft peaks form.
- Be careful not to overwhip – you want the cream to hold its shape but still be smooth.
- Gently fold the whipped cream into the cream cheese mixture in three additions.
- Use a rubber spatula and fold carefully to maintain the light, airy texture.
6. Assemble the Jars:
- Divide the cheesecake filling evenly among the prepared jars, filling them about ¾ full.
- Smooth the tops with a small offset spatula or the back of a spoon.
- Cover each jar with plastic wrap or lid, ensuring the wrap doesn’t touch the surface.
- Refrigerate for at least 4 hours, but preferably overnight for best results.
7. Add Final Touches:
- Before serving, add your chosen toppings such as fresh berries, fruit sauce, or additional whipped cream.
- Garnish with mint leaves for a pop of color and fresh aroma.
Substitutions and Variations
The beauty of No Bake Cheesecake Jars lies in their versatility. Here are some creative substitutions and variations to customize your dessert:
Crust Variations:
- Oreo Crust: Replace graham crackers with crushed Oreo cookies (remove the filling first).
- Shortbread Crust: Use crushed shortbread cookies for a buttery, rich base.
- Nut Crust: Combine crushed nuts like pecans or almonds with a touch of honey.
Flavor Variations:
- Chocolate: Add ¼ cup cocoa powder to the cream cheese mixture for chocolate cheesecake.
- Lemon: Increase lemon juice to 3 tablespoons and add 1 tablespoon lemon zest.
- Strawberry: Blend ½ cup fresh strawberries and fold into the filling.
- Coffee: Dissolve 2 tablespoons instant coffee in the warm water before adding gelatin.
Dietary Modifications:
- Lighter Version: Use light cream cheese and substitute half the heavy cream with Greek yogurt.
- Sugar-Free: Replace powdered sugar with powdered erythritol or stevia equivalent.
- Dairy-Free: Use vegan cream cheese and coconut cream instead of dairy products.
Common Mistakes to Avoid
Avoid these common pitfalls to ensure your No Bake Cheesecake Jars turn out perfectly:
- Using Cold Cream Cheese: Room temperature cream cheese is crucial for a smooth filling without lumps.
- Overwhipping the Cream: Stop at soft peaks to prevent the cream from becoming grainy or separating.
- Not Dissolving Gelatin Properly: Undissolved gelatin can create lumps in your finished cheesecake.
- Insufficient Chilling Time: Rushing the setting process will result in runny cheesecake that won’t hold its shape.
- Overpacking the Crust: A too-thick crust layer will overpower the delicate cheesecake filling.
How to Serve No Bake Cheesecake Jars
These elegant desserts are perfect for various occasions and serving styles:
Formal Dinner Parties: Serve on small dessert plates with elegant spoons and fresh fruit garnish. The individual portions eliminate the need for cutting and ensure consistent serving sizes.
Casual Gatherings: Hand out the jars directly with long-handled spoons. This creates an interactive, fun dessert experience that guests will remember.
Picnics and Outdoor Events: The portable nature of jar desserts makes them ideal for outdoor entertaining. Just remember to keep them chilled until serving time.
Romantic Dinners: Create an intimate setting by serving two jars with shared toppings and a bottle of dessert wine or champagne.
Presentation Ideas for No Bake Cheesecake Jars
Transform your dessert into a visual masterpiece with these presentation ideas:
Layered Beauty: Create visible layers by alternating cheesecake filling with fruit purees or different flavored creams.
Garnish Variety: Top with fresh berries, edible flowers, mint sprigs, or a drizzle of berry coulis for color contrast.
Seasonal Themes: Adapt your toppings to match the season – pumpkin spice in fall, peppermint in winter, fresh berries in summer.
Elegant Labels: Attach small chalkboard labels or elegant tags to identify flavors when serving multiple varieties.
No Bake Cheesecake Jars Recipe Tips
Here are my best tips for cheesecake jar success:
Temperature Matters: Ensure your cream cheese is truly at room temperature – this typically takes 2-3 hours out of the refrigerator.
Quality Ingredients: Use high-quality cream cheese and pure vanilla extract for the best flavor.
Smooth Filling: Pass the cream cheese through a fine-mesh sieve before mixing if you’re concerned about lumps.
Even Distribution: Use an ice cream scoop or large spoon to ensure equal portions in each jar.
Make-Ahead Friendly: These jars actually improve in flavor when made a day ahead, making them perfect for entertaining.
Storage Consideration: Keep jars covered and refrigerated until 30 minutes before serving for optimal texture.
How to Store No Bake Cheesecake Jars
Proper storage ensures your cheesecake jars maintain their quality and safety:
Refrigeration: Store covered jars in the refrigerator for up to 5 days. The gelatin helps maintain structure longer than traditional no-bake cheesecakes.
Freezing: While possible, freezing isn’t recommended as the texture may become grainy upon thawing. If you must freeze, do so without toppings for up to 1 month.
Serving from Storage: Remove from refrigerator 15-30 minutes before serving to allow the texture to soften slightly for easier eating.
Frequently Asked Questions (FAQs)
Q: Can I make these without gelatin?
A: Yes, but the texture will be softer. Increase the chilling time to overnight and avoid warm environments. The dessert will still be delicious but less stable.
Q: How far in advance can I make these?
A: These jars are best made 1-2 days ahead. The flavors meld beautifully, and the texture becomes perfectly set. Add fresh toppings just before serving.
Q: What size jars work best?
A: 8-ounce mason jars are ideal, but 6-ounce jars work for smaller portions. Avoid jars larger than 10 ounces as the dessert may not set properly in deeper containers.
Q: Can I use flavored cream cheese?
A: Absolutely! Strawberry, vanilla, or honey cream cheese can add interesting flavor dimensions. Reduce other flavorings accordingly to avoid overwhelming the dessert.
Q: Why is my cheesecake filling grainy?
A: This usually indicates the cream cheese wasn’t fully softened or the mixture was overbeaten. Always use room temperature ingredients and beat just until smooth.
Q: Can children help make these?
A: Yes! The no-bake nature makes this a perfect recipe for young helpers. They can crush graham crackers, measure ingredients, and help assemble the jars.
Conclusion
No Bake Cheesecake Jars represent the perfect intersection of elegance and simplicity. These delightful individual desserts prove that you don’t need complex techniques or hours of baking to create something truly special. With their creamy texture, customizable flavors, and stunning presentation, they’re destined to become a favorite in your dessert repertoire.
The beauty of this recipe lies not just in its ease of preparation, but in its versatility and make-ahead convenience. Whether you’re a beginner baker looking for a foolproof dessert or an experienced cook seeking an elegant entertaining option, these cheesecake jars deliver on all fronts.
Remember, the key to perfect No Bake Cheesecake Jars is patience – allow proper setting time and use quality ingredients. With these simple guidelines, you’ll create a dessert that looks professionally made and tastes absolutely divine. So gather your jars, assemble your ingredients, and get ready to impress with this stunning no-bake creation!