No Bake Chocolate Peanut Butter Bars Recipe
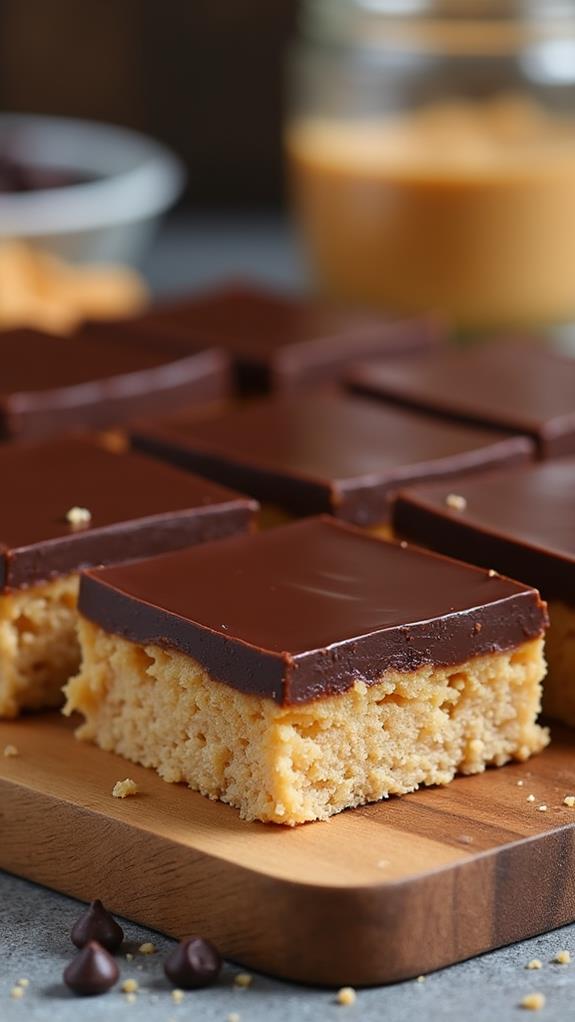
Craving something sweet but don’t want to turn on the oven? These No Bake Chocolate Peanut Butter Bars are your perfect solution! With just a handful of pantry staples and no baking required, you can whip up these irresistible treats in under 30 minutes.
These bars combine the classic flavor duo of rich chocolate and creamy peanut butter in layers of pure indulgence. Follow this foolproof recipe to create dessert bars so delicious, they’ll disappear faster than you can make them!
What are “No Bake Chocolate Peanut Butter Bars”?
No Bake Chocolate Peanut Butter Bars are a beloved dessert that combines a dense, sweet peanut butter base with a smooth chocolate topping. These bars require no oven time – just simple mixing, pressing, and chilling to create the perfect treat.
The beauty of these bars lies in their simplicity and the perfect balance of textures. The bottom layer is firm yet creamy, made from peanut butter, powdered sugar, and crushed graham crackers. The top layer is a glossy chocolate coating that sets into the perfect bite-sized squares.
Ingredients List for No Bake Chocolate Peanut Butter Bars
For the Peanut Butter Base:
- 1 cup creamy peanut butter
- ½ cup unsalted butter, melted
- 2 cups powdered sugar
- 1½ cups graham cracker crumbs (about 12 crackers)
- 1 teaspoon vanilla extract
- ¼ teaspoon salt
For the Chocolate Topping:
- 1½ cups semi-sweet chocolate chips
- 3 tablespoons creamy peanut butter
- 2 tablespoons coconut oil or vegetable shortening
How to Make No Bake Chocolate Peanut Butter Bars: A Step-by-Step Guide
Creating these delectable bars is surprisingly simple. Here’s my detailed guide to ensure perfect results every time:
1. Prepare Your Pan:
- Line an 8×8 inch or 9×9 inch square baking pan with parchment paper.
- Leave some overhang for easy removal later.
- Lightly grease the parchment paper with cooking spray or butter.
2. Make the Graham Cracker Crumbs:
- If you don’t have pre-made crumbs, place graham crackers in a food processor and pulse until fine.
- Alternatively, place crackers in a sealed plastic bag and crush with a rolling pin.
- You want fine, even crumbs for the best texture.
3. Create the Peanut Butter Base:
- In a large mixing bowl, combine the creamy peanut butter and melted butter.
- Mix until smooth and well combined.
- Gradually add the powdered sugar, mixing continuously to prevent lumps.
- Stir in the graham cracker crumbs, vanilla extract, and salt until everything is evenly distributed.
4. Press the Base Layer:
- Transfer the peanut butter mixture to your prepared pan.
- Using clean hands or the back of a measuring cup, press the mixture firmly and evenly into the pan.
- Make sure the surface is smooth and level – this will be the foundation of your bars.
5. Prepare the Chocolate Topping:
- In a microwave-safe bowl, combine the chocolate chips, peanut butter, and coconut oil.
- Microwave in 30-second intervals, stirring between each interval, until completely smooth.
- Alternatively, melt using a double boiler over simmering water.
6. Add the Chocolate Layer:
- Pour the melted chocolate mixture over the pressed peanut butter base.
- Use an offset spatula or the back of a spoon to spread evenly across the surface.
- Gently tap the pan on the counter to eliminate any air bubbles.
7. Chill and Set:
- Refrigerate the bars for at least 2 hours, or until completely set.
- For firmer bars, chill for 3-4 hours or overnight.
- Once set, lift the bars out using the parchment paper overhang and cut into squares.
Substitutions and Variations
I love how versatile this recipe is! Here are some substitutions and variations you can try:
Base Layer Variations:
- Graham Crackers: Use vanilla wafers, digestive biscuits, or even crushed Oreos for different flavors.
- Peanut Butter: Try almond butter, sunflower seed butter, or cashew butter for nut-free or different flavor options.
- Add-ins: Fold in mini chocolate chips, chopped peanuts, or toffee bits for extra texture.
Chocolate Layer Options:
- Dark Chocolate: Use dark chocolate chips for a more sophisticated flavor.
- White Chocolate: Create elegant white chocolate bars with white chocolate chips.
- Milk Chocolate: For sweeter bars, use milk chocolate chips.
Dietary Modifications:
- Gluten-Free: Use gluten-free graham crackers or substitute with gluten-free cookies.
- Dairy-Free: Ensure your chocolate chips are dairy-free and use vegan butter.
- Reduced Sugar: Use sugar-free powdered sugar and sugar-free chocolate chips.
Common Mistakes to Avoid
After making these bars countless times, I’ve learned to avoid these common pitfalls:
Mistake #1: Not Pressing the Base Firmly Enough
If you don’t press the peanut butter layer firmly, your bars will crumble when cut. Use significant pressure to create a compact base.
Mistake #2: Overheating the Chocolate
Chocolate can seize if overheated. Always use short intervals when microwaving and stir frequently.
Mistake #3: Cutting Too Soon
Patience is key! If you cut the bars before they’re fully set, they’ll be messy and won’t hold their shape.
Mistake #4: Using Natural Peanut Butter
Natural peanut butter can make the bars too oily. Stick with conventional creamy peanut butter for best results.
Mistake #5: Skipping the Parchment Paper
This makes removal nearly impossible. Always line your pan for easy lifting and cutting.
How to Serve No Bake Chocolate Peanut Butter Bars
These bars are incredibly versatile when it comes to serving. I love serving them at room temperature for the softest texture, though they’re equally delicious straight from the refrigerator for a firmer bite.
For casual gatherings, cut them into generous 2-inch squares. For more elegant occasions, cut smaller 1-inch pieces and arrange them on a decorative platter. They pair beautifully with a glass of cold milk, hot coffee, or even a scoop of vanilla ice cream for an extra indulgent dessert.
These bars are perfect for potluck dinners, bake sales, holiday gatherings, or whenever you need a crowd-pleasing dessert that requires minimal effort.
Presentation Ideas for No Bake Chocolate Peanut Butter Bars
Make your bars look as good as they taste with these presentation tips:
Elegant Garnishes:
- Drizzle melted white chocolate in decorative patterns over the set chocolate layer.
- Sprinkle chopped peanuts or sea salt flakes on top before the chocolate sets.
- Dust with cocoa powder for a sophisticated finish.
Creative Serving Ideas:
- Cut into triangles instead of squares for a unique shape.
- Use cookie cutters to create fun shapes for kids’ parties.
- Serve on individual paper liners for easy grab-and-go treats.
Plating Suggestions:
- Arrange on a marble board with fresh berries for contrast.
- Create a dessert bar with different flavored variations.
- Package in clear cellophane bags tied with ribbon for gifts.
No Bake Chocolate Peanut Butter Bars Recipe Tips
Here are my top tips for perfect bars every time:
Temperature Matters:
Make sure your melted butter isn’t too hot when mixing with peanut butter, or it might make the mixture too runny.
Texture is Key:
The peanut butter base should hold together when pressed but not be overly sticky. If it’s too dry, add a tablespoon more melted butter.
Chocolate Consistency:
Your melted chocolate should be smooth and pourable but not hot. Let it cool slightly before pouring over the base.
Clean Cuts:
For the cleanest cuts, wipe your knife clean between each slice. A warm knife also helps create smoother edges.
Make-Ahead Friendly:
These bars actually improve after sitting overnight, as the flavors meld together beautifully.
How to Store No Bake Chocolate Peanut Butter Bars
Proper storage keeps these bars fresh and delicious for days. Once completely set and cut, store the bars in an airtight container in the refrigerator for up to one week.
For longer storage, wrap individual bars in plastic wrap and freeze for up to three months. Let frozen bars thaw at room temperature for 10-15 minutes before serving.
If you’re storing them at room temperature, they’ll keep for 2-3 days in a cool, dry place. However, I recommend refrigeration for the best texture and to prevent the chocolate from becoming too soft.
Frequently Asked Questions (FAQs)
Q: Can I make these bars without graham crackers?
A: Absolutely! You can substitute with vanilla wafer crumbs, crushed cookies, or even finely ground nuts for a different texture and flavor.
Q: Why won’t my chocolate layer set properly?
A: This usually happens if the chocolate was too warm when poured, or if there’s too much oil in the mixture. Make sure your chocolate mixture has cooled slightly before pouring, and stick to the recipe proportions.
Q: Can I double this recipe?
A: Yes! Double all ingredients and use a 9×13 inch pan instead. The chilling time may need to be extended by 30-60 minutes.
Q: My bars are too soft – what went wrong?
A: This often happens when the base wasn’t pressed firmly enough, or if natural peanut butter was used. Make sure to use conventional peanut butter and press the base very firmly.
Q: Can I add other flavors to these bars?
A: Definitely! Try adding a teaspoon of espresso powder to the chocolate layer, or mix in some crushed pretzels or cookies to the base for extra flavor and texture.
Q: How far in advance can I make these?
A: These bars are perfect make-ahead treats! You can prepare them up to 3 days in advance and store them covered in the refrigerator.
Conclusion
No Bake Chocolate Peanut Butter Bars prove that sometimes the simplest recipes create the most satisfying treats. With just a few basic ingredients and no oven required, you can create dessert bars that rival any bakery creation.
The combination of creamy peanut butter and rich chocolate never goes out of style, and these bars deliver that perfect flavor balance in every bite. Whether you’re hosting a party, need a quick dessert for unexpected guests, or simply want to satisfy your sweet tooth, this recipe is your go-to solution.
I love how forgiving and customizable this recipe is – you can adapt it to dietary needs, experiment with different flavors, and always achieve delicious results. The best part? You can have these bars ready to serve in under 30 minutes of active time.
So grab your ingredients, press that base layer with confidence, and get ready to enjoy some of the most irresistible chocolate peanut butter bars you’ve ever made. Trust me, once you try these, they’ll become a permanent fixture in your dessert repertoire. Happy baking – or should I say, happy no-baking!