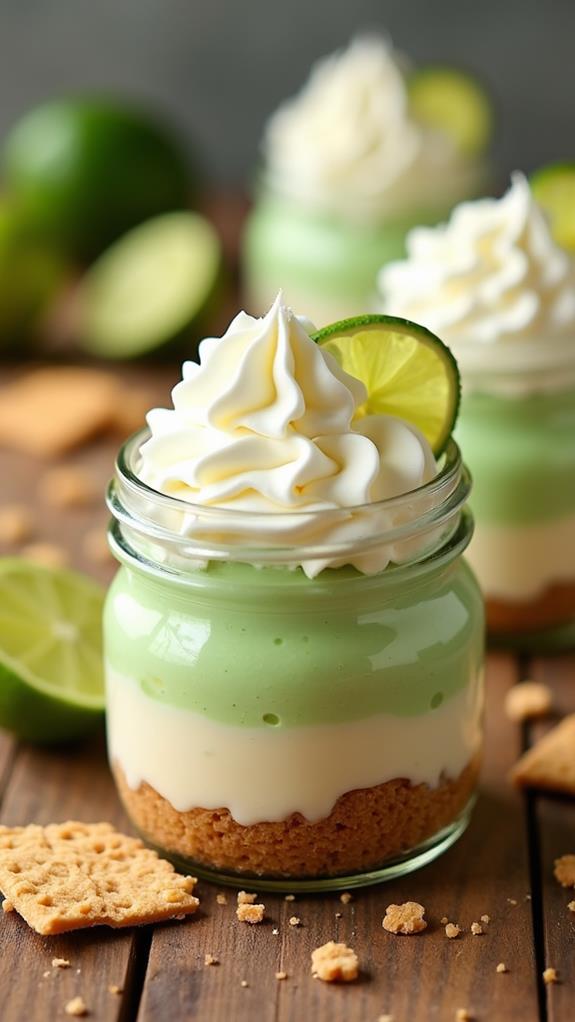
No Bake Key Lime Cheesecake Jars Recipe
Craving a dessert that’s both refreshing and indulgent without turning on the oven? These No Bake Key Lime Cheesecake Jars are your answer! With their creamy, tangy filling and buttery graham cracker crust, these individual treats capture the essence of summer in every spoonful.
Perfect for entertaining or when you want something special without the fuss, these cheesecake jars require no baking and can be made ahead of time. Let me guide you through creating these delightful desserts that are sure to become your new favorite go-to treat!
What are “No Bake Key Lime Cheesecake Jars”?
No Bake Key Lime Cheesecake Jars are individual-sized desserts that combine the classic flavors of key lime pie with the rich creaminess of cheesecake. Served in mason jars or small glasses, these treats feature layers of buttery graham cracker crust and smooth, tangy key lime cheesecake filling.
The beauty of this recipe lies in its simplicity – no oven required! The cheesecake sets in the refrigerator, making it perfect for hot summer days or when you want to prepare dessert in advance. Each jar provides the perfect portion size and creates an elegant presentation that guests absolutely love.
Ingredients List for No Bake Key Lime Cheesecake Jars
For the Graham Cracker Crust:
- 1½ cups graham cracker crumbs (about 12 crackers)
- ⅓ cup unsalted butter, melted
- 3 tablespoons granulated sugar
- Pinch of salt
For the Key Lime Cheesecake Filling:
- 16 oz cream cheese, softened to room temperature
- 1 cup powdered sugar
- 1 cup heavy whipping cream, cold
- ½ cup fresh key lime juice (about 12-15 key limes)
- 2 tablespoons key lime zest
- 1 teaspoon vanilla extract
- ¼ teaspoon salt
For Garnish (optional):
- Whipped cream
- Extra key lime zest
- Graham cracker crumbs
- Thin lime slices
How to Make No Bake Key Lime Cheesecake Jars: A Step-by-Step Guide
Creating these delightful cheesecake jars is easier than you might think. Here’s my detailed guide to ensure perfect results every time:
1. Prepare Your Jars:
- Gather 6-8 mason jars or small glasses (about 8 oz capacity each).
- Clean and dry them thoroughly to ensure the best presentation.
- Set them aside on a tray that will fit in your refrigerator.
2. Make the Graham Cracker Crust:
- In a medium bowl, combine graham cracker crumbs, melted butter, sugar, and salt.
- Mix until the crumbs are evenly moistened and hold together when pressed.
- The mixture should feel like wet sand and stick together when squeezed.
- Divide the crust mixture evenly among your jars, using about 2-3 tablespoons per jar.
- Press down firmly with the back of a spoon or a small glass to create a compact layer.
3. Prepare the Key Lime Filling:
- Ensure your cream cheese has reached room temperature for smooth mixing.
- In a large bowl, beat the softened cream cheese with an electric mixer until light and fluffy (about 2-3 minutes).
- Gradually add the powdered sugar, beating until well combined and smooth.
- Mix in the key lime juice, lime zest, vanilla extract, and salt until fully incorporated.
4. Whip the Cream:
- In a separate chilled bowl, whip the cold heavy cream until stiff peaks form.
- Be careful not to overwhip, as this can turn the cream into butter.
- The cream should hold its shape when the beaters are lifted.
5. Fold and Combine:
- Gently fold the whipped cream into the cream cheese mixture in three additions.
- Use a rubber spatula and fold from bottom to top to maintain the light, airy texture.
- Mix just until no white streaks remain – don’t overmix or the filling will become dense.
6. Assemble the Jars:
- Divide the key lime filling evenly among the jars, filling them almost to the top.
- Leave about ½ inch of space for garnishes if desired.
- Smooth the tops with the back of a spoon for a clean presentation.
- Cover each jar with plastic wrap or lid.
7. Chill and Set:
- Refrigerate the jars for at least 4 hours, but preferably overnight.
- This chilling time allows the filling to set properly and the flavors to meld together.
- The longer they chill, the better the texture and taste will be.
Substitutions and Variations
Want to customize your No Bake Key Lime Cheesecake Jars? Here are some delicious alternatives and variations:
- Key Lime Juice: If key limes aren’t available, substitute with regular lime juice, though the flavor will be slightly less intense.
- Cream Cheese: Greek yogurt cream cheese can be used for a lighter version, though the texture will be less rich.
- Heavy Cream: You can use whipped topping instead, but fold it in gently to maintain texture.
- Graham Crackers: Try vanilla wafers, digestive biscuits, or even crushed shortbread cookies for the crust.
- Flavor Variations: Add a tablespoon of coconut extract for a tropical twist, or try lemon juice and zest for lemon cheesecake jars.
- Sweetener: Replace powdered sugar with the same amount of granulated sugar, though powdered sugar creates a smoother texture.
Common Mistakes to Avoid
To ensure your No Bake Key Lime Cheesecake Jars turn out perfectly, avoid these common pitfalls:
- Using Cold Cream Cheese: Room temperature cream cheese is crucial for a smooth, lump-free filling. Plan ahead and let it soften for at least an hour.
- Overbeating the Mixture: Once you add the whipped cream, mix gently. Overbeating will deflate the cream and create a dense texture.
- Not Chilling Long Enough: Patience is key! The jars need adequate time to set properly in the refrigerator.
- Using Bottled Lime Juice: Fresh key lime juice provides the best flavor. Bottled juice often tastes artificial and lacks the bright acidity needed.
- Skipping the Zest: Key lime zest adds essential oils and intensifies the lime flavor – don’t leave it out!
How to Serve No Bake Key Lime Cheesecake Jars
These cheesecake jars are perfect for various occasions and can be served in multiple ways:
Serve them chilled directly from the refrigerator for the best texture and flavor. They make excellent individual desserts for dinner parties, picnics, or casual gatherings. The portable nature of jars makes them ideal for outdoor events where traditional plated desserts might be impractical.
For a more elegant presentation, transfer the chilled cheesecake to small glasses or dessert bowls. This works particularly well for formal dinners or special occasions where you want a more refined look.
Presentation Ideas for No Bake Key Lime Cheesecake Jars
Elevate your cheesecake jars with these beautiful presentation ideas:
- Layered Look: Create visible layers by alternating crust and filling, finishing with a sprinkle of graham cracker crumbs on top.
- Tropical Garnish: Top with a dollop of whipped cream, a sprinkle of toasted coconut, and a thin lime wheel for a tropical feel.
- Elegant Finish: Pipe rosettes of whipped cream on top and add a delicate mint sprig with extra lime zest.
- Rustic Charm: Leave the jars slightly messy around the edges and tie with twine and a small wooden spoon for a farmhouse aesthetic.
No Bake Key Lime Cheesecake Jars Recipe Tips
Here are my best tips for achieving perfect results every time:
- Quality Ingredients Matter: Use real key limes when possible, as they provide a more complex, less acidic flavor than regular limes.
- Temperature Control: All dairy ingredients should be at room temperature before mixing to ensure smooth incorporation.
- Proper Measurements: Level your measuring cups for accurate results, especially with the powdered sugar.
- Make Ahead: These jars actually improve in flavor when made a day ahead, making them perfect for entertaining.
- Taste and Adjust: Before adding the whipped cream, taste the filling and adjust the lime juice or sugar as needed.
- Uniform Portions: Use an ice cream scoop or large spoon to ensure each jar has an equal amount of filling.
How to Store No Bake Key Lime Cheesecake Jars
Proper storage ensures your cheesecake jars maintain their quality and safety:
Store the jars covered in the refrigerator for up to 5 days. Cover each jar tightly with plastic wrap or use lids if your jars have them. This prevents the cheesecake from absorbing other refrigerator odors and keeps the surface from forming a skin.
For best quality, consume within 3-4 days of making. The texture and flavor are optimal during this timeframe. If you need to transport them, keep them chilled in a cooler with ice packs.
These cheesecake jars are not suitable for freezing, as the cream-based filling will separate and become grainy when thawed.
Frequently Asked Questions (FAQs)
Q: Can I make these cheesecake jars ahead of time?
A: Absolutely! These jars are actually better when made ahead. I recommend preparing them at least 4 hours in advance, but they’re perfect when made the day before serving.
Q: What’s the difference between key limes and regular limes?
A: Key limes are smaller, more aromatic, and have a more complex, less acidic flavor than regular Persian limes. They’re worth seeking out, but regular limes can be substituted if needed.
Q: Can I use store-bought whipped topping instead of heavy cream?
A: Yes, you can substitute 2 cups of thawed whipped topping for the heavy cream. Fold it in gently to maintain the light texture.
Q: How do I know when the cheesecake is properly set?
A: The filling should be firm to the touch and hold its shape when gently jiggled. If it’s still jiggly or soft, it needs more chilling time.
Q: Can I make this recipe dairy-free?
A: Yes! Use dairy-free cream cheese and coconut whipping cream. Make sure both are well-chilled before using.
Q: What size jars work best for this recipe?
A: 8-ounce mason jars or similar-sized glasses work perfectly. You can also use 6-ounce jars for smaller portions.
Conclusion
No Bake Key Lime Cheesecake Jars offer the perfect combination of convenience, flavor, and presentation that makes them ideal for any occasion. The bright, tangy key lime flavor paired with rich, creamy cheesecake creates a dessert that’s both refreshing and satisfying.
I love how these individual portions eliminate the need for cutting and serving, while the make-ahead nature means you can prepare them when it’s convenient for you. Whether you’re hosting a summer barbecue, bringing dessert to a potluck, or simply treating yourself to something special, these cheesecake jars deliver restaurant-quality results with minimal effort.
The beauty of this recipe lies in its flexibility – you can customize the flavors, adjust the sweetness, and present them in countless ways. Most importantly, the no-bake method means you can enjoy homemade cheesecake even on the hottest days without heating up your kitchen.
Give this recipe a try, and I’m confident these delightful jars will become a staple in your dessert repertoire. Happy making!