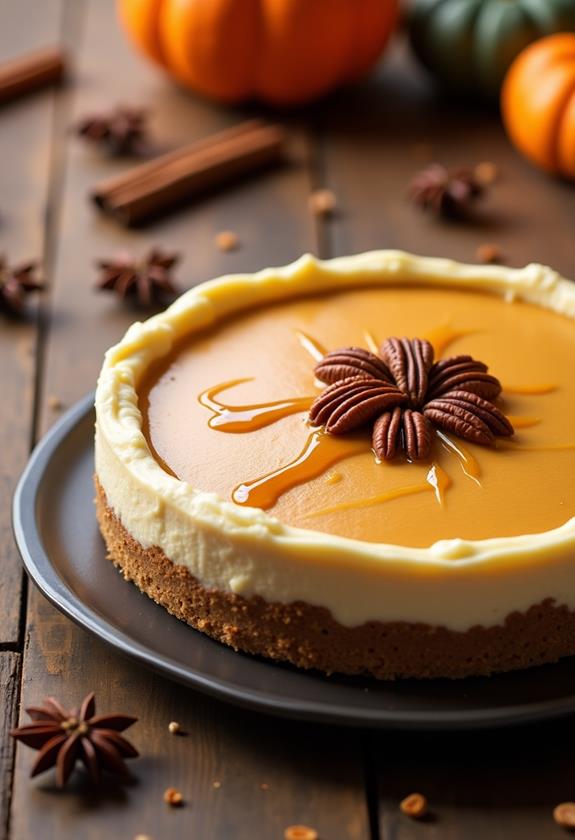
No Bake Pumpkin Cheesecake Recipe
When autumn arrives and pumpkin spice fills the air, there’s nothing quite like a rich, creamy pumpkin cheesecake to capture the essence of the season. This no-bake version delivers all the traditional flavors you crave without the fuss of turning on your oven.
Perfect for busy schedules or warm climates, this no-bake pumpkin cheesecake combines the smooth texture of classic cheesecake with warm spices and real pumpkin flavor. Follow this foolproof recipe to create a dessert that will have your family and friends asking for seconds!
What is “No Bake Pumpkin Cheesecake”?
No-bake pumpkin cheesecake is a chilled dessert that captures all the beloved flavors of traditional pumpkin pie and cheesecake without requiring any baking time. Instead of using eggs and heat to set the filling, this version relies on cream cheese, whipped cream, and gelatin to create a perfectly smooth and creamy texture.
The dessert features a graham cracker crust as its foundation, topped with a spiced pumpkin filling that’s both light and indulgent. What makes this recipe particularly appealing is its simplicity – you can prepare it entirely in advance, making it ideal for holiday entertaining or any time you want an impressive dessert without the stress.
Ingredients List for No Bake Pumpkin Cheesecake
For the Crust:
- 1½ cups graham cracker crumbs
- ⅓ cup melted butter
- ¼ cup granulated sugar
- ½ teaspoon ground cinnamon
- Pinch of salt
For the Filling:
- 1 packet (2¼ teaspoons) unflavored gelatin
- ¼ cup cold water
- 16 oz cream cheese, softened to room temperature
- ¾ cup powdered sugar
- 1 cup pumpkin puree (not pumpkin pie filling)
- 1 teaspoon vanilla extract
- 1 teaspoon ground cinnamon
- ½ teaspoon ground nutmeg
- ¼ teaspoon ground ginger
- ⅛ teaspoon ground cloves
- 1 cup heavy whipping cream
For Garnish (Optional):
- Whipped cream
- Cinnamon stick
- Crushed graham crackers
- Caramel sauce drizzle
How to Make No Bake Pumpkin Cheesecake: A Step-by-Step Guide
Creating the perfect no-bake pumpkin cheesecake requires attention to timing and technique. Here’s my detailed guide to ensure your dessert turns out flawlessly:
1. Prepare the Crust:
- Line a 9-inch springform pan with parchment paper for easy removal.
- In a medium bowl, combine graham cracker crumbs, melted butter, sugar, cinnamon, and salt.
- Mix thoroughly until the mixture resembles wet sand and holds together when pressed.
- Press the mixture firmly into the bottom of your prepared pan, creating an even layer.
- Refrigerate the crust while you prepare the filling to help it set properly.
2. Bloom the Gelatin:
- Sprinkle the unflavored gelatin over cold water in a small bowl.
- Let it sit for 5 minutes until the gelatin absorbs the water and becomes spongy.
- Microwave for 15-20 seconds or place the bowl in a small saucepan with simmering water until the gelatin completely dissolves.
- Set aside to cool slightly while you prepare the other components.
3. Create the Cream Cheese Base:
- In a large mixing bowl, beat the softened cream cheese with an electric mixer until completely smooth and fluffy.
- Gradually add the powdered sugar, beating continuously until well combined and no lumps remain.
- This step is crucial for achieving the silky texture that makes this cheesecake irresistible.
4. Add Pumpkin and Spices:
- Beat in the pumpkin puree, vanilla extract, cinnamon, nutmeg, ginger, and cloves.
- Mix until the filling is uniform in color and all spices are evenly distributed.
- Slowly drizzle in the cooled gelatin mixture while beating on low speed to prevent lumps.
5. Whip the Cream:
- In a separate clean bowl, whip the heavy cream to soft peaks using clean beaters.
- Be careful not to overwhip, as this can lead to a grainy texture in your final dessert.
- The cream should hold its shape but still look smooth and glossy.
6. Fold and Combine:
- Gently fold one-third of the whipped cream into the pumpkin mixture to lighten it.
- Add the remaining whipped cream in two additions, folding carefully to maintain the airy texture.
- Pour the filling over the chilled crust, smoothing the top with an offset spatula.
7. Chill and Set:
- Cover the cheesecake with plastic wrap, ensuring it doesn’t touch the surface.
- Refrigerate for at least 4 hours, but preferably overnight for the best texture and flavor development.
- The gelatin needs this time to fully set, creating the perfect sliceable consistency.
Substitutions and Variations
I love how adaptable this no-bake pumpkin cheesecake recipe can be. Here are some substitutions and variations you can try to customize it to your preferences:
- Crust Options: Try gingersnap cookies, vanilla wafers, or even crushed pecans mixed with butter for different flavor profiles.
- Dairy-Free Version: Use vegan cream cheese and coconut cream in place of traditional dairy products. Make sure to chill the coconut cream overnight before whipping.
- Spice Variations: Add a pinch of cardamom or allspice for a more complex flavor, or use store-bought pumpkin pie spice for convenience.
- Sweetener Alternatives: Replace powdered sugar with maple syrup or honey, adjusting the liquid content accordingly.
- Chocolate Twist: Add 2 tablespoons of cocoa powder to the crust or swirl melted chocolate into the filling for a decadent variation.
Common Mistakes to Avoid
Having made this recipe countless times, I’ve learned to avoid these common pitfalls that can affect the final result:
- Using Cold Cream Cheese: Room temperature cream cheese is essential for a smooth filling. Cold cream cheese will create lumps that are difficult to eliminate.
- Skipping the Gelatin Bloom: Properly blooming the gelatin ensures it dissolves completely and sets the cheesecake properly.
- Overwhipping the Cream: Stop at soft peaks to maintain the creamy texture. Overwhipped cream can make the filling grainy.
- Not Chilling Long Enough: Patience is key! The cheesecake needs adequate time to set, or it will be too soft to slice cleanly.
- Using Pumpkin Pie Filling: Always use pure pumpkin puree, not pre-spiced pumpkin pie filling, to control the sweetness and spice levels.
How to Serve No Bake Pumpkin Cheesecake
This pumpkin cheesecake is versatile enough to be the star of any dessert table. I recommend serving it slightly chilled, allowing it to sit at room temperature for about 10 minutes before slicing for the creamiest texture.
For the cleanest slices, use a sharp knife dipped in warm water and wiped clean between cuts. This technique prevents the filling from sticking to the blade and creates professional-looking portions.
The rich, creamy texture pairs beautifully with a cup of coffee, spiced chai tea, or even a glass of dessert wine. For special occasions, consider serving smaller portions alongside other autumn desserts for a seasonal dessert spread.
Presentation Ideas for No Bake Pumpkin Cheesecake
Elevate your no-bake pumpkin cheesecake with these presentation ideas that will make it look as amazing as it tastes:
- Whipped Cream Rosettes: Pipe decorative rosettes of whipped cream around the edge using a star tip for an elegant finish.
- Caramel Drizzle: Create an artistic caramel sauce drizzle on the plate before placing each slice for a restaurant-quality presentation.
- Candied Pecans: Top with homemade candied pecans for added texture and a sophisticated touch.
- Cinnamon Dust: Lightly dust the surface with cinnamon using a fine-mesh sieve for a beautiful, aromatic finish.
- Seasonal Garnishes: Add small decorative pumpkins, autumn leaves, or a sprinkle of toasted pumpkin seeds for a festive fall appearance.
No Bake Pumpkin Cheesecake Recipe Tips
Here are my tried-and-true tips for ensuring your no-bake pumpkin cheesecake turns out perfectly every time:
- Temperature Matters: Ensure all ingredients are at the proper temperature before beginning. This prevents lumps and ensures smooth mixing.
- Quality Ingredients: Use high-quality cream cheese and real vanilla extract for the best flavor. The difference is noticeable in the final product.
- Gentle Folding: When incorporating the whipped cream, use a folding motion rather than stirring to maintain the light, airy texture.
- Proper Storage: Keep the cheesecake covered in the refrigerator to prevent it from absorbing other flavors and to maintain its texture.
- Make-Ahead Friendly: This dessert actually improves after a day in the refrigerator, making it perfect for advance preparation.
How to Store No Bake Pumpkin Cheesecake
Proper storage is essential for maintaining the quality and safety of your no-bake pumpkin cheesecake. Cover the entire cheesecake with plastic wrap or store individual slices in airtight containers in the refrigerator.
The cheesecake will stay fresh for up to 5 days when properly stored. For longer storage, you can freeze individual slices wrapped tightly in plastic wrap and aluminum foil for up to 2 months. Thaw frozen slices in the refrigerator overnight before serving.
Always keep the cheesecake refrigerated except when serving, as the dairy-based filling can spoil at room temperature. If you’re transporting the dessert, use a cooler with ice packs to maintain the proper temperature.
Frequently Asked Questions (FAQs)
Q: Can I make this cheesecake without gelatin?
A: While gelatin helps create the perfect texture, you can omit it for a mousse-like consistency. The cheesecake will be softer and may not hold its shape as well when sliced.
Q: How far in advance can I make this dessert?
A: You can make this cheesecake up to 2 days in advance. In fact, I find it tastes even better after resting overnight, as the flavors have time to meld together.
Q: Can I use fresh pumpkin instead of canned?
A: Absolutely! Roast fresh pumpkin, puree it until smooth, and strain to remove excess moisture. Make sure the puree has the same consistency as canned pumpkin.
Q: What if my cheesecake doesn’t set properly?
A: If it’s too soft, it likely needs more chilling time or the gelatin wasn’t properly dissolved. Refrigerate for several more hours or overnight.
Q: Can I double this recipe?
A: Yes, you can double the recipe to make two cheesecakes or use a larger pan. Just ensure you have enough refrigerator space for proper chilling.
Conclusion
This no-bake pumpkin cheesecake represents everything I love about fall baking – it’s rich, comforting, and filled with warm spices that capture the essence of the season. The beauty of this recipe lies not only in its incredible taste but also in its simplicity and make-ahead convenience.
Whether you’re hosting a holiday gathering, attending a potluck, or simply craving a taste of autumn, this dessert delivers impressive results without the stress of traditional baking. The creamy texture, perfectly spiced filling, and buttery graham cracker crust create a harmony of flavors that will have everyone asking for the recipe.
Take your time with each step, use quality ingredients, and don’t rush the chilling process. With these guidelines, you’ll create a no-bake pumpkin cheesecake that rivals any bakery version. Enjoy every creamy, spiced bite of this autumn masterpiece!