Peach Cobbler Cheesecake Fruit Salad Recipe
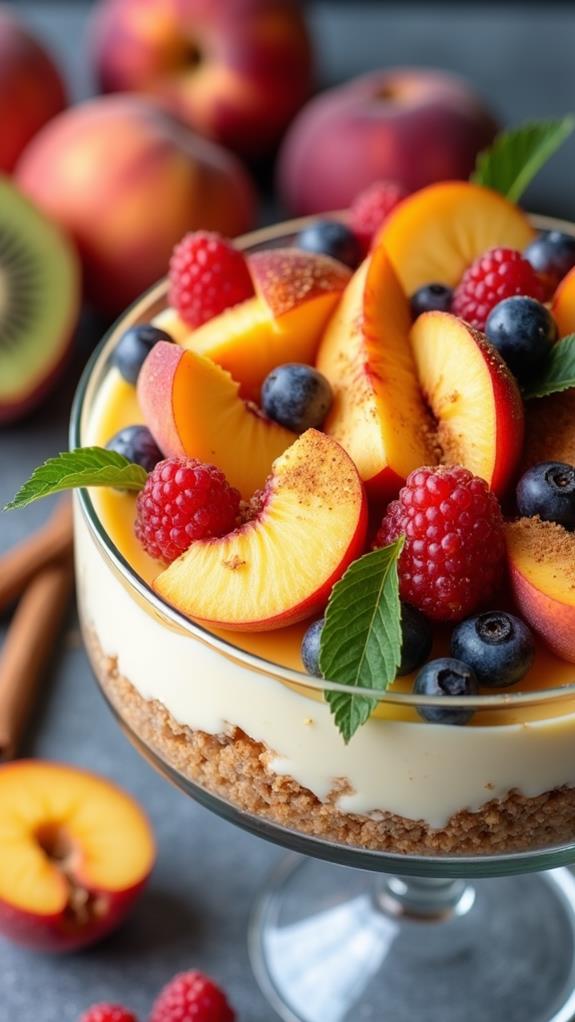
Craving a dessert that captures the essence of summer in every spoonful? This Peach Cobbler Cheesecake Fruit Salad is the perfect fusion of three beloved desserts rolled into one irresistible treat. Imagine the juicy sweetness of fresh peaches, the creamy richness of cheesecake, and the comforting warmth of cobbler spices all dancing together in harmony.
This easy-to-make dessert is perfect for potlucks, family gatherings, or when you want to impress guests without spending hours in the kitchen. Let me walk you through creating this crowd-pleasing masterpiece that will have everyone asking for the recipe!
What is “Peach Cobbler Cheesecake Fruit Salad”?
Peach Cobbler Cheesecake Fruit Salad is a no-bake dessert that combines the best elements of three classic treats. At its heart, it’s a fresh fruit salad featuring ripe, juicy peaches and complementary fruits. What makes it special is the luxurious cheesecake-inspired cream that coats every piece of fruit, along with crunchy cobbler-style topping that adds texture and that familiar cinnamon-spiced flavor we all love.
This dessert captures the essence of a traditional peach cobbler and creamy cheesecake without requiring any baking skills. It’s essentially a deconstructed version of these classic desserts, reimagined as a refreshing fruit salad that’s perfect for warm weather entertaining.
Ingredients List for Peach Cobbler Cheesecake Fruit Salad
For the Fruit Base:
- 6 large ripe peaches, peeled and diced
- 2 cups fresh strawberries, hulled and sliced
- 1 cup fresh blueberries
- 1 cup seedless grapes, halved
- 2 tablespoons fresh lemon juice
- 2 tablespoons granulated sugar
For the Cheesecake Cream:
- 8 oz cream cheese, softened to room temperature
- 1 cup heavy whipping cream
- ½ cup powdered sugar
- 1 teaspoon vanilla extract
- ¼ teaspoon almond extract
For the Cobbler Topping:
- 1½ cups graham crackers, crushed
- ½ cup brown sugar, packed
- 1 teaspoon ground cinnamon
- ¼ teaspoon ground nutmeg
- 4 tablespoons unsalted butter, melted
- ½ cup chopped pecans (optional)
How to Make Peach Cobbler Cheesecake Fruit Salad: A Step-by-Step Guide
Creating this delectable dessert involves several simple steps that build layers of flavor and texture. Here’s your complete guide to making it perfectly every time:
1. Prepare the Fresh Fruit:
Start by washing all your fruits thoroughly under cold running water. For the peaches, bring a large pot of water to boil and prepare an ice bath in a separate bowl. Score an ‘X’ on the bottom of each peach and blanch them in boiling water for 30-60 seconds. Immediately transfer to the ice bath to stop cooking. The skins should peel off easily now.
Dice the peeled peaches into bite-sized pieces and place them in a large mixing bowl. Hull and slice the strawberries, adding them to the bowl along with the blueberries and halved grapes. Sprinkle the fruit with lemon juice and granulated sugar, then gently toss to combine. This will help prevent browning and enhance the natural sweetness.
2. Create the Cheesecake Cream:
In a separate large bowl, beat the softened cream cheese with an electric mixer until it’s completely smooth and fluffy, about 2-3 minutes. Make sure there are no lumps remaining, as these will affect the final texture of your cream.
In another bowl, whip the heavy cream until soft peaks form. Gradually add the powdered sugar, vanilla extract, and almond extract, continuing to whip until stiff peaks form. Be careful not to over-whip, as this can cause the cream to become grainy.
Gently fold the whipped cream mixture into the cream cheese using a spatula, working in thirds to maintain the light, airy texture. The result should be a smooth, creamy mixture that’s reminiscent of cheesecake filling.
3. Make the Cobbler Topping:
Combine the crushed graham crackers, brown sugar, cinnamon, and nutmeg in a medium bowl. Mix these dry ingredients thoroughly to ensure even distribution of the spices.
Drizzle the melted butter over the crumb mixture and stir until everything is evenly moistened. The mixture should hold together when pressed but still maintain a crumbly texture. If using pecans, fold them in at this stage for added crunch and flavor.
4. Assemble the Fruit Salad:
Add the prepared cheesecake cream to the bowl of mixed fruit. Using a large spoon or spatula, gently fold the cream into the fruit until every piece is well-coated. Be gentle to avoid mashing the delicate fruits, especially the peaches and strawberries.
Transfer the creamy fruit mixture to your serving bowl or individual dessert cups. The presentation can be as casual or elegant as your occasion demands.
5. Add the Final Touch:
Just before serving, sprinkle the cobbler topping evenly over the surface of the fruit salad. This timing is important because adding it too early will cause the topping to become soggy. The contrast between the creamy fruit and the crunchy, spiced topping is what makes this dessert truly special.
Substitutions and Variations
The beauty of this Peach Cobbler Cheesecake Fruit Salad lies in its versatility. Here are several ways you can customize it to suit different tastes and dietary needs:
Fruit Variations: Feel free to substitute or add other summer fruits like nectarines, apricots, blackberries, or raspberries. Canned peaches work in a pinch, but make sure to drain them thoroughly and pat dry. Frozen fruits can also be used, but thaw and drain them completely first.
Cream Alternatives: For a lighter version, substitute half the cream cheese with Greek yogurt. Those avoiding dairy can use dairy-free cream cheese and coconut whipping cream. For a tangier flavor, add a tablespoon of sour cream to the mixture.
Topping Options: Instead of graham crackers, try crushed vanilla wafers, gingersnaps, or even crumbled oatmeal cookies. For a gluten-free version, use gluten-free cookies or make a topping with crushed nuts and a touch of honey.
Flavor Enhancements: Add a pinch of ginger or cardamom to the cream for complexity. A splash of bourbon or rum extract can add sophisticated depth, while orange zest brightens the entire dish.
Common Mistakes to Avoid
When making Peach Cobbler Cheesecake Fruit Salad, steer clear of these common pitfalls to ensure your dessert turns out perfectly:
Using Underripe Fruit: Peaches should yield slightly to pressure and have a sweet aroma. Underripe fruit will be tart and lack the natural sweetness that makes this dessert shine. If your peaches aren’t quite ready, let them ripen at room temperature for a day or two.
Over-mixing the Cream: Be gentle when folding the whipped cream into the cream cheese. Over-mixing will deflate the whipped cream and result in a dense, heavy texture instead of the light, fluffy consistency you want.
Adding Topping Too Early: The cobbler topping should only be added just before serving. Adding it earlier will cause it to absorb moisture from the fruit and lose its delightful crunch.
Not Draining Excess Juice: If your fruit releases a lot of juice, drain some of it before adding the cream. Too much liquid will thin out the cheesecake component and make the salad watery.
How to Serve Peach Cobbler Cheesecake Fruit Salad
This versatile dessert works beautifully in many serving scenarios. For casual gatherings, serve it family-style in a large, clear glass bowl to showcase the beautiful layers of fruit and cream. The transparency allows guests to see all the colorful components, making it as visually appealing as it is delicious.
For more formal occasions, consider portioning it into individual glass cups or mason jars. This creates an elegant presentation and makes serving easier. You can even layer the components separately in clear containers for a parfait-like effect that’s Instagram-worthy.
Pair this fruit salad with crispy cookies, shortbread, or even a slice of pound cake for those who want a more substantial dessert. A cup of coffee or tea complements the rich, creamy flavors beautifully, while sparkling water with a twist of lime provides a refreshing palate cleanser.
Presentation Ideas for Peach Cobbler Cheesecake Fruit Salad
Elevate your Peach Cobbler Cheesecake Fruit Salad with these stunning presentation ideas:
Layered Glass Bowl: Use a large trifle bowl to create beautiful visible layers. Start with fruit, add cream, then topping, and repeat. This creates a stunning visual impact that’s perfect for special occasions.
Individual Mason Jars: Portion the salad into mason jars for a rustic, charming presentation. Add a dollop of extra cream and a sprinkle of topping on top, then tie with ribbon for a gift-worthy appearance.
Garnish with Fresh Herbs: A few fresh mint leaves or a light dusting of edible flowers can add color and sophistication to your presentation.
Drizzle Art: Create artistic drizzles on the serving plate using caramel sauce or fruit puree before adding the salad for a restaurant-quality presentation.
Peach Cobbler Cheesecake Fruit Salad Recipe Tips
Here are my tried-and-true tips for making this dessert absolutely perfect every time:
Temperature Matters: Make sure your cream cheese is truly at room temperature before beginning. Cold cream cheese will create lumps that are difficult to smooth out, affecting the final texture of your dessert.
Quality Ingredients: Since this is a simple recipe with few ingredients, each one should be the best quality you can find. Fresh, ripe fruit and real vanilla extract make a noticeable difference in the final taste.
Make-Ahead Strategy: Prepare the cream and fruit separately up to a day ahead, then combine them just before serving. This saves time and allows flavors to develop while maintaining the best texture.
Taste as You Go: Adjust the sweetness based on the natural sugar content of your fruit. Very ripe, sweet peaches may need less added sugar, while tarter fruit might need a bit more.
Chill Factor: This dessert tastes best when served slightly chilled. Refrigerate for at least 30 minutes before serving to allow flavors to meld and the cream to set slightly.
How to Store Peach Cobbler Cheesecake Fruit Salad
Proper storage is key to maintaining the quality and safety of your Peach Cobbler Cheesecake Fruit Salad. Transfer any leftover salad to an airtight container and refrigerate immediately after serving. The dairy components require cold storage to prevent spoilage.
Store the cobbler topping separately from the fruit salad to maintain its crunch. Keep it in a sealed container at room temperature for up to one week. When ready to serve leftovers, simply sprinkle fresh topping over the chilled fruit salad.
The fruit salad itself will keep in the refrigerator for 2-3 days, though it’s best enjoyed within the first 24 hours when the fruit is at its peak freshness and the cream maintains its optimal texture. After this time, the fruit may begin to release more juices, which can thin the cream.
Frequently Asked Questions (FAQs)
Q: Can I make Peach Cobbler Cheesecake Fruit Salad ahead of time?
A: Yes, you can prepare the cream and fruit components separately up to 24 hours in advance. Combine them 2-3 hours before serving and add the cobbler topping just before presenting the dish.
Q: What if I can’t find ripe peaches?
A: You can use high-quality canned peaches in juice (not syrup), drained thoroughly, or substitute with nectarines, apricots, or even mangoes for a tropical twist.
Q: Can I make this dessert dairy-free?
A: Absolutely! Use dairy-free cream cheese and coconut whipping cream as substitutes. The texture will be slightly different but still delicious.
Q: How do I prevent the fruit from browning?
A: The lemon juice in the recipe helps prevent oxidation. Make sure to toss all cut fruit with lemon juice immediately after cutting, and store covered in the refrigerator.
Q: Can I freeze this dessert?
A: Freezing isn’t recommended as the cream will separate and the fruit will become mushy when thawed. This dessert is best enjoyed fresh.
Q: What’s the best way to crush graham crackers?
A: Place them in a sealed plastic bag and crush with a rolling pin, or pulse them in a food processor. You want a mix of fine crumbs and small chunks for the best texture.
Conclusion
Peach Cobbler Cheesecake Fruit Salad is more than just a dessert – it’s a celebration of summer flavors that brings joy to any gathering. This recipe successfully marries the comfort of traditional peach cobbler with the elegance of cheesecake and the freshness of fruit salad, creating something entirely new and exciting.
The beauty of this recipe lies in its simplicity and flexibility. Whether you’re hosting a backyard barbecue, bringing a dish to a potluck, or simply treating your family to something special, this dessert delivers impressive results with minimal effort. The combination of creamy, fruity, and crunchy elements creates a satisfying dessert that appeals to all ages and preferences.
Remember that the key to success lies in using the ripest, most flavorful fruit you can find and taking care not to over-mix the delicate cream components. With these fundamentals in place, you’ll create a dessert that not only tastes incredible but also looks stunning on any table.
I encourage you to make this recipe your own by experimenting with different fruit combinations and flavor additions. The basic technique is forgiving and adaptable, making it a wonderful foundation for your creativity. Happy cooking, and enjoy watching faces light up when you serve this delightful Peach Cobbler Cheesecake Fruit Salad.

