Peanut Butter Butterfinger Cheesecake Recipe
Are you ready to create a dessert that combines two beloved flavors into one show-stopping treat? This Peanut Butter Butterfinger Cheesecake is the ultimate indulgence for anyone who loves the rich, nutty taste of peanut butter paired with the sweet crunch of Butterfinger candy bars.
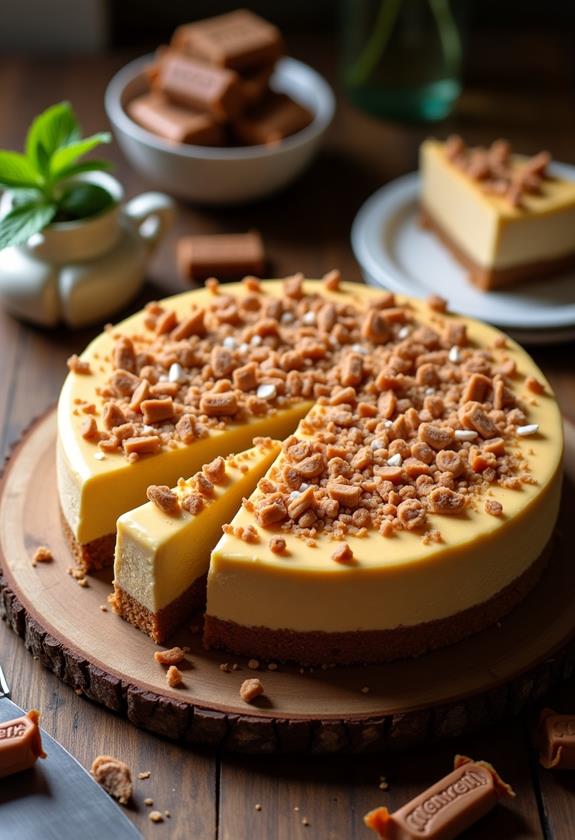
This decadent cheesecake features a smooth, creamy peanut butter filling studded with chunks of Butterfinger candy, all nestled on a golden graham cracker crust. Follow this detailed recipe to create a dessert that’s guaranteed to be the star of any gathering or celebration.
What is “Peanut Butter Butterfinger Cheesecake”?
Peanut Butter Butterfinger Cheesecake is a rich, no-bake or baked cheesecake that celebrates the irresistible combination of creamy peanut butter and crunchy Butterfinger candy pieces. This dessert features a classic graham cracker crust as the foundation, topped with a velvety smooth cream cheese and peanut butter filling that’s generously loaded with chopped Butterfinger bars.
The result is a dessert that offers multiple textures and flavors in every bite – from the buttery crunch of the crust to the silky smoothness of the filling and the delightful surprise of candy pieces throughout. It’s a perfect treat for peanut butter lovers and anyone who enjoys the nostalgic taste of Butterfinger candy bars.
Ingredients List for Peanut Butter Butterfinger Cheesecake
For the Crust:
- 1½ cups graham cracker crumbs
- ⅓ cup granulated sugar
- 6 tablespoons butter, melted
- Pinch of salt
For the Filling:
- 24 oz cream cheese, softened to room temperature
- 1 cup creamy peanut butter
- 1 cup powdered sugar
- 1 teaspoon vanilla extract
- 3 large eggs, room temperature
- ½ cup heavy cream
- 1¼ cups Butterfinger candy bars, roughly chopped (about 6-8 fun-size bars)
For the Topping:
- 1 cup heavy whipping cream
- 2 tablespoons powdered sugar
- ½ teaspoon vanilla extract
- ½ cup Butterfinger pieces for garnish
- 2 tablespoons peanut butter, melted (for drizzling)
How to Make Peanut Butter Butterfinger Cheesecake: A Step-by-Step Guide
Creating this stunning cheesecake involves several key steps that build upon each other to create the perfect dessert. Here’s your complete guide to success:
1. Prepare Your Pan and Oven:
- Preheat your oven to 325°F (163°C).
- Grease a 9-inch springform pan with butter or cooking spray.
- Wrap the bottom of the pan tightly with aluminum foil to prevent water from seeping in during the water bath.
2. Make the Graham Cracker Crust:
- In a medium bowl, combine graham cracker crumbs, granulated sugar, and a pinch of salt.
- Pour in the melted butter and mix until the mixture resembles wet sand.
- Press the mixture firmly into the bottom of your prepared springform pan, creating an even layer.
- Bake the crust for 10 minutes, then remove and let it cool while you prepare the filling.
3. Prepare the Cheesecake Filling:
- In a large mixing bowl, beat the softened cream cheese with an electric mixer until smooth and creamy, about 2-3 minutes.
- Add the peanut butter and beat until well combined and fluffy.
- Gradually add the powdered sugar, beating until smooth.
- Mix in the vanilla extract.
4. Add Eggs and Cream:
- Add eggs one at a time, beating on low speed just until incorporated after each addition.
- Pour in the heavy cream and mix gently until just combined.
- Fold in 1 cup of the chopped Butterfinger pieces, reserving the rest for topping.
5. Bake the Cheesecake:
- Pour the filling over the cooled crust, spreading it evenly.
- Place the springform pan in a large roasting pan and add hot water halfway up the sides.
- Bake for 55-65 minutes, until the center is almost set but still slightly jiggly.
- Turn off the oven and crack the door open, allowing the cheesecake to cool gradually for 1 hour.
6. Chill and Prepare Topping:
- Remove from the water bath and refrigerate for at least 4 hours or overnight.
- Before serving, whip the heavy cream with powdered sugar and vanilla until soft peaks form.
- Spread or pipe the whipped cream over the chilled cheesecake.
- Garnish with remaining Butterfinger pieces and drizzle with melted peanut butter.
Substitutions and Variations
Want to customize your Peanut Butter Butterfinger Cheesecake? Here are some delicious alternatives and variations you can try:
- Crust Options: Replace graham crackers with chocolate cookie crumbs, vanilla wafers, or even crushed peanut butter cookies for different flavor profiles.
- Peanut Butter Types: Experiment with chunky peanut butter for added texture, or try natural peanut butter for a more intense flavor.
- Candy Alternatives: Substitute Butterfinger bars with other peanut butter candies like Reese’s cups, Snickers, or peanut butter cups.
- Lighter Version: Use reduced-fat cream cheese and substitute Greek yogurt for some of the heavy cream to create a lighter dessert.
- Chocolate Addition: Add ¼ cup cocoa powder to the filling for a chocolate-peanut butter combination.
- No-Bake Version: Skip the baking step and add 1 packet of unflavored gelatin dissolved in warm water to set the filling.
Common Mistakes to Avoid
Avoid these common pitfalls to ensure your Peanut Butter Butterfinger Cheesecake turns out perfect every time:
- Using Cold Ingredients: Room temperature cream cheese and eggs are crucial for a smooth, lump-free filling.
- Overmixing: Once you add the eggs, mix just until combined to prevent incorporating too much air, which can cause cracks.
- Skipping the Water Bath: The water bath helps prevent cracks and ensures even cooking throughout the cheesecake.
- Opening the Oven Door: Resist the urge to check on your cheesecake too often, as temperature fluctuations can cause cracking.
- Rushing the Cooling Process: Gradual cooling is essential to prevent the top from cracking or the texture from becoming grainy.
- Not Chilling Long Enough: Proper chilling time is crucial for the cheesecake to set completely and develop the right texture.
How to Serve Peanut Butter Butterfinger Cheesecake
This rich and decadent cheesecake is best served as the grand finale to a special meal. Cut clean slices using a sharp knife dipped in warm water and wiped clean between cuts. Serve each slice on chilled dessert plates for the best presentation.
The cheesecake pairs beautifully with a cup of hot coffee or a glass of cold milk. For special occasions, consider serving it alongside fresh berries or a drizzle of chocolate or caramel sauce. A small scoop of vanilla ice cream can also complement the rich flavors perfectly.
Presentation Ideas for Peanut Butter Butterfinger Cheesecake
Transform your cheesecake into a show-stopping centerpiece with these elegant presentation ideas:
- Chocolate Ganache Border: Pipe a border of chocolate ganache around the edge for an professional bakery look.
- Candy Bar Decoration: Arrange whole mini Butterfinger bars around the perimeter of the cheesecake for a fun, candy shop aesthetic.
- Peanut Butter Drizzle Art: Create artistic patterns with melted peanut butter drizzled in spirals or zigzag patterns across the top.
- Chopped Peanut Rim: Press finely chopped peanuts around the sides of the cheesecake for added texture and visual appeal.
- Individual Portions: Make mini cheesecakes in muffin tins for elegant individual servings at dinner parties.
Peanut Butter Butterfinger Cheesecake Recipe Tips
Follow these expert tips to ensure your cheesecake turns out perfectly every time:
- Quality Ingredients Matter: Use high-quality cream cheese and real butter for the best flavor and texture.
- Temperature Control: Invest in an oven thermometer to ensure accurate baking temperatures.
- Fresh Candy: Use fresh Butterfinger bars for the best crunch and flavor – avoid bars that have been sitting around too long.
- Proper Storage: Keep ingredients properly stored and check expiration dates before baking.
- Patience is Key: Don’t rush any step of the process, especially the cooling and chilling phases.
- Test for Doneness: The center should still be slightly jiggly when done – it will continue to set as it cools.
How to Store Peanut Butter Butterfinger Cheesecake
Proper storage is essential for maintaining the quality and safety of your cheesecake. Allow the cheesecake to cool completely before covering it with plastic wrap or placing it in an airtight container. Store in the refrigerator for up to 5-7 days.
For longer storage, you can freeze the cheesecake for up to 3 months. Wrap individual slices in plastic wrap and then aluminum foil, or freeze the whole cheesecake in an airtight container. Thaw frozen cheesecake in the refrigerator overnight before serving.
Frequently Asked Questions (FAQs)
Q: Can I make this cheesecake without a springform pan?
A: While a springform pan makes removal easier, you can use a regular 9-inch cake pan lined with parchment paper with overhang for easy lifting.
Q: Why did my cheesecake crack on top?
A: Cracks usually occur due to overbaking, rapid temperature changes, or overmixing. Use a water bath and gradual cooling to prevent this.
Q: Can I use natural peanut butter instead of regular?
A: Yes, but make sure to stir it well first. Natural peanut butter may result in a slightly different texture due to the oil separation.
Q: How do I know when the cheesecake is done?
A: The center should be almost set but still slightly jiggly. It will continue to firm up as it cools.
Q: Can I make this cheesecake dairy-free?
A: Yes, substitute the cream cheese with dairy-free alternatives and use coconut cream instead of heavy cream.
Q: What’s the best way to crush Butterfinger bars?
A: Place them in a sealed plastic bag and use a rolling pin or meat mallet to crush them to your desired size.
Conclusion
This Peanut Butter Butterfinger Cheesecake is the ultimate dessert for anyone who loves the classic combination of peanut butter and chocolate-covered toffee. The creamy, rich filling paired with the satisfying crunch of Butterfinger pieces creates a dessert experience that’s both nostalgic and sophisticated.
By following these detailed instructions and tips, you’ll create a cheesecake that not only tastes incredible but also looks professional and impressive. Whether you’re making it for a birthday celebration, holiday gathering, or just because you’re craving something special, this cheesecake is sure to become a favorite in your dessert repertoire.
Remember to be patient with the process, use quality ingredients, and allow proper chilling time for the best results. Your guests will be amazed by this decadent creation, and you’ll have the satisfaction of knowing you made something truly spectacular from scratch. Happy baking!