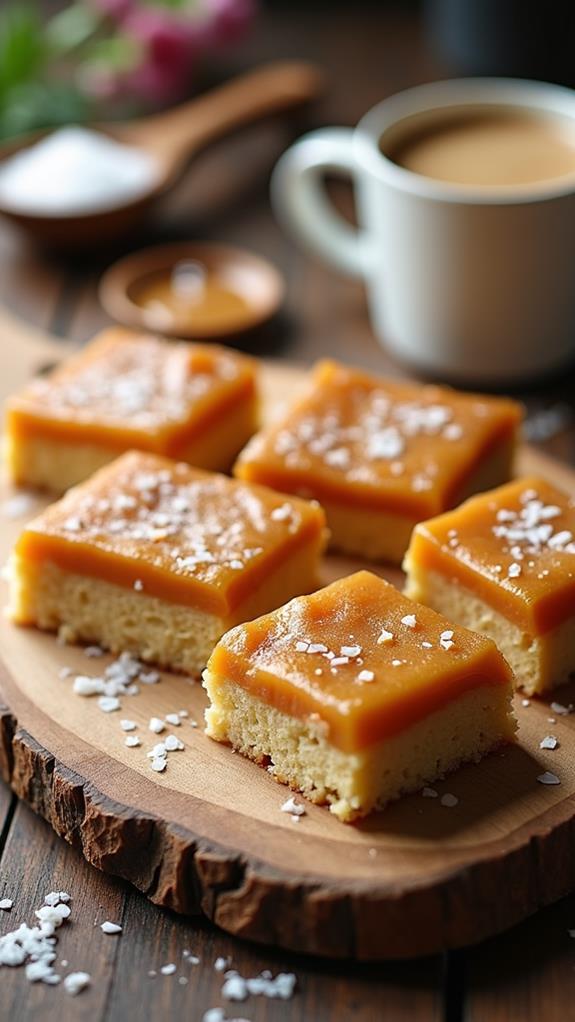
Salted Caramel Apple Pie Bars Recipe
Craving the perfect fall dessert that combines all your favorite flavors in one irresistible bite? These Salted Caramel Apple Pie Bars are exactly what you need. With a buttery shortbread crust, spiced apple filling, and rich salted caramel drizzle, they capture all the comfort of apple pie in an easy-to-serve bar format.
I love making these bars because they’re so much simpler than traditional apple pie, yet they deliver the same satisfying flavors. Follow this detailed recipe to create bars that will have everyone asking for seconds and begging for the recipe!
What are “Salted Caramel Apple Pie Bars”?
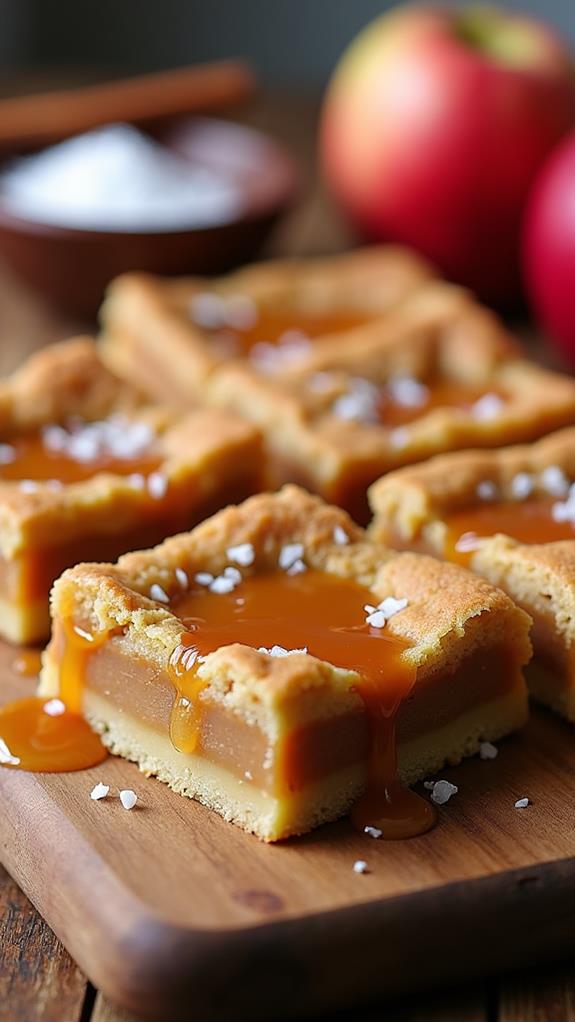
Salted Caramel Apple Pie Bars are a brilliant fusion of classic apple pie and modern salted caramel flavors, all packed into convenient bar form. These treats feature three distinct layers: a golden shortbread crust that provides the perfect buttery foundation, a spiced apple filling that tastes like autumn in every bite, and a luscious salted caramel sauce that adds sophistication and depth.
Unlike traditional apple pie, these bars are incredibly easy to slice, serve, and transport, making them ideal for potlucks, bake sales, or any gathering where you want to impress without the fuss of pie slices. The combination of sweet and salty elements creates a complex flavor profile that appeals to both kids and adults.
Ingredients List for Salted Caramel Apple Pie Bars
For the Shortbread Crust:
- 2 cups all-purpose flour
- ½ cup powdered sugar
- 1 teaspoon salt
- 1 cup (2 sticks) unsalted butter, cold and cubed
- 1 large egg yolk
- 1 teaspoon vanilla extract
For the Apple Filling:
- 6 medium Granny Smith apples, peeled and diced
- ½ cup granulated sugar
- ¼ cup brown sugar, packed
- 2 tablespoons all-purpose flour
- 1 teaspoon ground cinnamon
- ¼ teaspoon ground nutmeg
- ¼ teaspoon ground ginger
- ⅛ teaspoon ground cloves
- 1 tablespoon lemon juice
- 2 tablespoons butter, cubed
For the Salted Caramel Sauce:
- 1 cup granulated sugar
- 6 tablespoons unsalted butter, cubed
- ½ cup heavy cream
- 1 teaspoon vanilla extract
- 1 teaspoon sea salt (or to taste)
How to Make Salted Caramel Apple Pie Bars: A Step-by-Step Guide
Creating these delectable bars involves several steps, but each one is straightforward and rewarding. Here’s my detailed guide to ensure perfect results every time:
1. Prepare Your Workspace:
- Preheat your oven to 350°F (175°C).
- Line a 9×13 inch baking pan with parchment paper, leaving some overhang for easy removal.
- Lightly grease the parchment paper with butter or cooking spray.
2. Make the Shortbread Crust:
- In a large mixing bowl, whisk together flour, powdered sugar, and salt.
- Add the cold, cubed butter and use a pastry cutter or your fingers to work it into the flour mixture until it resembles coarse crumbs.
- Mix in the egg yolk and vanilla extract until the dough just comes together.
- Press the dough evenly into the bottom of your prepared pan, making sure to reach all corners.
- Bake for 15-18 minutes until the edges are lightly golden. Remove and set aside.
3. Prepare the Apple Filling:
- While the crust bakes, peel and dice your apples into ½-inch pieces for the best texture.
- In a large bowl, toss the diced apples with both sugars, flour, and all the spices.
- Add lemon juice and mix well to prevent browning and enhance flavor.
- Let this mixture sit for 10 minutes to allow the apples to release their juices.
4. Assemble and Bake:
- Spread the apple mixture evenly over the pre-baked crust.
- Dot the top with small cubes of butter for extra richness.
- Bake for 35-40 minutes until the apples are tender and the top is lightly golden.
- Remove from oven and let cool completely in the pan.
5. Make the Salted Caramel Sauce:
- In a heavy-bottomed saucepan, heat the sugar over medium heat, stirring constantly with a whisk.
- Continue cooking until the sugar melts and turns a deep amber color (this takes about 8-10 minutes).
- Immediately add the butter and whisk vigorously until melted and combined.
- Slowly pour in the heavy cream while whisking continuously (the mixture will bubble up).
- Remove from heat and stir in vanilla and sea salt.
- Let cool for 10 minutes before drizzling over the bars.
6. Final Assembly:
- Once the bars are completely cool, drizzle the salted caramel sauce over the top.
- Allow the caramel to set for at least 30 minutes before cutting.
- Use the parchment paper overhang to lift the bars from the pan for easy cutting.
Substitutions and Variations
I love experimenting with different variations of this recipe to suit various tastes and dietary needs:
- Apples: While Granny Smith apples provide the perfect tart contrast, you can use Honeycrisp, Braeburn, or a mix of varieties for different flavor profiles.
- Gluten-Free Option: Substitute the all-purpose flour with a 1:1 gluten-free baking flour blend for both the crust and filling.
- Dairy-Free Alternative: Use vegan butter in place of regular butter and coconut cream instead of heavy cream for the caramel.
- Nuts: Add ½ cup of chopped pecans or walnuts to the apple filling for extra crunch and flavor.
- Oat Topping: Instead of just caramel, you can add a streusel topping made with oats, brown sugar, and butter before the final baking.
- Spice Variations: Try adding cardamom, allspice, or even a pinch of black pepper for unique flavor twists.
Common Mistakes to Avoid
Through years of making these bars, I’ve learned to avoid these common pitfalls:
- Underbaking the Crust: Make sure the initial crust is lightly golden before adding the apples, or it may become soggy.
- Cutting Apples Too Large: Pieces larger than ½ inch won’t cook evenly and may result in crunchy bits in your finished bars.
- Rushing the Caramel: Don’t rush the sugar-melting process. Low and slow prevents burning and ensures smooth caramel.
- Not Letting Cool Completely: Cutting the bars too soon will result in messy, falling-apart pieces. Patience is key!
- Skipping the Lemon Juice: This prevents browning and adds brightness that balances the sweetness.
How to Serve Salted Caramel Apple Pie Bars
These versatile bars can be served in numerous delightful ways. I love serving them at room temperature with a scoop of vanilla ice cream for the ultimate comfort dessert. They’re also wonderful slightly warmed with a dollop of freshly whipped cream or a drizzle of additional caramel sauce.
For more casual occasions, they’re perfect on their own with coffee or tea. During holiday gatherings, I like to dust them lightly with powdered sugar for an elegant presentation that looks bakery-professional.
Presentation Ideas for Salted Caramel Apple Pie Bars
To make these bars look as amazing as they taste, consider these presentation tips:
- Individual Servings: Cut into perfect squares and serve on small dessert plates with a fork for an upscale presentation.
- Garnish Options: Top each piece with a thin apple slice, a sprinkle of cinnamon, or a few flakes of sea salt for visual appeal.
- Warm Serving: Briefly warm individual pieces in the microwave and serve with a scoop of ice cream that slowly melts alongside.
- Gift Presentation: Package individual bars in clear cellophane bags tied with autumn-colored ribbons for perfect gifts.
Salted Caramel Apple Pie Bars Recipe Tips
Here are my best tips for ensuring perfect results every time:
- Apple Preparation: I always peel my apples for the smoothest texture, but you can leave peels on for extra fiber and rustic appeal.
- Caramel Safety: When making caramel, have all ingredients measured and ready. The process moves quickly once the sugar begins to caramelize.
- Storage Secret: Store leftover caramel sauce separately and drizzle fresh over individual servings for the best presentation.
- Texture Tip: For extra-tender apples, you can briefly sauté them before adding to the crust.
- Make-Ahead Strategy: You can prepare the crust and apple filling a day ahead, then assemble and bake when ready to serve.
How to Store Salted Caramel Apple Pie Bars
Proper storage ensures these bars maintain their delicious texture and flavor. Allow the bars to cool completely before storing them in an airtight container at room temperature for up to 3 days. If your kitchen is particularly warm, refrigerate them to prevent the caramel from becoming too soft.
For longer storage, you can refrigerate the bars for up to one week or freeze them for up to three months. When freezing, wrap individual bars in plastic wrap before placing in a freezer-safe container. Thaw at room temperature for about 30 minutes before serving.
Frequently Asked Questions (FAQs)
Q: Can I make these bars ahead of time for a party?
A: Absolutely! These bars actually improve in flavor after sitting for a day. Make them up to 2 days in advance and store covered at room temperature.
Q: What if my caramel sauce is too thick or too thin?
A: If too thick, warm it gently and stir in a tablespoon of cream. If too thin, cook it a bit longer over low heat to reduce and thicken.
Q: Can I use store-bought caramel sauce instead?
A: While homemade is best, you can use high-quality store-bought caramel. Just add a pinch of sea salt to enhance the flavor.
Q: Why did my crust turn out soggy?
A: This usually happens when the crust isn’t pre-baked long enough or the apple mixture is too wet. Make sure to pre-bake until lightly golden and drain excess liquid from the apple mixture.
Q: Can I double this recipe?
A: Yes! Use two 9×13 pans or one large sheet pan. You may need to adjust baking times slightly for larger pans.
Q: What’s the best way to cut clean squares?
A: Use a sharp knife wiped clean between cuts, and make sure the bars are completely cool. Chilling them for 30 minutes before cutting can also help.
Conclusion
Salted Caramel Apple Pie Bars represent the perfect marriage of traditional comfort food and modern flavor sophistication. These bars capture everything I love about fall baking – the warm spices, tender apples, and that irresistible combination of sweet and salty that keeps you coming back for more.
Whether you’re an experienced baker or just starting your culinary journey, this recipe is forgiving and rewarding. The step-by-step process ensures success, while the endless variation possibilities mean you can make this recipe your own. I hope these bars become a cherished addition to your dessert repertoire, bringing the same joy to your kitchen and table that they’ve brought to mine. Happy baking!