Stuffed Shells With Meat And Cheese Recipe
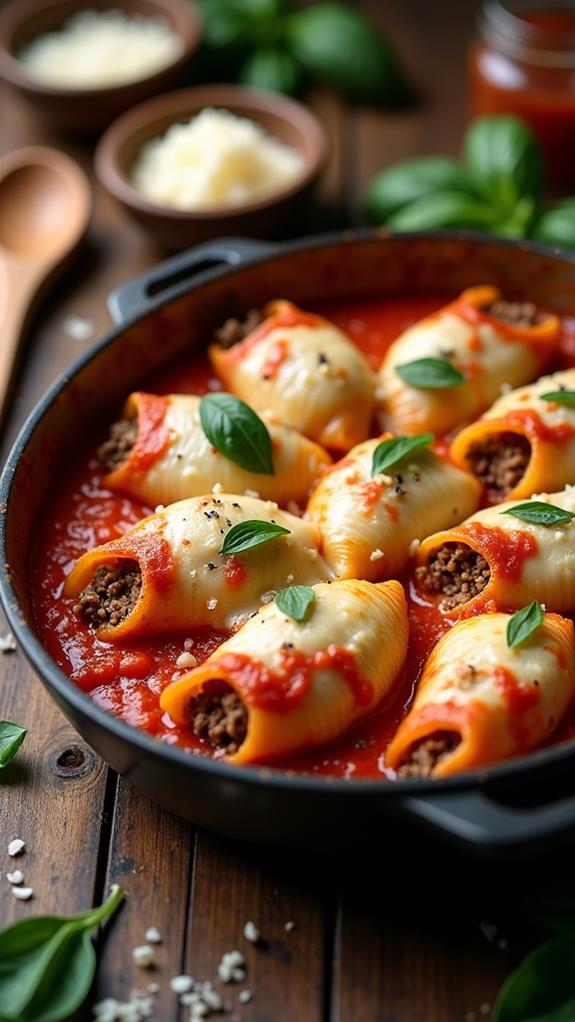
When I think of comfort food that brings the whole family together, stuffed shells with meat and cheese immediately comes to mind. This classic Italian-American dish features jumbo pasta shells filled with a rich mixture of seasoned ground meat, creamy ricotta, and melted cheese, all nestled in a bed of marinara sauce.
I’ve been perfecting this recipe for years, and I can confidently say it’s one of those dishes that never fails to impress. Whether you’re hosting a dinner party or simply craving a hearty weeknight meal, these stuffed shells deliver maximum flavor with minimal fuss.
What are Stuffed Shells With Meat And Cheese?
Stuffed shells, or “conchiglie ripiene” in Italian, are large pasta shells that serve as edible vessels for delicious fillings. This particular version combines seasoned ground beef or Italian sausage with a creamy cheese mixture, creating a protein-packed meal that’s both satisfying and elegant.
The beauty of this dish lies in its versatility and make-ahead potential. You can prepare the shells in advance, freeze them for later, or customize the filling to suit your family’s preferences. The combination of tender pasta, savory meat, and melted cheese creates a harmony of textures and flavors that never gets old.
Ingredients List for Stuffed Shells With Meat And Cheese
For the Pasta:
- 20-24 jumbo pasta shells
- 1 tablespoon salt for pasta water
For the Meat Filling:
- 1 pound ground beef (80/20 blend) or Italian sausage
- 1 small onion, finely diced
- 3 cloves garlic, minced
- 1 teaspoon Italian seasoning
- ½ teaspoon dried basil
- ½ teaspoon dried oregano
- ½ teaspoon salt
- ¼ teaspoon black pepper
- ¼ teaspoon red pepper flakes (optional)
For the Cheese Mixture:
- 15 oz ricotta cheese
- 1 large egg
- 1 cup shredded mozzarella cheese, divided
- ½ cup grated Parmesan cheese
- ¼ cup fresh parsley, chopped
- ½ teaspoon garlic powder
- ½ teaspoon salt
- ¼ teaspoon black pepper
For Assembly:
- 3 cups marinara sauce, divided
- ½ cup shredded mozzarella cheese (for topping)
- ¼ cup grated Parmesan cheese (for topping)
- Fresh basil leaves for garnish
How to Cook Stuffed Shells With Meat And Cheese: A Step-by-Step Guide
Creating perfect stuffed shells requires attention to detail, but the process is straightforward when broken down into manageable steps. Here’s my foolproof method:
1. Prepare the Pasta Shells:
- Preheat your oven to 375°F (190°C).
- Bring a large pot of salted water to a rolling boil.
- Add the jumbo shells and cook for 2-3 minutes LESS than the package directions indicate.
- You want them slightly undercooked since they’ll finish cooking in the oven.
- Drain carefully and rinse with cool water to stop the cooking process.
- Lay the shells on a clean kitchen towel to prevent sticking.
2. Cook the Meat Mixture:
- Heat a large skillet over medium-high heat.
- Add the ground beef or sausage and cook, breaking it up with a spoon.
- When the meat is about halfway cooked, add the diced onion.
- Continue cooking until the meat is browned and the onion is softened, about 5-7 minutes.
- Add the minced garlic and cook for another 30 seconds until fragrant.
- Season with Italian seasoning, basil, oregano, salt, pepper, and red pepper flakes.
- Remove from heat and let cool slightly.
3. Prepare the Cheese Mixture:
- In a large bowl, combine ricotta cheese, egg, ¾ cup mozzarella, Parmesan, parsley, garlic powder, salt, and pepper.
- Mix thoroughly until well combined and smooth.
- Fold in the cooled meat mixture, ensuring even distribution.
4. Assemble the Dish:
- Spread 1 cup of marinara sauce evenly across the bottom of a 9×13-inch baking dish.
- Using a spoon or small ice cream scoop, fill each shell generously with the meat and cheese mixture.
- Arrange the filled shells in the prepared baking dish, opening side up.
- Pour the remaining marinara sauce over and around the shells.
- Sprinkle the remaining mozzarella and Parmesan cheese over the top.
5. Bake to Perfection:
- Cover the dish tightly with aluminum foil.
- Bake for 25 minutes, then remove the foil.
- Continue baking for an additional 10-15 minutes until the cheese is melted and bubbly.
- Let rest for 5 minutes before serving to allow the filling to set.
Substitutions and Variations
One of the things I love most about this recipe is how adaptable it is. Here are some variations I’ve tried and loved:
- Meat Options: Substitute ground turkey, chicken, or a mix of ground beef and Italian sausage for different flavor profiles.
- Vegetarian Version: Replace meat with sautéed mushrooms, spinach, and diced zucchini for a hearty vegetarian option.
- Cheese Alternatives: Try cottage cheese instead of ricotta for a lighter texture, or add cream cheese for extra richness.
- Sauce Variations: Use alfredo sauce, pesto, or a combination of marinara and alfredo for different flavor experiences.
- Herb Upgrades: Fresh herbs like basil, oregano, and thyme can replace dried herbs for brighter flavors.
Common Mistakes to Avoid
Through years of making this dish, I’ve learned to avoid these common pitfalls:
- Overcooking the Shells: Undercooked shells will finish cooking in the oven, while overcooked ones will fall apart when stuffed.
- Overstuffing: While it’s tempting to pack in as much filling as possible, overstuffed shells can burst during baking.
- Skipping the Rest Period: Let the dish rest after baking to prevent the filling from spilling out when served.
- Using Cold Filling: Make sure your meat mixture has cooled before combining with the cheese to prevent the egg from cooking prematurely.
- Insufficient Sauce: Don’t skimp on the sauce at the bottom of the dish, as it prevents sticking and adds moisture.
How to Serve Stuffed Shells With Meat And Cheese
I typically serve stuffed shells as the main course, accompanied by a fresh Caesar salad and warm garlic bread. The richness of the shells pairs beautifully with the crisp lettuce and tangy dressing, while the bread helps soak up any extra sauce.
For a complete Italian meal experience, start with a light antipasto platter featuring olives, cured meats, and fresh mozzarella. A glass of Chianti or Sangiovese complements the flavors perfectly, though sparkling water with lemon works just as well for a non-alcoholic option.
Presentation Ideas for Stuffed Shells With Meat And Cheese
To elevate the presentation of your stuffed shells, consider these simple touches:
- Individual Portions: Serve in individual ramekins for an elegant dinner party presentation.
- Fresh Herb Garnish: Top with fresh basil leaves, chopped parsley, or a sprinkle of oregano.
- Cheese Drizzle: A light drizzle of good olive oil and freshly cracked black pepper adds restaurant-quality finish.
- Color Contrast: Serve on white plates to make the rich red sauce and golden cheese pop visually.
Stuffed Shells Recipe Tips
Here are my top tips for stuffed shell success:
- Make-Ahead Friendly: Assemble the entire dish up to 24 hours in advance and refrigerate. Add 10-15 minutes to the baking time if cooking from cold.
- Freezer Instructions: Freeze assembled unbaked shells for up to 3 months. Thaw overnight in the refrigerator before baking as directed.
- Shell Selection: Choose shells that are intact and uniform in size for the best presentation and even cooking.
- Filling Consistency: The mixture should be moist but not wet. If it seems dry, add a tablespoon of marinara sauce.
- Temperature Check: The internal temperature should reach 165°F (74°C) to ensure the meat is thoroughly heated.
How to Store Stuffed Shells With Meat And Cheese
Allow the stuffed shells to cool completely before storing (within 2 hours of cooking). Transfer leftovers to airtight containers and refrigerate for up to 4 days. For longer storage, individual portions can be wrapped tightly and frozen for up to 3 months.
To reheat, thaw frozen shells overnight in the refrigerator. Cover with foil and reheat in a 350°F oven for 20-25 minutes, or microwave individual portions for 2-3 minutes until heated through.
Frequently Asked Questions (FAQs)
Q: Can I use different types of pasta shells?
A: While jumbo shells work best for stuffing, you can use large shells in a pinch. Avoid medium or small shells as they won’t hold enough filling.
Q: How many shells does this recipe make?
A: This recipe typically yields 18-20 stuffed shells, depending on how generously you fill them. This serves 6-8 people as a main course.
Q: Can I make this dish gluten-free?
A: Absolutely! Use gluten-free jumbo pasta shells and ensure your marinara sauce is gluten-free. The rest of the ingredients are naturally gluten-free.
Q: What’s the best way to fill the shells without making a mess?
A: I use a small ice cream scoop or large spoon to fill the shells. Work over the baking dish to catch any spills, and don’t worry about perfection – rustic looks delicious too!
Q: Can I double this recipe for a crowd?
A: Yes! Double all ingredients and use two 9×13-inch baking dishes. The cooking time remains the same, but you may need to rotate the dishes halfway through baking for even cooking.
Conclusion
Stuffed shells with meat and cheese represent everything I love about comfort food – they’re hearty, satisfying, and bring people together around the dinner table. This recipe has become a staple in my kitchen because it’s reliable, delicious, and adaptable to different tastes and dietary needs.
The combination of tender pasta, savory meat, and creamy cheese creates a meal that feels both familiar and special. Whether you’re feeding a hungry family on a weeknight or entertaining guests for a special occasion, these stuffed shells deliver every time.
I encourage you to make this recipe your own by experimenting with different herbs, cheeses, or meat combinations. The basic technique remains the same, but the flavor possibilities are endless. Take your time with each step, use quality ingredients, and don’t forget to let the dish rest before serving. Happy cooking!